
|
|||||||
| S40 / V40 '96-'04 General Forum for the Volvo S40 and V40 (Classic) Series from 1995-2004. |
 Information
|
|
Guide: Changing the engine/coolant temperature sensorViews : 27056 Replies : 21Users Viewing This Thread : |
 |
|
|
Thread Tools | Display Modes |
 Oct 22nd, 2011, 12:02
|
#1 |
|
VOC Member

Last Online: Apr 4th, 2023 18:13
Join Date: Apr 2010
Location: Oxford
|
This really is very easy indeed but I always think a photo guide helps in overcoming fear, especially for the inexperienced, and since one or two people (including me) have recently been asking how you do it, here's how.
My reason for changing mine is that I suspect the old one of under-reading the temperature, and thus causing overfuelling and damaging my mpg. I had put a new genuine Volvo 90 degree thermostat in a few months ago, but running temperature seemed to be stuck around 85 degrees - never up to a steady 90 as it used to be before. This is for cars with the temperature sensor on the thermostat housing. Mine is a 1997 2-litre petrol non-turbo (B4204S). What you need Torx T30 and T40 drivers 19mm open spanner Flat-bladed screwdriver Temperature sensor (part number 9186486 up to 1999; 9125463 from 2000 onwards) The new part, excitingly just delivered by the postie, looks like this: 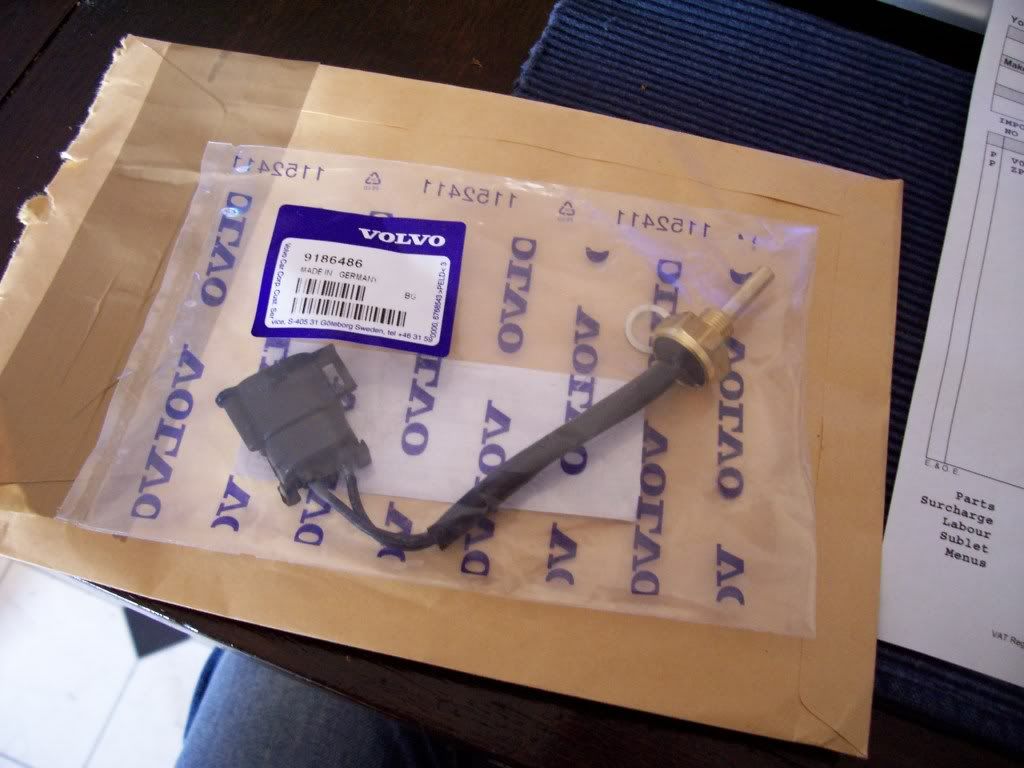 How to do it 1. Undo the four T30 screws holding on the plastic engine cover (if you have one), and lift it off. You will see the thermostat housing on the driver's side front corner of the engine (the thing with a fat rubber hose coming from it that goes to the top of the radiator):  2. Undo and remove the two T40 bolts that hold on the lid of the thermostat housing. You should apply quite a lot of downward pressure on the tool as you undo these bolts, as they will be quite tight and you don't want to mess up the heads of the bolts by letting the driver slip. 3. Lift off the top of the housing. It may or may not be slightly stuck down with coolant so it may need a wiggle to get it to come off. About a cupful of coolant will come out – don't panic (as I did the first time I did this). Just lift up the fat hose as quick as you can and prop it up with something to minimise coolant loss (you can see that I've just wedged my ratchet with an extension bar fitted underneath the hose to hold it up). You can then see your thermostat sitting happily in its cosy little spot, and, on the side of the housing, the temperature sensor (looking like a big brass nut with a wire coming from it): 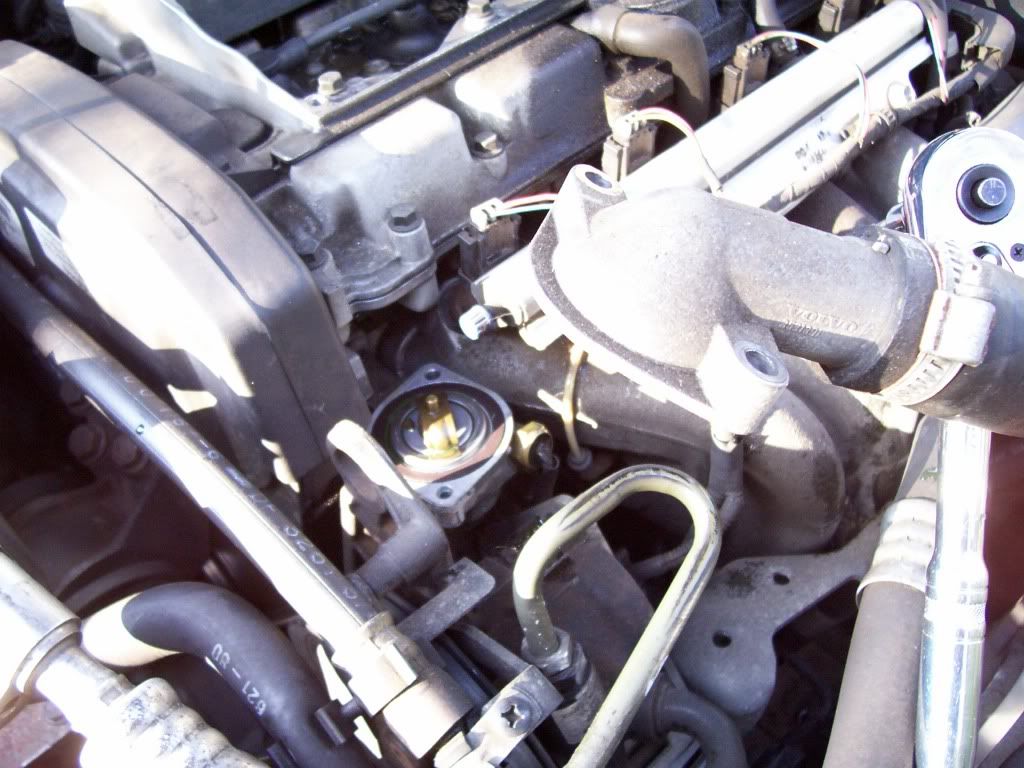 4. Follow the wire from the temperature sensor and you will find that it goes down to a connector attached to a little metal bracket slightly forward of and below the thermostat housing. You can just about see the connector in position in this picture: 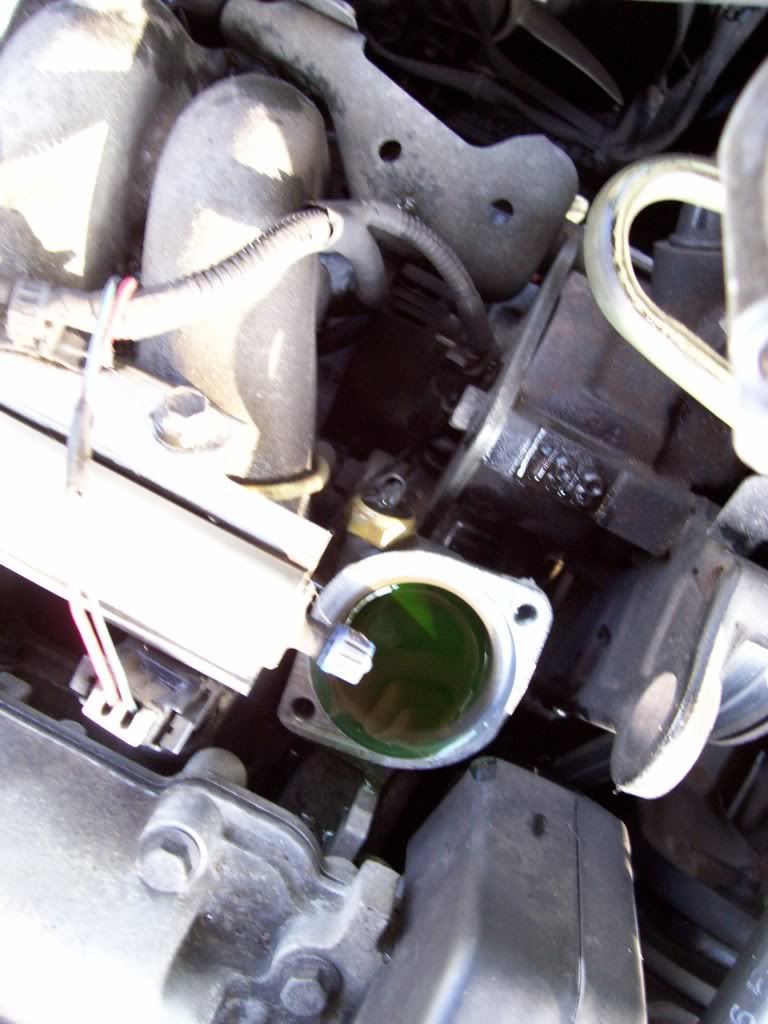 You can also see that I've lifted out the thermostat. I don't think this is necessary but it does no harm to have a little look at it. Finding myself thus confronted with a little green pool of coolant, I took the opportunity to test my coolant strength (using my 99p Ultimate Speed (from Lidl) coolant tester. It said mine was good for well below minus 40 degrees, so I think I'm ready for winter  ). ). 5. Use your flat-bladed screwdriver to ease the connector sideways off its bracket (there's just a loop of moulded plastic on the side of the connector that slides over the metal bracket). You can then pull the connector up and disconnect the sensor by lifting the little plastic clip on the connector with a fingernail and pulling/wiggling the two bits apart. Here is the connector with the sensor disconnected: 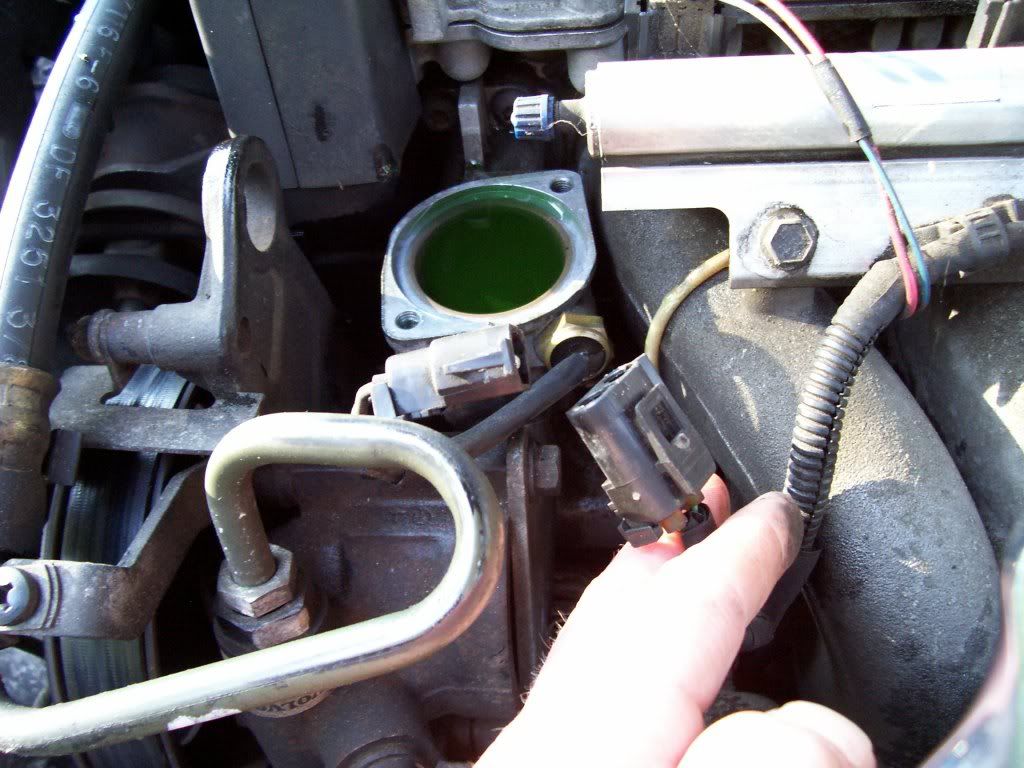 6. Unscrew the temperature sensor from the thermostat housing with your 19mm spanner. There is a little metal washer/sealing ring that may remain stuck to the outside of the thermostat housing, in which case make sure you chisel it off with your screwdriver before fitting the new one. Here's how things look when you've removed it: 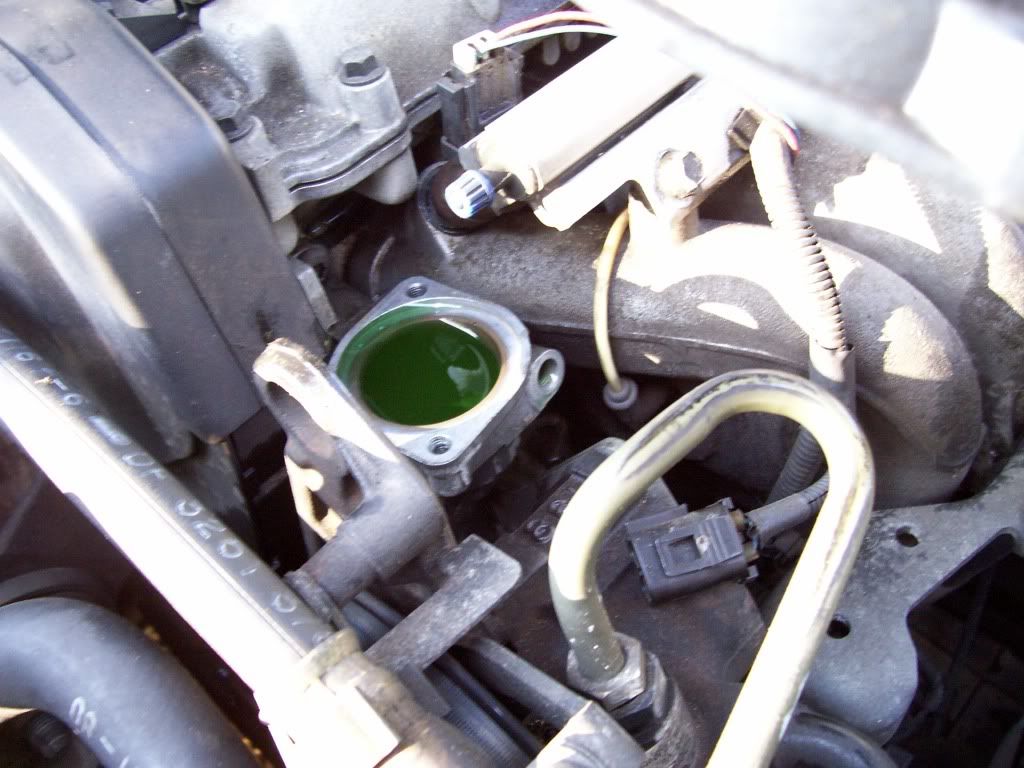 7. Screw in the new one, not forgetting the new washer/sealing ring that comes in the pack; I used a bit of copper grease on the threads. It's supposed to be tightened to 10Nm (– or, in my language, just a little bit tight; don't go mad). Push the two electrical connector bits together. You can see which way round they're meant to go as only one side of the sensor's connector has a little protruding bit for the security tab on the car's connector to hook over. Here it is, fitted and reconnected. This picture also gives you a decent view of the metal bracket on to which the connector fits - it's the small tongue of metal sticking out above the alternator, directly below the connector in the picture: 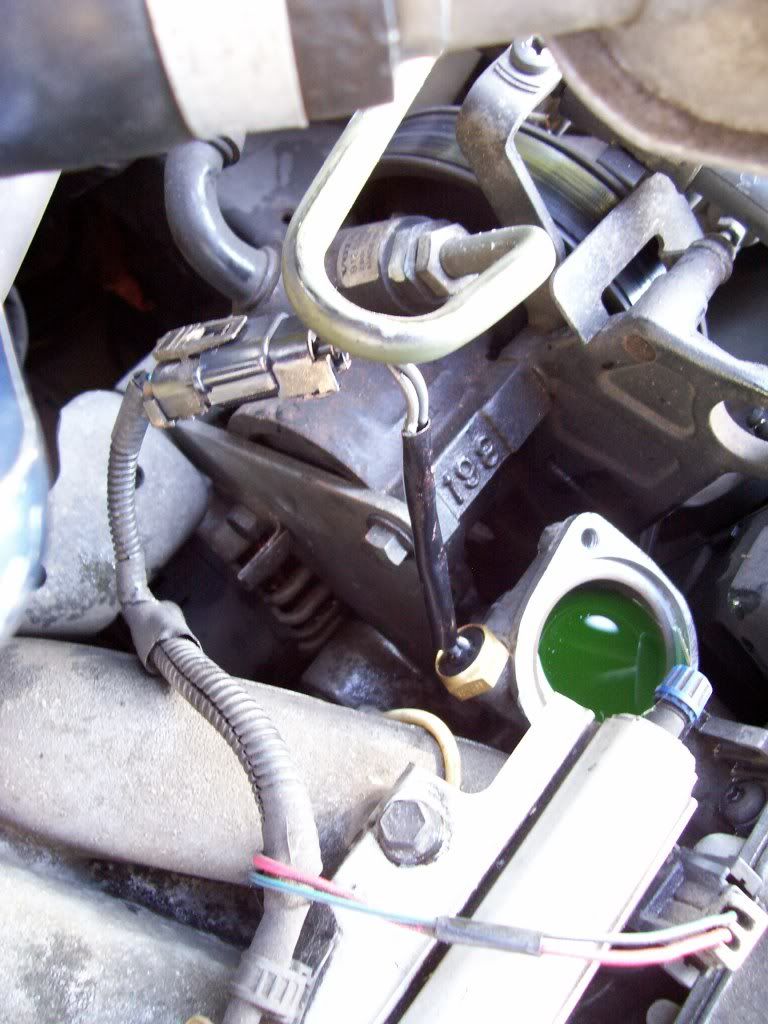 8. Slide the connector back on to its little metal bracket so that it is all secure again. 9. Pop the thermostat back in if you have removed it, and replace the top of the housing. The thermostat housing bolts should be tightened to 17Nm. Then replace the engine cover and you're done. 10. You should keep an eye on the coolant level over the next week or so as the bit of coolant that you just lost may mean that you need to top up slightly and/or it may create an air lock - which should, however, work its own way out of the system in time. Thanks to andy_d and 960kg (and, earlier, stevo48 and kebab10) for teaching me how to do it in the first place.
__________________
(Formerly) 1988 745 B230K (Phoenix) Last edited by DWM; Oct 22nd, 2011 at 12:40. Reason: typos |

|

|
| The Following 11 Users Say Thank You to DWM For This Useful Post: |
|
Oct 22nd, 2011, 13:01
|
#2 |
|
Premier Member
Last Online: Dec 28th, 2022 12:25
Join Date: Jun 2009
Location: Mercville
|
what a super How To!, and great pictures as well
just a thing that made me nervous!! i would like to say, open holes on top of the engine always frighten me as i learnt the hard way one time, if you take out the thermostat cover the hole with some rag or kitchen towel as if you drop a washer or screw and you can`t find it it will by sod`s law be in that hole and you don`t know it`s there until perhaps it goes around the water impeller (pump) on the Lotus Twincam engine putting the head back on i dropped a head washer down the front opening where the camshaft chain runs and i couldn`t find it so i had to take all the sump off and look upwards with a torch and it was sitting on a ledge right next to the gearwheels from then on i always cover up even sparkplugs holes while i am changing them
__________________
 Mercedes C320CDI Sport Estate 3 litre V6 7 Gear Auto Remap 290bhp 628Nm torque @ 1600revs 45.1mpg |
|
|
|
| The Following 6 Users Say Thank You to 960kg For This Useful Post: |
|
Oct 22nd, 2011, 13:10
|
#3 |
|
VOC Member
Last Online: Apr 4th, 2023 18:13
Join Date: Apr 2010
Location: Oxford
|
LOL yes that is doubtless very good advice.
__________________
(Formerly) 1988 745 B230K (Phoenix) |
|
|
|
|
Oct 22nd, 2011, 18:45
|
#5 | |
|
VOC Member
Last Online: Apr 4th, 2023 18:13
Join Date: Apr 2010
Location: Oxford
|
Quote:
__________________
(Formerly) 1988 745 B230K (Phoenix) |
|
|
|
|
|
Oct 22nd, 2011, 19:00
|
#6 | |
|
Idiot

Last Online: Apr 21st, 2019 17:29
Join Date: Nov 2006
Location: Derby
|
Quote:
__________________
Vectra VXR estate convert Experience = V40 1998 2.0 CD lots of mods Busy pestering the poor sods here now |
|
|
|
|
| The Following User Says Thank You to Dog_Book For This Useful Post: |
|
Oct 22nd, 2011, 19:25
|
#7 |
|
Premier Member

Last Online: Nov 15th, 2022 21:34
Join Date: Apr 2010
Location: London / Essex
|
lol. good one
__________________
Current car: 2002 S40 1.9D, 1992 240SE Nullius in Verba
|
|
|
|
|
Oct 26th, 2011, 19:36
|
#8 |
|
VOC Member
Last Online: Apr 4th, 2023 18:13
Join Date: Apr 2010
Location: Oxford
|
This exercise failed. I mean the new sensor works fine, but so did the old one! I'm sure now that it was the (new, genuine Volvo) thermostat letting me down, not the temperature sensor.
Soo...... I bought a cheap non-Volvo one which has improved things a bit, but still we're stuck around 88 degrees (even though it's got 92 degrees stamped on it). Why oh why can't anyone just provide me with a thermostat that keeps the temperature at 90 or more?! Is it just unrealistic to ask this????? It's not exactly midwinter yet!
__________________
(Formerly) 1988 745 B230K (Phoenix) |
|
|
|
|
Oct 26th, 2011, 20:04
|
#9 |
|
Premier Member
Last Online: Jul 24th, 2015 16:09
Join Date: Sep 2008
Location: oxford
|
Thanks DWM for being credited with helping with the thermostat in the past. Surely one advantage with the thermostat opening a little quicker is that the car is warming up faster and is therefore more economical.
With the thermostat marking of 88 or 92, I would expect that they also have a 5-10% temperature variation, so opening early 80's to the mid high 90's. Dont worry about it really, as long as it opens then good. A good way to get rid of a suspected airlock is to once you have finished with the car for the day, pop the bonnet and slowly release the rad pressure cap. Obviously wait till it has cooled down or you may get burnt. Just release the pressure and retighten. Do this for a few days and the air lock will go. |
|
|
|
|
Oct 26th, 2011, 20:13
|
#10 |
|
VOC Member
Last Online: Apr 4th, 2023 18:13
Join Date: Apr 2010
Location: Oxford
|
I do realise I'm fussing about a small difference but surely hotter means more economical? So 90 would be better than 88? It's the aim of maximising mpg that is driving all this meddling....
Thanks for airlock tip.
__________________
(Formerly) 1988 745 B230K (Phoenix) |
|
|
|
|
| Currently Active Users Viewing This Thread: 1 (0 members and 1 guests) | |
| Thread Tools | |
| Display Modes | |
|
|


 Linear Mode

