
|
|||||||
| 700/900 Series General Forum for the Volvo 740, 760, 780, 940, 960 & S/V90 cars |
 Information
|
|
How to Colour code switches, instruments with LED bulbsViews : 10057 Replies : 86Users Viewing This Thread : |
 |
|
|
Thread Tools | Display Modes |
 Apr 8th, 2013, 03:13
|
#1 |
|
Premier Member
Last Online: Yesterday 12:22
Join Date: May 2012
Location: Lakenheath
|
Hi All,
after a request in another thread, here's a selection of photos and words about colour coding your instruments and switches using LED bulbs. Firstly, a little about LEDs for those of you that don't know and for those of you that do, please bear with me! A Light Emitting Diode (LED) is an electronic component developed from the humble diode which in simple terms is a one way valve for electricity. I can guarantee that almost everyone that owns a piece of electronic equipment of some description has at least diodes in most of those bits of kit and quite probably LEDs in some of it too. So if it's a one way valve, that means it will only allow current to flow in one direction. That means that LEDs only work one way round and you have to install them the right way else they won't work. At the kind of voltages present in a cars electrical system, this won't cause any damage but can be annoying if you've put all the screws back only to find some of them are the wrong way round! Anyway, now let the fun begin! Things you will need : Small Flat-bladed Screwdriver #2 Pozi-Driv Screwdriver T10 LEDs T5 LEDs Other colours are available, i linked to green ones simply because that is the colour i'm fitting at the moment. You could change them as often as you like i suppose, maybe have a different colour for each season - red for summer, blue for winter, green for spring and yellow for autumn. I also bought flat top T5 LEDs for the simple reason i had difficulty getting the dome topped LED to fit in the auto selector due to it being 2-3mm longer - if you have a manual car this won't effect you. Using a small, flat bladed screwdriver, pop out the covers each end of the instrument cluster : 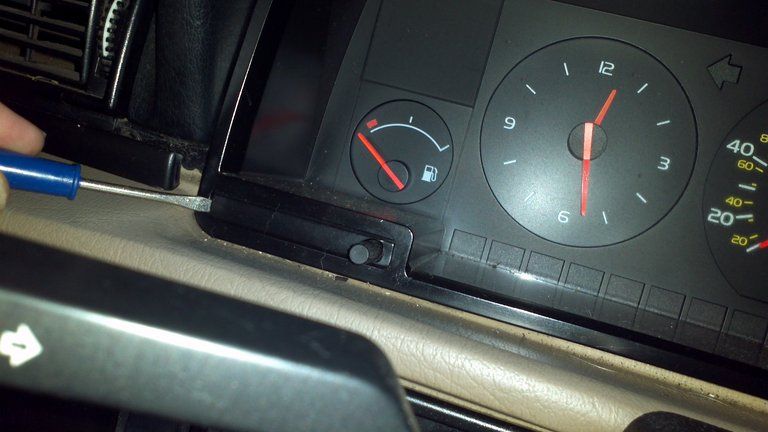 to reveal the screws that secure it : 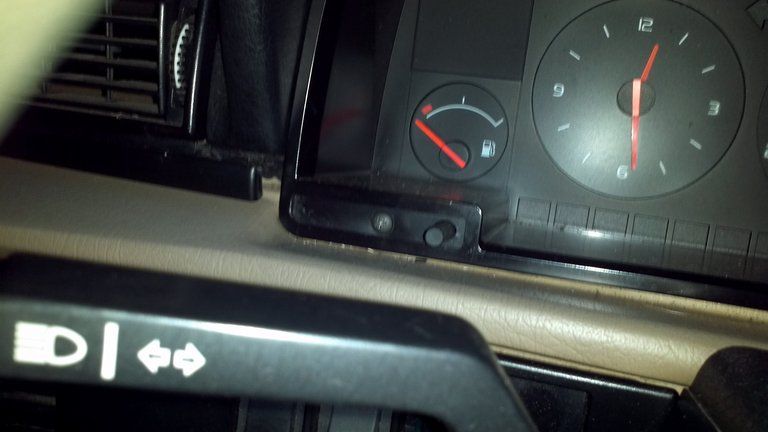 Now ease the cluster out. I find it easier to put the wiper and indicator stalks down a notch to make more room. As it comes out, twist it towards the windscreen so you can get at the multiplugs on the back to remove them : 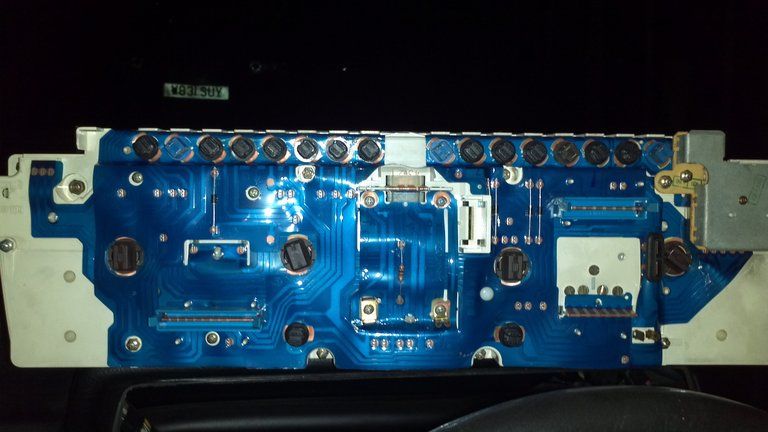 Don't worry about what goes where as they can only go on in the right place. The only one you need to pay attention to is the red/white wire that connects the rev counter. This is the only single wire connection. Once you've got it all disconnected and sat on top of the dash, you can see the 4 main bulb holders that hold the illumination bulbs. These are the ones you are going to replace with the T10 type LED bulbs (the larger of the 2). Remove the 4 holders and then pull the bulbs out. Now fit the LEDs to the holders and replace the holders in the cluster. Once they are back in, reconnect the multiplugs to the back of the cluster and get it roughly in position. Switch the ignition on the bring the lighting on in the cluster. Make sure the dimmer isn't turned down else you won't get anything but hopefully you should have a nice even spread of light in your chosen colour. If you have any dark spots, first of all try rotating the bulb holders back and forth in their holes - sometimes they don't find their perfect connection until you do. If you still don't get any joy, remove the bulbholder and rotate half a turn before refitting. This should now see the LED working. Very occasionally, the wire legs that wrap round the plastic base of the LED bulb are a little too straight on the base. Splaying them outwards usually helps them get a good connection. Before refitting the cluster completely, push the lighting switch escutcheon towards the steering wheel and pull the outboard end to release the spring clip then pull it to disengage the tongue on the steering wheel end : 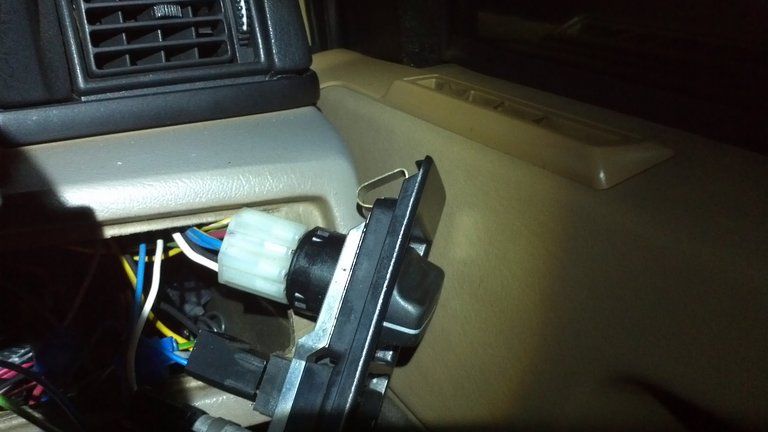 You can now get at the bulb holder - 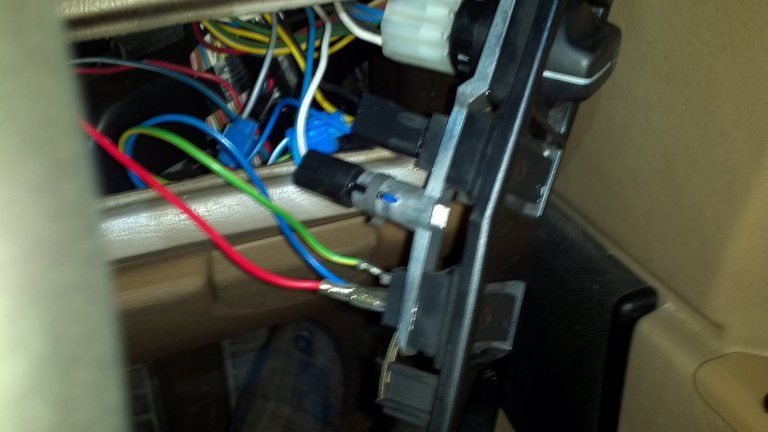 Pull it out, remove the bulb and fit the T5 LED : 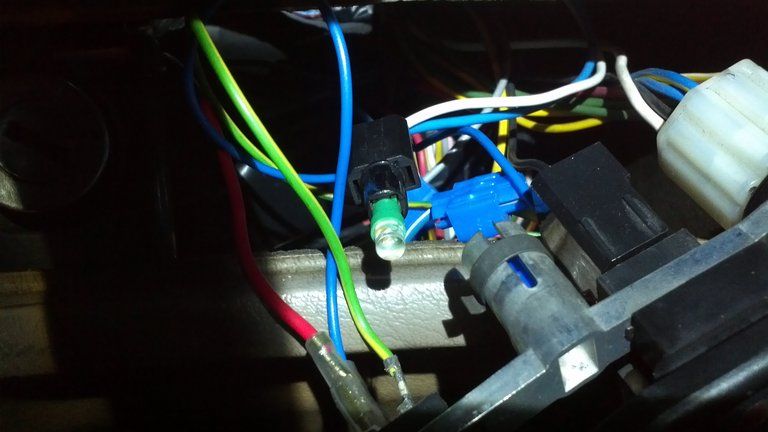 then switch the ignition on to test it. Remove and turn half a turn and refit if it doesn't light up then refit the holder. Now moving onto the other side, pull the end of the trim round the heater controls with one hand and slide the flat screwdriver in round the edge to release the clips : 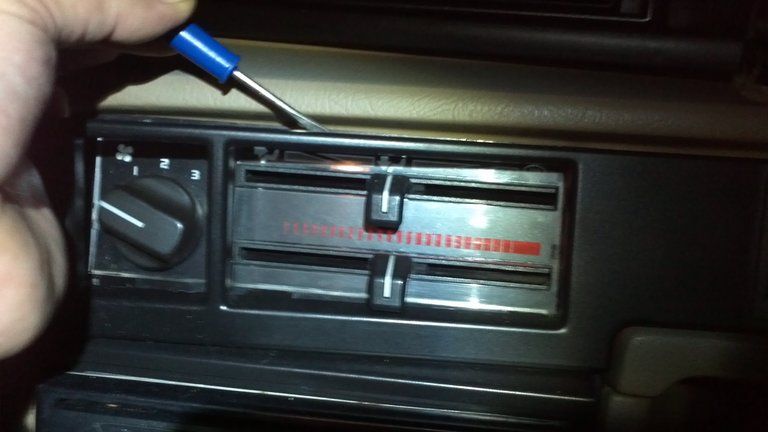 Once it's loose, pull it away from the steering wheel to disengage the tongue and then pull out to get at the bulbholders for the switches : 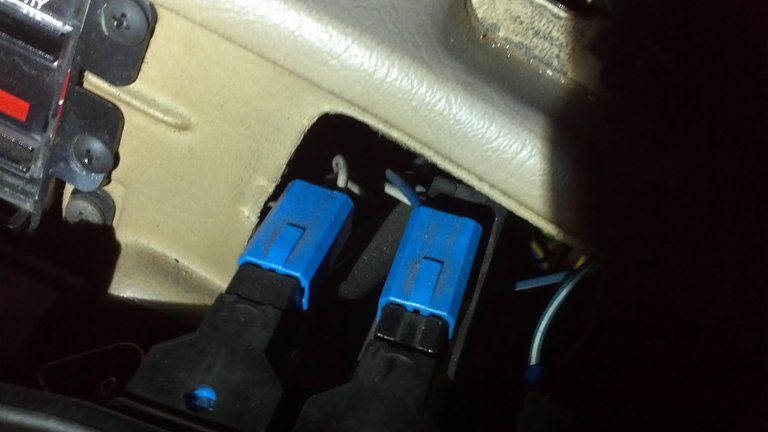 Once again, pull the holders out, replace the bulb with the T5 LEDs and refit, testing before moving on by switching the ignition on. Now remove the 4 screws holding the heater controls in place : 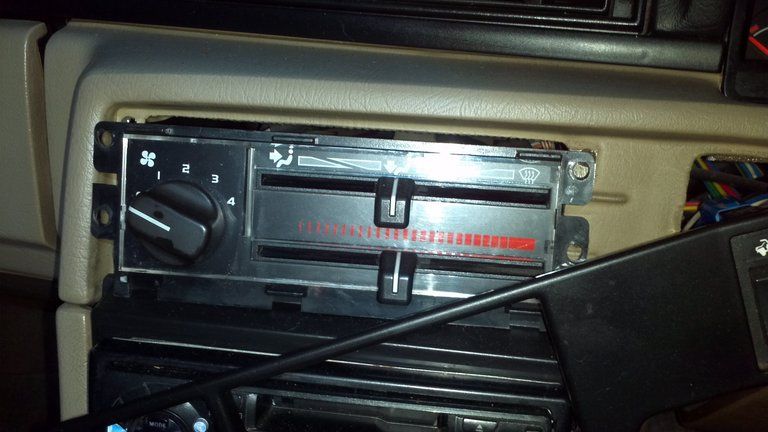 Now, reach behind the top of the fan switch, and pull the holder out towards the passenger side : 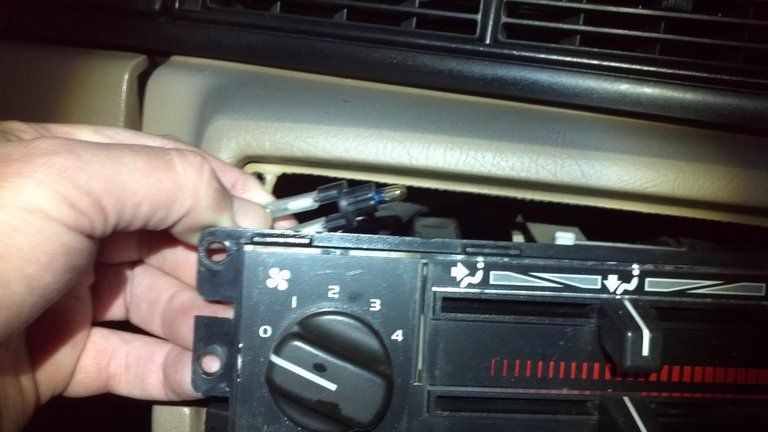 Now do the remove bulb, replace with LED etc and test before continuing. If all is well, replace the screws on the heater controls then refit by first engaging the tongue in the dash at the steering wheel end and push the trim back until it clicks into place. Do similar with the lighting switch trim and then refit the cluster complete with screws. If you want to be sure, switch the igntion on to check the cluster bulbs and the others before refitting the little bits of trim that were the first things to be removed. The cig lighter/ashtray bulb is reached by first removing the ashtray, then popping out the electrical cover and then pulling the trim off round the cig lighter to reveal 2 screws (one's at a funny angle) that secure the cig lighter and cubby hole : 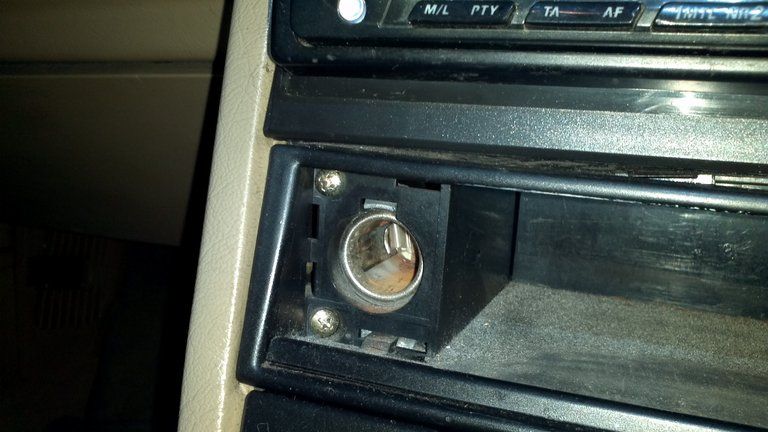 Remove the 2 screws then pull it out, disengaging the tongues on the drivers side as it comes out. Turn it over to reveal the bulbholder : 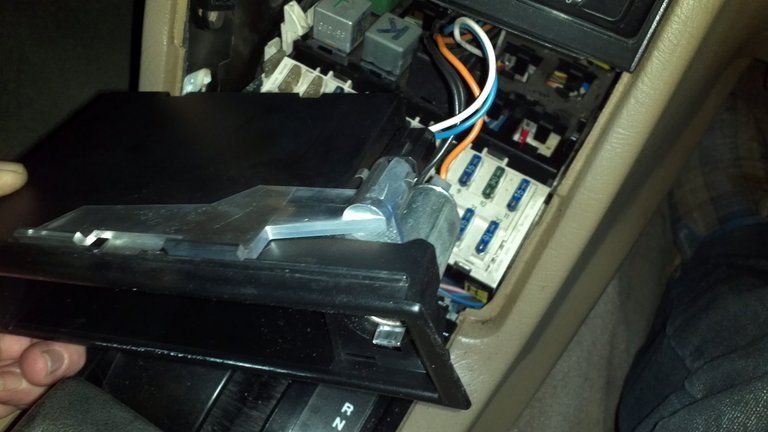 You should be ahead of me by now - pull the holder, change the bulb for the LED, test etc. If you have either heated seats with the switches mounted in the centre console or an automatic, keep reading. If not, refit the cubby hole/cig lighter, electrical cover and ashtray and go and have a cup of tea or similar until it's dark so you can admire it properly!  As you're still with me here, i'm guessing you have either auto transmission or heated seat switches in the centre console. Using the flat screwdriver, ease the clip off the holds the console trim to the frame : 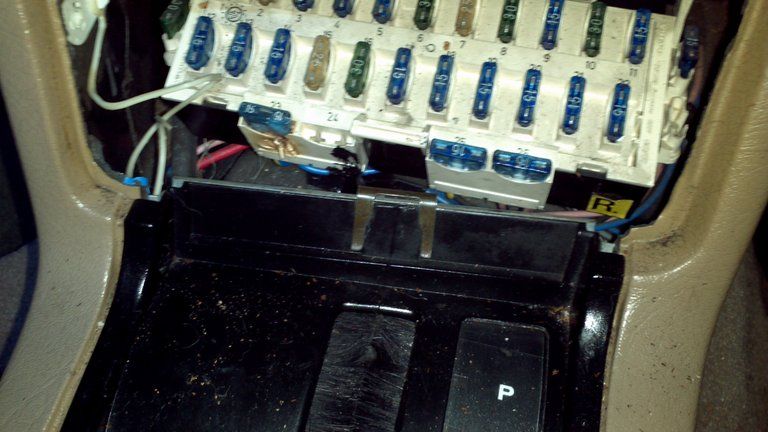 Now pop out the small piece of trim under the handbrake (literally just clips in, get your finger under it and lift) and then remove the 2 screws just in front of it to release the centre console trim. Push the trim forward to disengage the tongues that hold it under the lidded cubby in the back end of the console. There should be enough slack on the wiring to turn the trim over to reveal the bulbholder for the heated seat switches : 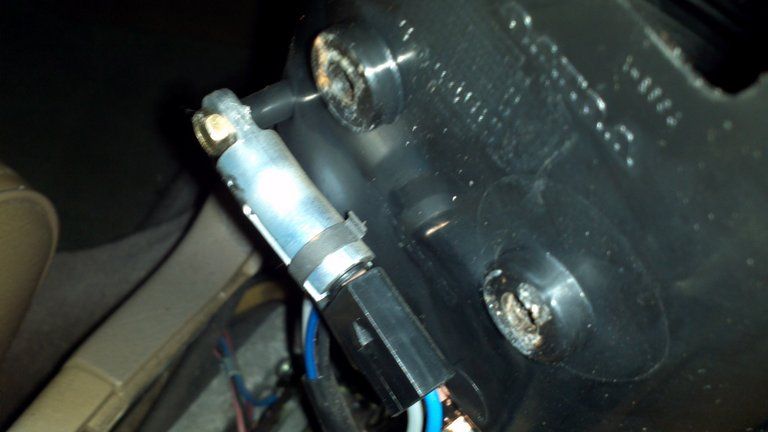 You know what to do by now, change the bulb for the LED and test! If yours is auto, while the console trim is out of the way, remove the 2 screws the hold the front and back end of the selector quadrant : 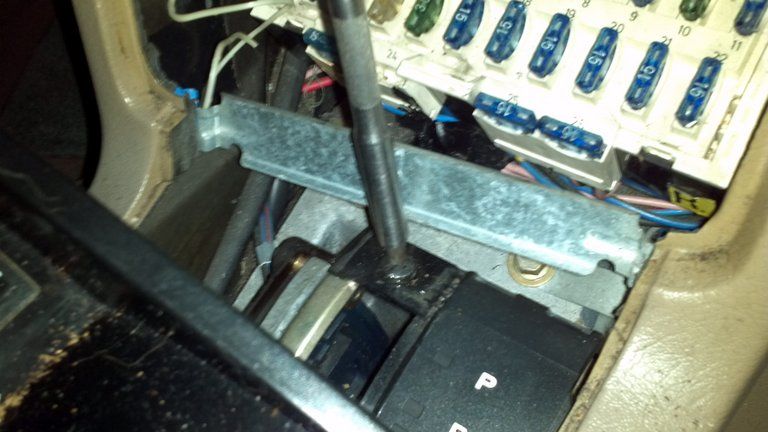 Manouevre it out carefully and turn it over to get at the bulbholder : 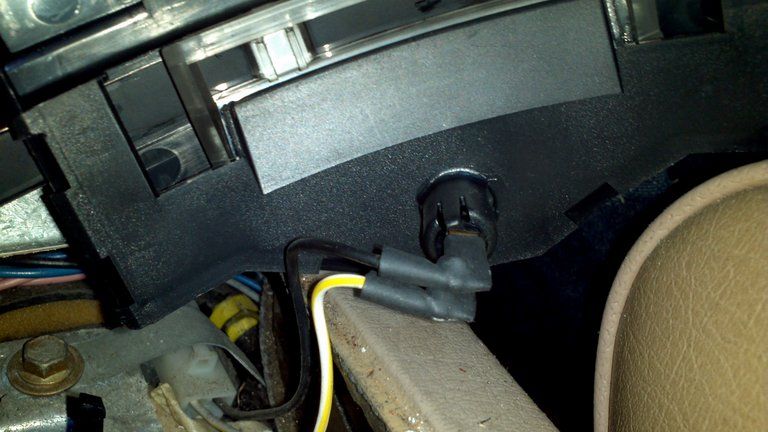 Once you've changed the bulb for an LED, "Haynes it". In other words, refit in reverse order of removal. Be careful to locate the groove in the selector quadrant with the finger on the gear lever so that when you move the lever, the quadrant moves as well. Refit the console trim and the clip, screws etc, do a final test and you're done! All except the seat belt buckle lights that is! I've not done mine yet, mainly because i generally don't need to look to find the buckles. One of mine has a working bulb at present but when that dies i suppose i'll do both of them! Apparently the holders just slide downwards out of the buckle then it's a case of changing the bulb for an LED, testing and refitting. They look awkward to get at though, another reason i've not done mine yet! Please feel free to add some pics if you do yours, be interesting to see how they're done!
__________________
Cheers Dave Next Door to Top-Gun with a Honda CR-V & S Type Jag Volvo gone but not forgotten........
Last edited by Laird Scooby; Apr 8th, 2013 at 03:45. |

|

|
| The Following 4 Users Say Thank You to Laird Scooby For This Useful Post: |
|
Apr 8th, 2013, 10:24
|
#2 |
|
If in doubt flat out

Last Online: Sep 24th, 2019 13:17
Join Date: Mar 2009
Location: Leven
|
Good write up Dave, thanks. How long did it take ?
__________________
2007 C30 D5 2008 Saab Aero 2lt turbo 1982 BMW 735i 1989 Daimler xj40 |
|
|
|
| The Following User Says Thank You to ton246 For This Useful Post: |
|
Apr 8th, 2013, 11:44
|
#3 |
|
Premier Member
Last Online: Yesterday 12:22
Join Date: May 2012
Location: Lakenheath
|
Thanks Tony, you're welcome. Err how long did it take?
Good question! Firstly i was faffing about in the dark with a head torch and also trying to take photos of as much of it as possible. That in itself probably doubled how long it took. Secondly, because of the forces of gravity and pull of cables on certain bits of trim, some photos took about 5 minutes to "stage" to be sure of getting the right shot of what was needed. All in all i was sat in the car for probably about an hour and a half. Take out all the faffing about and do it late in the day when there's enough daylight to see what you're doing but it's dim enough to see if the LEDs are working before continuing, it would probably have taken about half an hour. I would suggest putting an hour aside to do it comfortably, certainly the first time anyway. Alternatively, you could break the job into 2 halves. First half would be the cluster, light switch, heater controls and auxiliary switches (HRW, sunroof etc) and the second half would be the cig lighter and heated seat switches/auto shift selector. Any problems, feel free to give me a shout. I'm also evaluating another little minor modification that costs pennies to make but improves fuel economy considerably. It's worked well on my other beast giving at least a 25% boost to fuel economy and power but the engine management on that car helps considerably. So far it has definitely improved pick up and torque on my 740, i've yet to see if it improves the economy though. Difficult to tell just now as most of the time the car is loaded with various household stuff and/or towing a trailer with even more stuff on! Two weeks time should see that lot done with so hopefully be able to give a more accurate figure but very crude calculations suggest at least a 10% increase. More to come later if it definitely works..........
__________________
Cheers Dave Next Door to Top-Gun with a Honda CR-V & S Type Jag Volvo gone but not forgotten........
|
|
|
|
|
Apr 8th, 2013, 12:15
|
#4 |
|
If in doubt flat out
Last Online: Sep 24th, 2019 13:17
Join Date: Mar 2009
Location: Leven
|
.
Intrigued..............please tell. Also, forgot to say, where is the after pics, we would like to see the fruits of your labour.
__________________
2007 C30 D5 2008 Saab Aero 2lt turbo 1982 BMW 735i 1989 Daimler xj40 Last edited by CTCNetwork; Apr 9th, 2013 at 22:14. Reason: Forgot something - And quote removed |
|
|
|
|
Apr 8th, 2013, 13:41
|
#5 |
|
Premier Member
Last Online: Yesterday 12:22
Join Date: May 2012
Location: Lakenheath
|
D'oh!!! Knew there was something i forgot! It's not terrifically clear as the warning lights cause a sort of "flare" on the auto-focus settings on my camera phone. There is a way round it but i couldn't remember or be bothered to try and find it at 1am in near-zero temperatures!
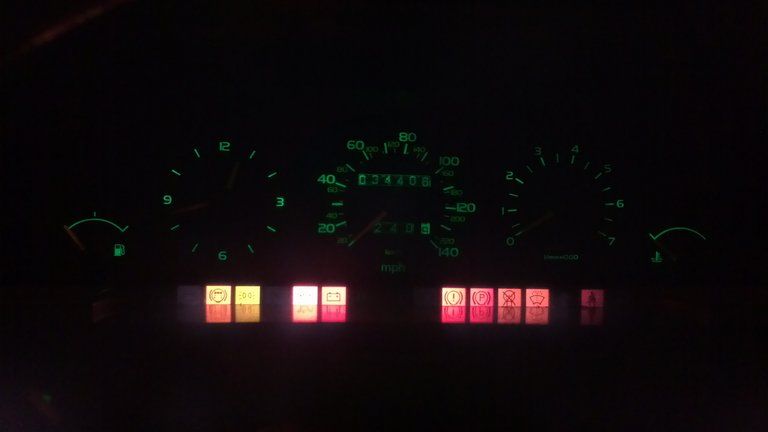 As for the other thing, it's water injection. It's a very crude but effective set-up that i first trialled on my other car some 3-4 years back and wouldn't be without it on there now. Going back to WW II, aircraft pilots found the engines performed better and were more economical when flying low over lakes, rivers etc. Turned out the water vapour was cooling the inlet charge, making it more dense and in effect, raising the octane rating of the fuel. By doing this, more advance can be run on the ignition which in general will give more power and economy. However, advancing the ignition with low octane fuels will cause pre-ignition/detonation or pinking (pinging to our USA cousins) which is no good for anything, especially the engine! By adding a cooling component in this case the water, the advanced timing can be used with no ill effects. On my other beast, the engine management advances the timing until it begins to detect pinking then retards it slightly. This gives a "fail-safe" in case it runs out of water as it simply returns to standard. On the 740 GLE, there is a different system and i'm not 100% sure of how it operates. As it has a knock sensor (left hand side of the engine block, just under the inlet manifold), it seems reasonable to assume it does advance the ignition somewhat until it detects pinking then retards it. Either way it still provides a fail-safe in case of running out of water. I've not tried adding any advance to my 740 as yet, not really had the time! I have noticed though that as the engine reaches 3000rpm, it becomes much stronger and full throttle (kickdown) up-changes now happen 3-400 rpm higher, implying the engine is developing more power. Obviously the people that have an electronic engine management system are likely to see more benefits than us with the K-Jet system but in my book, any improvement in power and/or economy for very little outlay can only improve things! It also doesn't effect catalytic converters and because it makes the inlet charge more dense, gives a slight "cushioning" effect on the piston/con-rod as they approach TDC which reduces the stress caused by changing from upward to downward movement. In theory i suppose that could prolong engine life but i daresay it would be minimal. However, both engines i've tried it on sound quieter and smoother and according to the emissions print-out from the recent MoT on my other car, run cleaner. Previously i've left the water injection disconnected for the MoT on that but decided it was time for a comparison this year! Once i have some concrete evidence to support my "feelings" of more economy and power, i'll do a write up on how to fit the water injection. Total cost is under a tenner for a length of windscreen washer tubing or similar, an empty fabric conditioner bottle or similar and a 1.8mm hypodermic needle, similar to those used by body piercers and err - oh yeah, doctors! *** Just noticed - the photo of the instruments was taken with one LED not working correctly between the tacho and temp gauge - i did rectify this though!***
__________________
Cheers Dave Next Door to Top-Gun with a Honda CR-V & S Type Jag Volvo gone but not forgotten........
Last edited by Laird Scooby; Apr 8th, 2013 at 13:43. Reason: Clarification - or something like that! |
|
|
|
|
Apr 8th, 2013, 13:55
|
#6 |
|
Master Member
Last Online: Aug 2nd, 2018 19:03
Join Date: May 2011
Location: Essex
|
You can get a similar effect from misting cold water onto the intercooler in a Turbo, anything that cools the inlet charge will make it denser and allow more fuel to be mixed in.
Ram air intakes work on the same principle as the turbo, using the cars speed to force air in, which should also be cooler due to coming from outside rather than under the bonnet, opening up a cold air feed to a stock airbox will help a bit but it has been shown that midrange driveability is better with a warmer intake charge, while outright power will be boosted with a colder one.
__________________
2.3 Turbo "Celebration" 
|
|
|
|
| The Following User Says Thank You to popuptoaster For This Useful Post: |
|
Apr 8th, 2013, 14:03
|
#7 | |
|
Premier Member

Last Online: Oct 21st, 2023 20:25
Join Date: Dec 2008
Location: Halesowen
|
Quote:
I would be interested in trying it on my N/A classic mini though. Timing not a problem as I've got a programmable MegaJolt ignition system which I can have 2 ignition maps which would automatically switch based on a water level sensor in the WI tank.
__________________
 1990 Volvo 760 GLE D24TIC ZF22 - 16psi, more fuel, Monark 293 nozzles, 40mm lower, Bilstein TCs, 24/19 ARBs, full Polybushed front, H&R spacers, 17" Titans. Running Veg oil/petrol mix. Past: 1988 Volvo 740 B230E M46, 1991 Volvo 940 B230FB M47 |
|
|
|
|
|
Apr 8th, 2013, 14:06
|
#8 |
|
Premier Member
Last Online: Yesterday 12:22
Join Date: May 2012
Location: Lakenheath
|
That's helpful to know, thanks. I see you have a turbo model, if i do a write up (in another thread) would you fancy trying it on yours?
Placement of the metering jet/atomiser (hypodermic needle) might be a bit different, i would suggest fitting it pre-turbo so compressed air from the turbo isn't forced backwards into the water reservoir (conditioner bottle) but it would be very interesting to know if it is more or less effective on a turbo. Theory suggests it would be more effective, as it would enhance the effect of the intercooler.
__________________
Cheers Dave Next Door to Top-Gun with a Honda CR-V & S Type Jag Volvo gone but not forgotten........
|
|
|
|
|
Apr 8th, 2013, 14:12
|
#9 |
|
I've Been Banned
Last Online: Aug 10th, 2018 09:22
Join Date: Jan 2011
Location: The Lincolnshire Wolds & West Sussex Coast
|
What great entertainment - thread subject change - this is!
Prufrock. |
|
|
|
|
Apr 8th, 2013, 14:14
|
#10 | |
|
Premier Member
Last Online: Yesterday 12:22
Join Date: May 2012
Location: Lakenheath
|
Quote:
Your reply came while i was replying to popuptoaster about the positioning of the metering needle. My system relies purely on the venturi effect caused by air flwoing through the inlet system and as such compressed air would end up causing the water to flow backwards in my system. Are you still running the SU carbs on your Mini? If so, you could use the breather tube as a site to fit the metering needle as it needs to be upstream of the throttle butterfly so it is not subject to pure inlet manifold vacuum. I'm fairly sure it would improve things on your Mini but not knowing what other mods you have can't really say much more. Using the pressurised system on your D24TIC is a good idea if you're running 16psi of boost, if nothing else it will help cool things down to an acceptable level without melting pistons! 
__________________
Cheers Dave Next Door to Top-Gun with a Honda CR-V & S Type Jag Volvo gone but not forgotten........
|
|
|
|
|
|
| Currently Active Users Viewing This Thread: 1 (0 members and 1 guests) | |
|
|


 Linear Mode

