
|
|||||||
| S40 / V40 '96-'04 General Forum for the Volvo S40 and V40 (Classic) Series from 1995-2004. |
 Information
|
|
How to fit parking sensors.Views : 10980 Replies : 41Users Viewing This Thread : |
 |
|
|
Thread Tools | Display Modes |
 Mar 9th, 2007, 20:44
|
#1 |
|
My nipper said!

Last Online: Aug 1st, 2022 20:15
Join Date: Oct 2006
Location: Who knows?
|
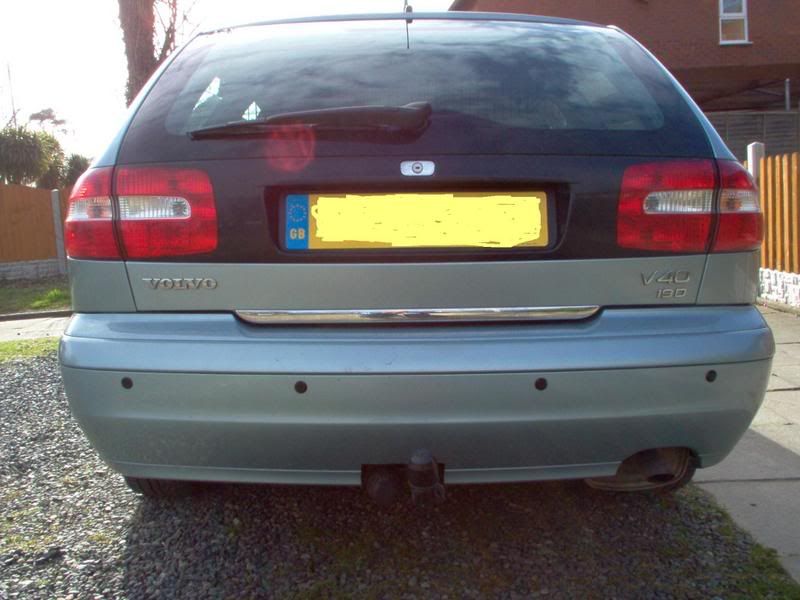
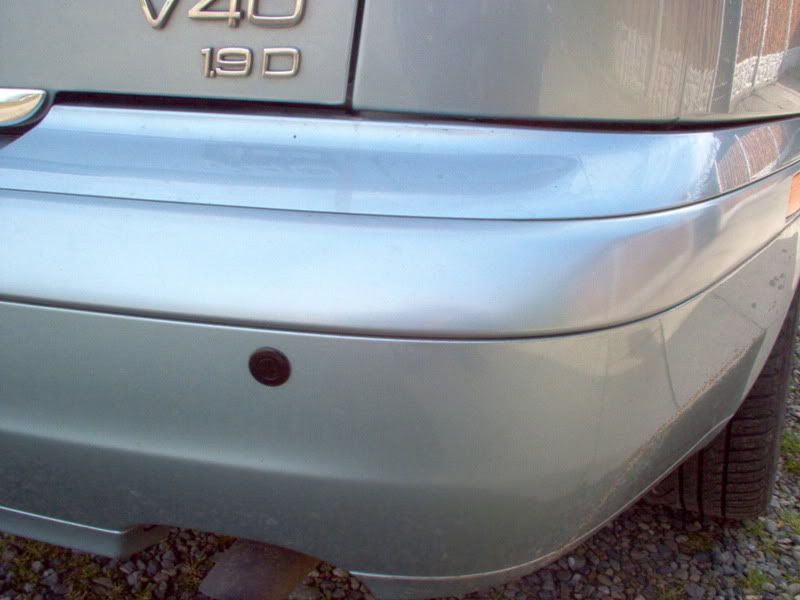
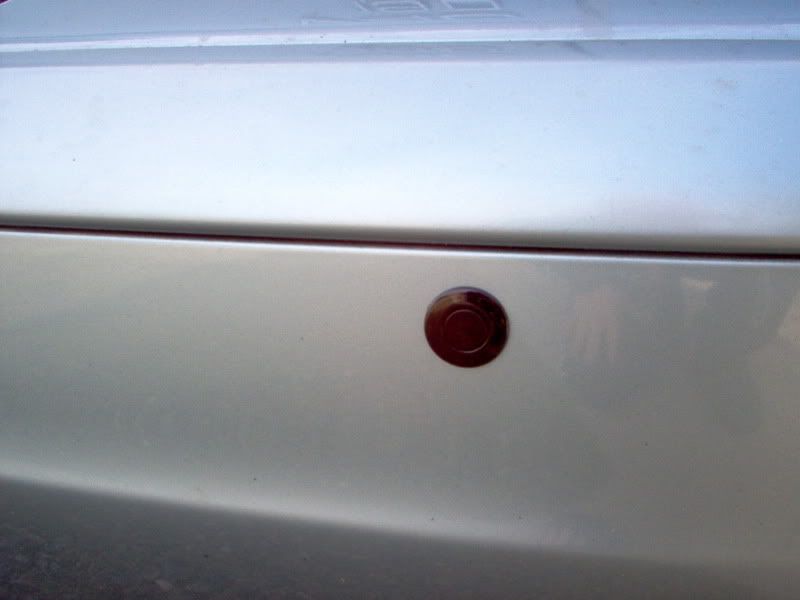
As you may know, I've been looking into some sensors for the V40.
Well, seeing as nobody else could help, I decided to bite the bullet and go for it, saving myself £145.00. Firstly I bought the sensors (4 of them, buzzer, but no camera) from the beloved ebay for £18.99 plus p+p. They came with the little holesaw and instructions etc. This is how I fitted them. 1) First job was to masking-tape the bumper to avoid scratches and aid marking out. 2) Then I measured the entire length of the bumper using a sewing-type tape measure by taping one end to the edge of the bumper and pulling it round the profile of the bumper. (I chose to mount mine on the square edge (I'll post some pics tomorrow) just below the colour-coded (or black) ridge which houses the orange lights at either side. 3) Once measured, I marked the centre line (halfway point of whole bumper length) with a pencil. 4) Next step was to mark the four positions of the sensors, which I did by measuring from the centre line, 9 inches, and 23 inches on either side, then down 1 inch from the ridge/groove where the colour-coded (or black) strip is. This meant that when I cut the holes, I wouldn't be drilling into the metal plate behind the bumper, and also meant the sensors were far enough away from my towbar so as not to pick up on it and interfere. 5) After marking the hole centres clearly with pencil, I drilled them, using a 2 millimetre pilot-drill (a similar small size will do), so when it came to using the hole-saw, there was less chance of it slipping. Then I drilled them all with the hole saw (22mm I think), very carefully. 6) I then de-burred the holes lightly with a small file and removed the masking tape. 7) Then it was time to feed the sensors into the holes, pulling the wires over the back of the steel plate behind the bumper, using a piece of bent coat-hanger or similar. (NOTE: the wire on the two outer sensors has to be pulled to the side, again using a coat-hanger or similar, and fed through a gap which you can see by removing the rubber seal off the boot and using a torch, before you can pull them over the back of the steel plate. 8) Once that was done (easier than it sounds. Honest!) I fed the wires through the grommit situated between the bumper and spare-wheel well (torch advised again) which is accessible by taking the plastic boot-trim off, (unclips) and pulling up the boot-carpet. 9) Next step was to plug the sensors into the control box (numbered so you can't go wrong), and find the power supply and earth. I used my tow-bar earthing point, and spliced into the violet with white-trace wire (reversing lights) running behind the left-hand side boot carpet using a scotch-lock connector, then plugged it into the control box. 10) Then all that remained to do was tidy up the wiring (tape and zip-ties), plug the warning buzzer into the control box, and find a place to locate them. I stuck the box to the inside boot-panel behind the carpet, and mounted the buzzer in the boot as it's quite loud. 11) The final step, was to test them, and spend about an hour smiling at my brilliance. Hope this helps any DIYer's out there. Disclaimer: I am in no way responsible for any work carried out by yourselves to any vehicle. The above is a guide to how I fitted mine, if in doubt, consult a professional. Last edited by morphinemitt; Mar 9th, 2007 at 20:48. |

|

|
| The Following 4 Users Say Thank You to morphinemitt For This Useful Post: |
|
Mar 10th, 2007, 00:15
|
#2 |
|
Junior Member
|
Picture tells a thousand words!
|
|
|
|
|
Mar 10th, 2007, 08:55
|
#3 | |
|
My nipper said!
Last Online: Aug 1st, 2022 20:15
Join Date: Oct 2006
Location: Who knows?
|
Quote:
|
|
|
|
|
|
Mar 10th, 2007, 09:58
|
#4 |
|
My nipper said!
Last Online: Aug 1st, 2022 20:15
Join Date: Oct 2006
Location: Who knows?
|
Here's the pictures, as promised.
|
|
|
|
| The Following 4 Users Say Thank You to morphinemitt For This Useful Post: |
|
Mar 11th, 2007, 19:47
|
#5 |
|
Potato!

Last Online: Apr 20th, 2024 06:46
Join Date: Aug 2006
Location: Norwich
|
For that price you can't go wrong! Can I ask if it was one of the following that you bought...
http://cgi.ebay.co.uk/Parking-Revers...QQcmdZViewItem or http://cgi.ebay.co.uk/REAR-CAR-PARKI...QQcmdZViewItem ...as I think I'll grab myself some! 
__________________
Scoot Gone, but not forgotten - S40 T4, C70 T5, S60 T5, V70 T5 '97 Currently - S40 T5 '04 & V70 T5 (Phase 2.5) |
|
|
|
|
Mar 12th, 2007, 18:59
|
#6 |
|
My nipper said!
Last Online: Aug 1st, 2022 20:15
Join Date: Oct 2006
Location: Who knows?
|
It was the first ones mate, though the second lot are identical.
Good service too,they arrived super-quick, sent me email's saying they'd been shipped etc. Good old fashioned customer service. I hope you find my guide easy to follow, I managed to get away without drilling through the steel bumper-backing plate with those measurements too. Hope this helps, good luck. Morphinemitt Doris said...! |
|
|
|
|
Apr 8th, 2007, 09:48
|
#7 |
|
Junior Member
Last Online: Nov 16th, 2011 13:06
Join Date: Dec 2004
Location: Copenhagen
|
Hi.
Nice job.. Did you have to get the bumper off, or could you do it when the bumper was on the car? Regards |
|
|
|
|
Apr 8th, 2007, 15:46
|
#8 |
|
VOC Member

Last Online: Sep 25th, 2023 14:09
Join Date: Nov 2006
Location: Wakefield (ish)
|
Well I finally bit the bullet and fitted some sensors.
Not quite as straight forward as this thread lead me to believe! Masked the bumper, found centre line and followed the above measurements. The 23" from centre only just cleared the edge of the metal section within the bumper, would probably recommend going 23.5". Other than that no problem. Drilled the 9" from centre only to find the biggest, blackest, plasticy, rubbery lump you've ever seen running full internal length of the metal section, unfortunately completely filling, wall to wall, floor to celing of the internal cavity. Hole cutter supplied fell about 3" short of making it through. Ended up using the longest drill I had about 4" and drilling through until reached the end of the rubber and into the back of the metal plate. At which point the drill broke and got stuck!!  Removed the bumper, not quite as bad as I imagined. Just undo three bolts under each arch to release the liner, unclip side markers, two bolts in boot floor and two nuts under plastic trim at the back of the boot and the whole shebang slides out towards you. Once bumper was off, knocked knackered bit out, used hole cutter from back of bumper through the metal plate, this allowed the cables to go through, filed edges and taped over to prevent chaffing. Oh, and dug rest of rubber out of the cavity so that the sensors would fit. Talked nicely to SWMBO, "Yes I know I said I'd only be an hour love!! I'll take you out later, honest!" Managed to fit sensors and feed cables through grommet just above spare wheel well. Refit bumper. By which time four hours had passed and SWMBO wasn't happy! Tidied up and left wiring for this morning. Went out this morning, "Shouldn't be too long love, only a 10 minute job to wire up." Ripped boot apart, no Violet and White wire any where. Looked at Haynes book, yep VO/W. Removed panel from tailgate found all wires yep, Violet and White. Peeled back headlining after removing half of interior. Found the Violet and White wire, followed it to a plug, only to find that the matching wire at the other side of the plug is Brown & Orange!! Traced the BR/OR wire through the roof and down the side pillar. Spliced into it. Earthed using one of the bumper mounting points. Wired up the sensors. Viola!, Roberts' your mothers brother. Now have functioning sensors. Rebuilt interior, tidied up. Total time about 7 hours. (Over two days.) Well chuffed with result. Now just need to placate the Mrs........... |
|
|
|
|
Apr 9th, 2007, 17:16
|
#9 |
|
My nipper said!
Last Online: Aug 1st, 2022 20:15
Join Date: Oct 2006
Location: Who knows?
|
It's father's brother not mother's.
Glad you got em in though mate, they look better than a £140.00 job too don't they. Strange the measurements didn't work out though, mines an 03 V40, what's yours? P.S. Let's have a look then, you've seen mine etc... Last edited by morphinemitt; Apr 9th, 2007 at 17:20. |
|
|
|
|
Apr 9th, 2007, 17:18
|
#10 | |
|
My nipper said!
Last Online: Aug 1st, 2022 20:15
Join Date: Oct 2006
Location: Who knows?
|
Quote:
Either way though, beats paying a sparky to do it eh? |
|
|
|
|
| The Following User Says Thank You to morphinemitt For This Useful Post: |
|
| Currently Active Users Viewing This Thread: 1 (0 members and 1 guests) | |
|
|


 Linear Mode

