Quote:
Originally Posted by gatos

The hardest bit is removing the relays. The solder on the board has no lead (Pb), so the melting point is higher. You will need a sucker/suction pump to remove the solder. However, you will find out that even though you remove most of the solder, the 5 relay legs will still be stuck to the board. If you attempt to pull the relays at this point, you will find out that most probably they will pull out the tiny metal seats at the base of the board and it will be almost impossible to apply solder when you put the new relays in. I damaged two CEMs this way when I first started
So, the way I do them now, is to carefully cut open the top part of the relay, use long nose pliers to pull out the internal smaller relay, then break off the 5 copper connecting wires at their base in there and carefully yank out the rest of the plastic bit of the relay. What you will be left out with, will be 5 small legs of each relay left on the board, Then you can use the soldering iron to heat up each one and while doing so, pull out.
I have done quite a few CEMs the last couple of years using this method and had a 100% success rate. Good luck with this
|
Hey guys.
So I ordered relays, had not much previous experience as to soldering, but I followed instructions which you provided and firstly removed old relay and then soldered on another one with the equipment I have at home. cost of repair was about £7-including solder sucker tool from ebay and 2 relays I bought online. All was delivered today so I gave it a go and luckily both of the lights are on. Perfect, thank u very much again for all your help and advice.
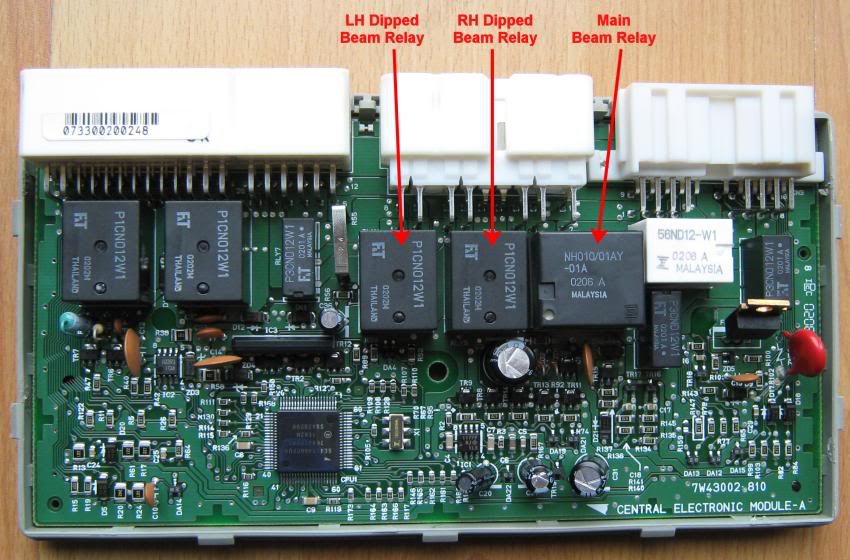
For all those who would get confused just like me about which relay belongs to which light, there is a picture in another thread and one is looking at lights from position of driver being inside, not outside.