
|
|||||||
| 700/900 Series General Forum for the Volvo 740, 760, 780, 940, 960 & S/V90 cars |
 Information
|
|
Missfire 960Views : 959 Replies : 24Users Viewing This Thread : |
 |
|
|
Thread Tools | Display Modes |
 Jun 19th, 2019, 13:20
|
#11 |
|
VOC Member
Last Online: Apr 12th, 2024 13:08
Join Date: Aug 2006
Location: Hounslow West London
|
Thanks for all your info Dave.
In the past when I have done rebuilds, my Healey 3000 for example and many others, its dead easy to "prime" the oil system ahead of the first start, by removing the distributor and using a modified flat ended rod from an electric drill to run the oil pump. I used to do this until I could see the oil seeping up at the rocker shaft, then you know the oil system is fully primed. On the white block 2.9 x 6 with hydraulic lifters is there any way to do similar or is it, plugs out and run the starter for some time until you think the oil is well up into the lifter passages and operating the valves? Garth |

|

|
|
Jun 19th, 2019, 13:42
|
#12 |
|
Premier Member
Last Online: Yesterday 09:22
Join Date: May 2012
Location: Lakenheath
|
The 6-pot lump in the Healey is a very different kettle of fish to the white block 3.0 Garth.
I'm not sure on the white block if there's a way of priming the oil system in advance like you describe, usually the idea is remove the plugs and give it several short bursts on the starter until the oil light goes off. The other thing is i think it has coil pack ignition on the white block, running those (even in short bursts) without plugs could be detrimental to their lifespan. Thing is, if you've got some sticking tappets, the only way is with a long, hard, fast run with something "extra" in the oil, whether it's HLA treatment or synthetic ATF just to get things started and then regular use throughout the rev range to continue the job.
__________________
Cheers Dave Next Door to Top-Gun with a Honda CR-V & S Type Jag  Volvo gone but not forgotten........ Volvo gone but not forgotten........
|
|
|
|
|
Jun 20th, 2019, 15:14
|
#13 |
|
VOC Member
Last Online: Apr 12th, 2024 13:08
Join Date: Aug 2006
Location: Hounslow West London
|
Thanks Dave, my thoughts are the same.
I have been looking at my spare 2.9 head and I don't know if you have had the opportunity to look carefully at the tappets. With the tappet cover off and the cams removed, you have full access to the 24 hydraulic lifters. As this head has been carefully oiled and covered up for about 15 years, I would expect to be able to push a tappet cylinder down a little (about 5mm) against the tappet piston spring and for it to come back up again. This I can do but there are about 5 tappets that I can't move and from checking how much of the piston is "up" it looks as if the stuck tappets are all stuck in the "up" position. Am I right in thinking that all the parts of a tappet are made of metal (i.e. no "O" rings etc) and therefore I can try a little gentle heat to see if I can get it to free? Garth |
|
|
|
| The Following User Says Thank You to mjk164 For This Useful Post: |
|
Jun 20th, 2019, 15:25
|
#14 | |
|
Experienced Member

Last Online: Yesterday 22:03
Join Date: Jun 2007
Location: L/H side
|
Quote:
__________________
|
|
|
|
|
| The Following User Says Thank You to Clan For This Useful Post: |
|
Jun 20th, 2019, 15:53
|
#15 |
|
Premier Member
Last Online: Yesterday 09:22
Join Date: May 2012
Location: Lakenheath
|
Good question Garth. Some hydraulic tappets have rubber in, others don't or at least that's been my experience.
I'd be reluctant to try heat regardless though, if there is oil that has gummed up and that's causing the sticking, heat could carbonise it and make it worse and then impossible to free. Also the springs inside the tappet are going to be tempered when new, heating them could detemper them rendering the tappet useless. 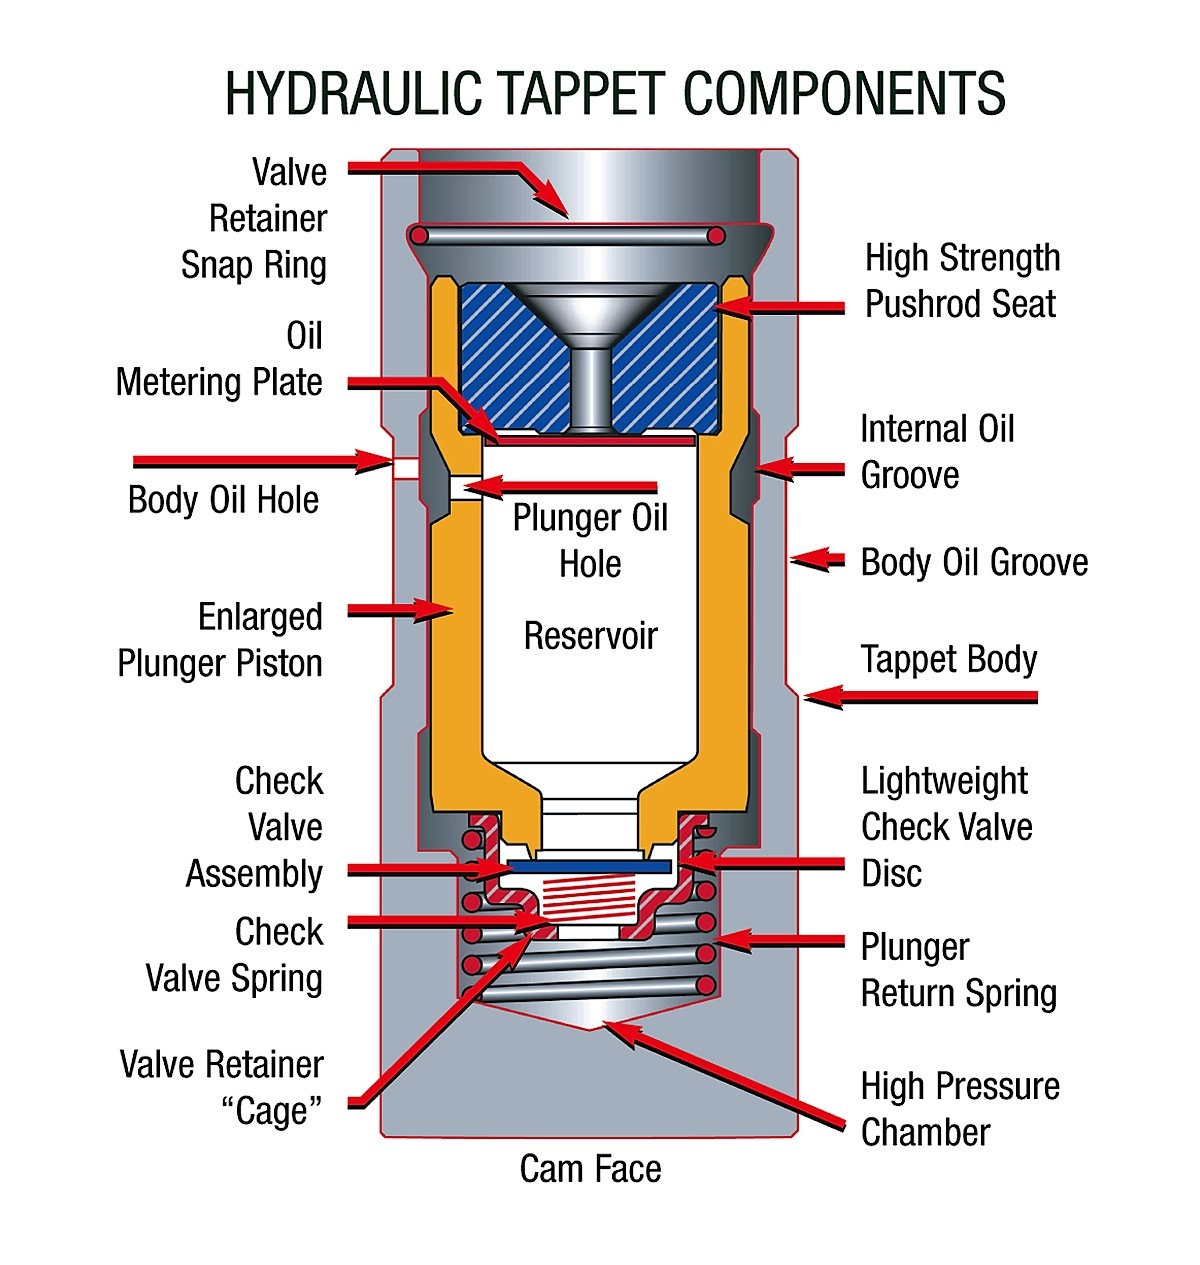 Pretty picture there of a hdraulic tappet, the check valve is the bit most likely to have rubber in/on it, many moons ago i pulled a hydraulic lifter apart to see what made it tick (or not tick as it really was) and that had a rubber disc bonded to the bottom of the check valve disc. Think it was a GM CIH engine from memory but might be wrong. Many different manufacturers do things differently so unless you destroy one to find out, there's no way of knowing so i'd err on the side of caution and play it safe - leave the hot burny thing alone!  As for the tappets sticking in your spare head, i'd hazard a guess they'd soon move under normal use or a bit more pressure. Having a quick look on Wiki to see if there were any useful pictures/diagrams, it mentions the use of a vice to help drain oil out of a tappet : https://en.wikipedia.org/wiki/Hydraulic_tappet Might give you a bit more of an idea what's going on in there. You can see why i like ATF for cleaning these beasties out! 
__________________
Cheers Dave Next Door to Top-Gun with a Honda CR-V & S Type Jag Volvo gone but not forgotten........
|
|
|
|
|
Jun 20th, 2019, 19:27
|
#16 |
|
VOC Member
Last Online: Apr 12th, 2024 13:08
Join Date: Aug 2006
Location: Hounslow West London
|
Thanks Clan and Dave for that.
As new ones are about £7 each, replacement is the answer for any that appear not to function properly. I'm not there yet as am still giving the AFT time to see what happens; but just planning ahead. Garth. |
|
|
|
| The Following User Says Thank You to mjk164 For This Useful Post: |
|
Jul 11th, 2019, 11:50
|
#17 |
|
VOC Member
Last Online: Apr 12th, 2024 13:08
Join Date: Aug 2006
Location: Hounslow West London
|
Dave, I have the head off now and its clear that 1 off no.2 cylinder exhaust valves is badly burnt and I can replace it from my spare 960 head. The seat is fine.
My question:- the valves seals, in the gasket set there is a set of stem seals (24). I assume they sit around the exposed part of the valve guide...so to get them out means some quite firm action since my engine has done about 380k miles. Is that right? My car is 1993 960. Thanks. |
|
|
|
| The Following User Says Thank You to mjk164 For This Useful Post: |
|
Jul 11th, 2019, 12:51
|
#18 | |
|
Premier Member
Last Online: Yesterday 09:22
Join Date: May 2012
Location: Lakenheath
|
Quote:
Given the fact they've been in a lot of miles, the valve guide seals might well be hard now so may need a bit of "persuasion" to remove. One method i've used in the past is an open end spanner just big enough to fit under the seal and snugly on the valve guide itself then lever up. You will need to lap the replacement valve in, to be honest if you're replacing all the valve guide seals, it would be worth giving the other valves a lap as well, just to make sure they're still seating nicely. Also worth cleaning the valves themselves with a rotary brush in a drill (or bench grinder - 6" and bigger rotary wire brushes are available for angle grinders fairly cheaply, gives a good finish quickly and easily) to remove the carbon and polish them up with some Solvol Autosol or similar. Lap each valve in first with coarse then fine carborundum paste, cleaning all traces of the paste after, fit the new valve guide seal with a splash of oil, refit the spring, cap and collets and move on to the next valve. Might take a bit longer but well worth it! While the head is off, get it checked for flatness and skimmed if necessary, also checked for anything else the machine shop can offer within reason, just to make sure you're not throwing a lot of work at a cracked head or something silly.
__________________
Cheers Dave Next Door to Top-Gun with a Honda CR-V & S Type Jag Volvo gone but not forgotten........
|
|
|
|
|
|
Jul 11th, 2019, 13:37
|
#19 |
|
Premier Member
Last Online: Dec 28th, 2022 12:25
Join Date: Jun 2009
Location: Mercville
|
Going back to Clans first post......a well known fault with this engine was the inlet manifold gasket of which the original was coloured Pink ....i would of thought all were done by now but if someone sells old stock don`t get the Pink one as the updated one is Green and does not cause problems.
In my opinion the practice of priming an oil pump is really just OTT as if you have stripped an engine down when re-building the bearing shells and pistons etc. in fact all moving parts should be assembled with the correct oil or STP and this procedure withstands the first startup. Don`t forget to start up with no coolant in for a minute so you know it runs ok before adding the coolant?
__________________
 Mercedes C320CDI Sport Estate 3 litre V6 7 Gear Auto Remap 290bhp 628Nm torque @ 1600revs 45.1mpg |
|
|
|
| The Following 2 Users Say Thank You to 960kg For This Useful Post: |
|
Jul 11th, 2019, 14:36
|
#20 | |
|
Premier Member
Last Online: Yesterday 09:22
Join Date: May 2012
Location: Lakenheath
|
Quote:
Again, run it up to temperature as per the instructions on the flush (each seems to differ slightly) and allow to cool again. Then remove the top hose and thermostat, refitting the 'stat housing without the 'stat inside. Refit the top hose to the 'stat housing but NOT to the radiator. Insert the garden hose into the "free" end of the top hose and turn the hose on, leave for at least half hour or until the water runs clear. This will back-flush the system completely and is mainly just water at this point. Once it runs clear, switch the hose off, remove it and refit the 'stat and top hose. Remove the bottom hose from the rad to drain the water from most of the system - some will remain. Refit the bottom hose and now add the correct amount of concentrated antifreeze to the cooling system, topping up with water as necessary. Refit the cap on the expansion tank, run the engine to temperature and allow to cool. Check the level again once cool, topping up with water as needed - don't forget the right amount of antifreeze is already in there. Keep an eye on the coolant level for a few days, it shouldn't alter appreciably but may need a little more water once the air locks purge themselves completely. For those about to scream that you can't put cooling system flush down the drain, most are based on caustic soda, the same stuff used for drain cleaner. Some modern ones use a more natural mix of other things that are safe to go down the drain. The rest should be just plain water.
__________________
Cheers Dave Next Door to Top-Gun with a Honda CR-V & S Type Jag Volvo gone but not forgotten........
|
|
|
|
|
| The Following User Says Thank You to Laird Scooby For This Useful Post: |
|
| Currently Active Users Viewing This Thread: 1 (0 members and 1 guests) | |
| Thread Tools | |
| Display Modes | |
|
|


 Linear Mode

