

|
|||||||
| 850 / S70 & V70 '96-'99 / C70 '97-'05 General Forum for the 850 and P80-platform 70-series models |
 Information
|
|
New pride & joyViews : 76197 Replies : 301Users Viewing This Thread : |
 |
|
|
Thread Tools | Display Modes |
|
|
#281 |
|
Premier Member
Last Online: Yesterday 22:48
Join Date: Jan 2011
Location: Horne (Nr. Horley)
|
So, a few posts ago I noted that I needed to do the PCV system on this car, life is manically busy but I finally - eventually - managed to get around to doing the job.
So here goes: The kit of parts (around £100 all in) had arrived from FRF Swansea some time ago, and I'd already bought a couple of cans of new oil and a filter, so all ready to go. Here is the engine bay before I started: 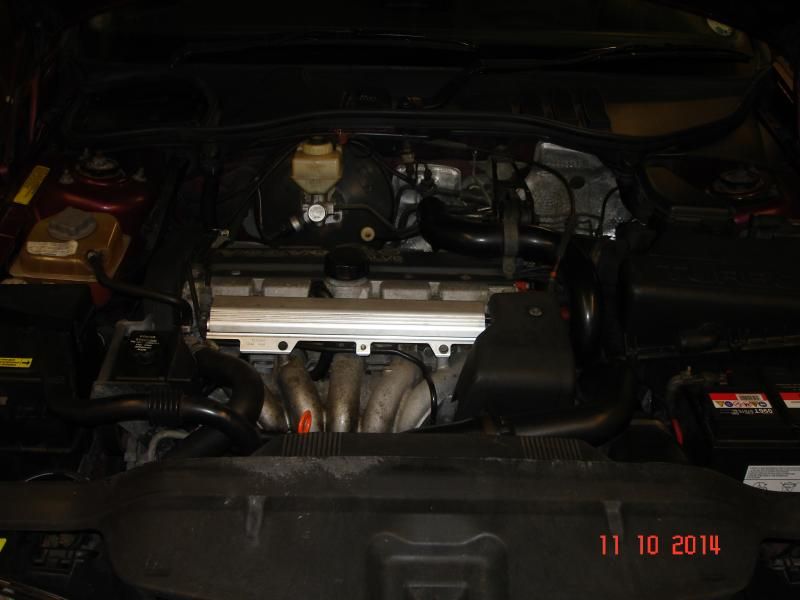 There are a couple of excellent guides in the articles section on here, which I read and absorbed before I started, and I'd also gathered a couple of pictures/diagrams of the PCV system, routing of tubes etc. which I printed out and had to hand as I went along. I started by disconnecting the negative terminal of the battery and draining a couple of pints of coolant, then removing the top left radiator hose in order to give better access. Other than that, I just started removing things as I went, knowing that the objective was to remove the inlet manifold. Here we are with the inlet manifold removed - you can see the gunky components of the PCV still attached: 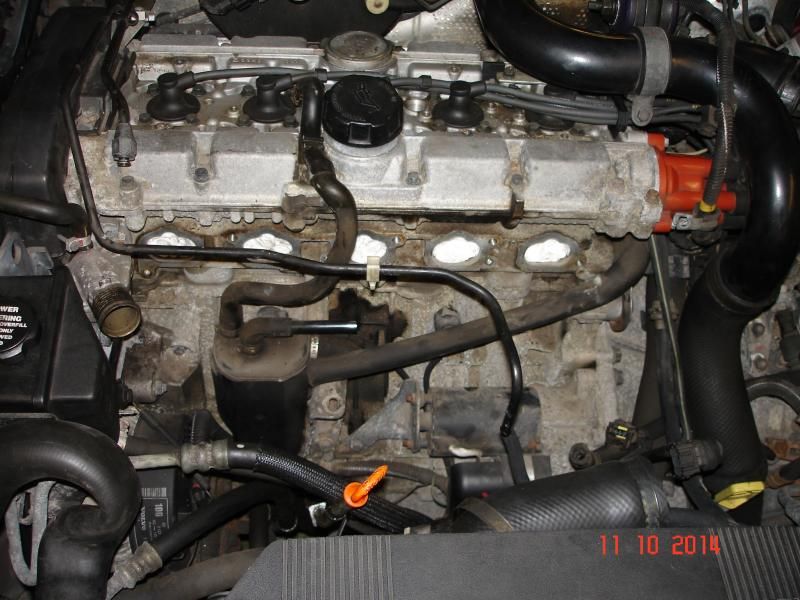 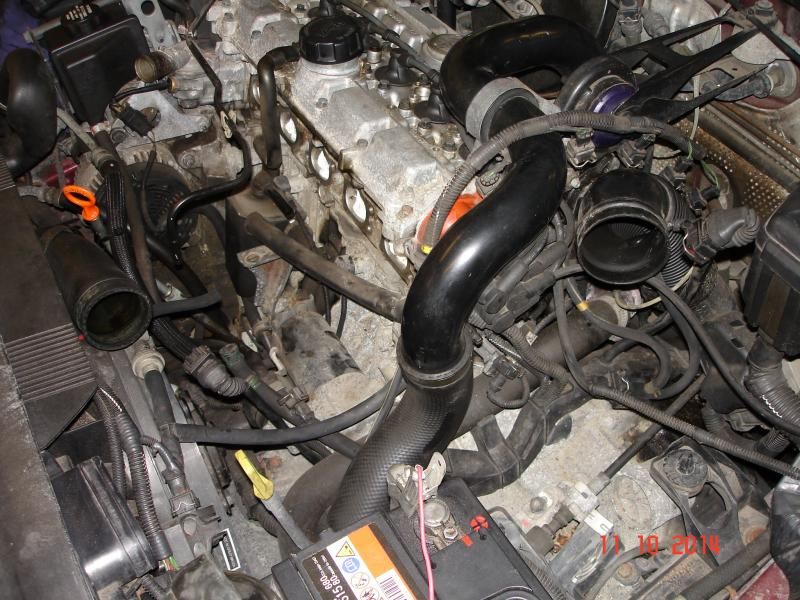 There is a lot said about the difficulty in getting to the lower inlet manifold bolts, in fact I found that the far left one under the thermostat houseing was quite easy, the far right one was more difficult but they all came out without any major drama. However, you do need a long socket extension bar (around 10" or more is ideal) and a wobble-joint adaptor. I found that 1/4" sockets and bars were easier to work with, but 3/8 would probably do the job. I managed to get the black metal fuel pipe out from under the fuel injector rail, so I left the injctor rail attached to the inlet manifold throughout the job, as I don't have any spare O rings for the injectors and I'd guarantee that one or more would be damaged if I tried to remove the injector rail. Only real hassle was that in order to get better access, I decided to remove the throttle cable drum and mechanism, along with the associated tubing, idle valve and vacuum tree. There's one 10mm bolt holding the vacuum tree in, and it snapped, so I had to put the whole inlet manifold on the pillar drill and drill it out and re-tap the hole - worked fine after that though. I then cleaned the front of the engine and the inlet manifold as thoroughly as I could, using paraffin and brake cleaner spray. Here's the new PCV kit starting to go back in: 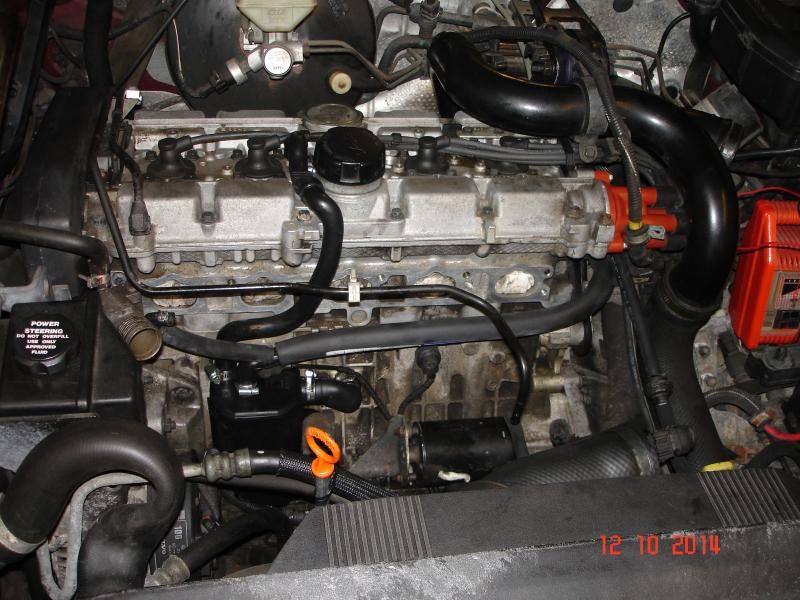 It was quite scary at this stage seeing buts of Volvo all over the workshop and a huge hole where the intake manifold used to be, and there were a good few vacuum pipes and electrical connectors dangling around, I was just hoping and praying that I'd remember where they all came from, although I did take a couple of extra close-up photos just in case! I didn't need them though, I found it was actually quite easy and good fun putting it all back together again with the new bits - the kit from FRF was spot-on, although I decided not to use the crimp-on hose clips they supplied, and used traditional jubilee clips instead. I have a tool for crimping the Volvo clips, but there's not really room to use it in most of the places you need it, and I prefer to be able to easily take the hoses off again if needed. While I was working on it I stuffed clean kitchen roll into the various oil and intake orifices to keep muck out, but with the wadding removed you can see my nice shiny inlet valves - not bad for over 150,000 miles eh? 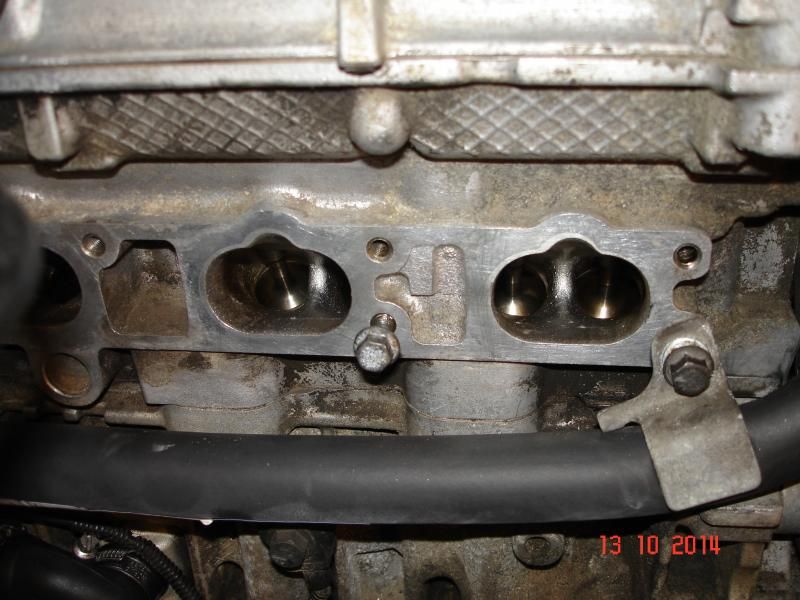 And here we are with the inlet manifold back on. The only additional hose I replaced was one running from near the radiator to the back of the engine on the turbo intake, it has a one-way valve in it and was looking a bit crusty - I had a piece of suitable hose on the shelf os I used that and it seemed to work OK. 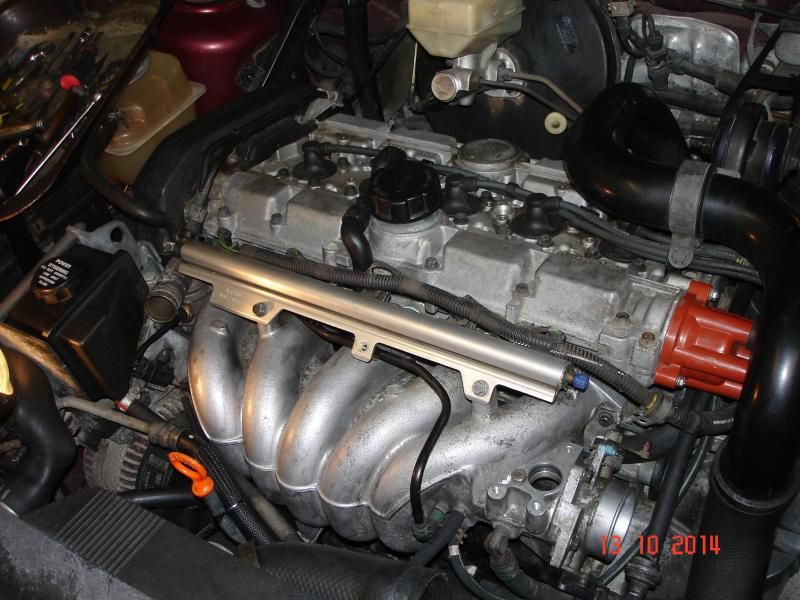 Another evening saw the rest of the stuff put back on, and an oil change completed (with new filter) and we end up back where we started - but the engine looking a little cleaner! 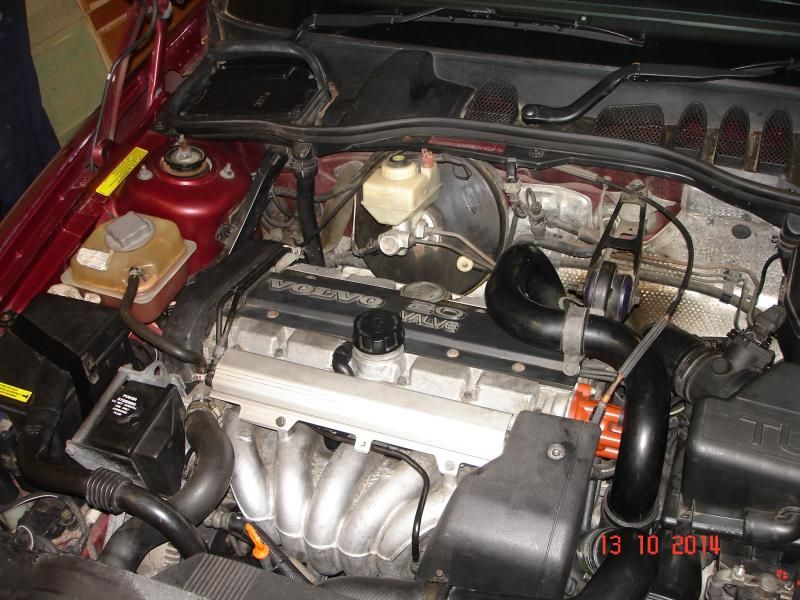 Final job was to cut the old PCV seperator in half with a hacksaw to see what it looked like, here it is: 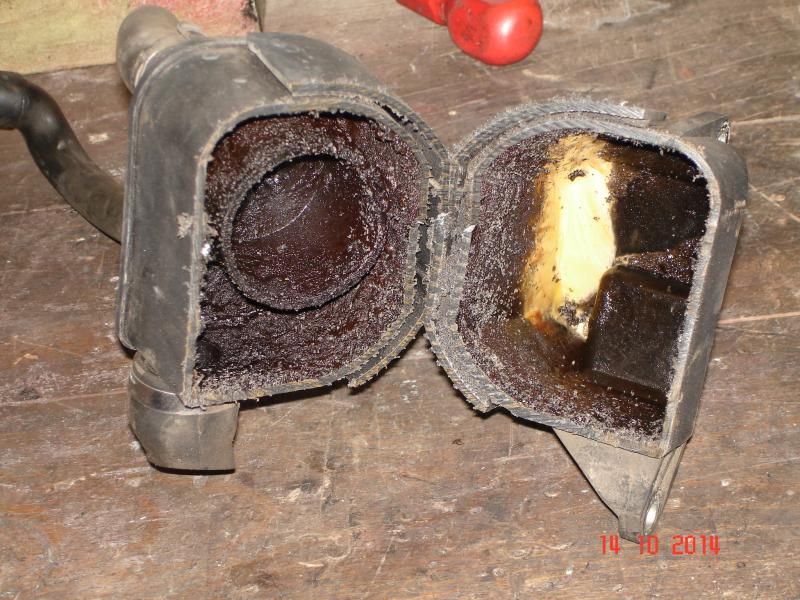 Not completely blocked by any means, in fact I didn't find any hoses that were totally blocked from what I could see, but they were pretty mucky so I didn't check by trying to blow them through. However, I 've no doubt that the job was well due to be done, especially as I mainly do lots of short journeys in this car, which can't do it much good. I have to say, that after diconnecting so many pipes and electrical connectors, I was fully prepared for some teething problems when I first started it up, but truth be told it fired up first time with no problems whatsoever, and after allowing a couple of heat cycles to bleed the coolant thoroughly it's all working 100% with no dramas, I have to admit I was quite proud of that! So, it took me one session of about 4 hours and another of about 3 to do the job, but this included some fairly time-consuming cleaning and fettling while I was in there, and also included sorting out the snapped vacuum-tree bolt in the inlet manifold, plus I'm not the fastest worker in the world! I'd say it's a fairly straightforward job so long as you are careful and methodical, and most importantly have a good selection of sockets, wobble-adapters and extension bars etc. Oh, and a magnetic bolt-retriever came in handy once! Cheers all!
__________________
Some people are like Slinkies, they serve no useful purpose but they still bring a smile to your face when you push them downstairs. Last edited by Luxobarge; Oct 20th, 2014 at 12:37. |
|
|

|
| The Following 8 Users Say Thank You to Luxobarge For This Useful Post: |
|
|
#282 |
|
Premier Member
Last Online: Apr 28th, 2023 19:21
Join Date: May 2013
Location: hertfordshire
|
Well done buddy. That's another fit and forget job which wont need doing for another 150k

__________________
2005 C70 2.4 GT Conv (LP Turbo) 2008 Seat Ibiza FR 1.9 Tdi "When I die, I want to go peacefully like my Grandfather did, in his sleep -- not screaming, like the passengers in his car". 
|
|
|

|
| The Following User Says Thank You to krussel For This Useful Post: |
|
|
#283 |
|
Member
Last Online: May 5th, 2024 21:50
Join Date: Oct 2014
Location: Isle of Skye
|
I've still got this job ahead of me on my 10v 2.5, but I have "fond" memories of pulling an inlet manifold off a 440 (towards the bulkhead on that one); albeit a Renault engine, it seems to share a common thread with the other Volvo inlet manifold fixings - no access for even a 1/4" drive on some studs.
|
|
|

|
|
|
#284 |
|
Senior Member
Last Online: May 24th, 2016 14:11
Join Date: Dec 2002
Location: Romford, U.K.
|
Hi Luxobarge
Thanks very much for that!! Very informative, as usual....!! And your baby STILL looks great on the inside, yes!!! Reevo Quote:
__________________
Reevo Anders 1994 2.0L 20v 850SE Manual, 206000miles, no mods (EX!!) 1994 2.4L 10v 850SE Auto, 47000miles, no mods 2009 Renault Clio III, 1.2 16V, 52000 miles (ex: 1985 2.3L 740GL, 266000miles, no mods) |
|
|

|
| The Following User Says Thank You to reevoanders For This Useful Post: |
|
|
#285 |
|
Premier Member
Last Online: Yesterday 22:48
Join Date: Jan 2011
Location: Horne (Nr. Horley)
|
OK, so during the week I popped out in the car first thing in the morning when it was quite icy, and when I started it up there was a very noticeable metallic whirring noise from the engine bay. I did the journey expecting it to be cold-related and therefore disappear but it didn't, so lifted the bonnet when I got home but couldn't see anything particularly amiss. Still whirring like a good'un though, going up and down with engine speed, so I thought I'd better investigate further.
I thought that the primary suspect was the auxiliary belt tensioner pulley and/or idler, so I ordered up both from PFV (about £45 delivered). I could have ordered a complete tensioner, but there's always the possibility of getting the wrong one, and it's a lot more expensive and I'm sure there's nothing wrong with the tensioner itself, just knackered bearings (probably original and done 152k now) so I ordered just the pulleys on their own. However, I couldn't be certain of this diagnosis so I also ordered a mechanic's stethoscope - holding one end of a screwdriver against your ear and the other end against the engine component works pretty well, but nothing like as good as a proper stethoscope and it was only a tenner delivered. So today I had another look, and sure enough the stethoscope seemed to indicate that my diagnosis of tensioner pulley was correct. I can strongly recommend the use of the stethoscope by the way, really excellent bit of kit. I also put my aux belt tensioner pull-back tool on it and released the tension while the engine was running enough to stop the belt rotating, and sure enough the noise completely stopped, so I was pretty sure I was on the right track. So, first I drew a diagram of the belt run so I wouldn't spend ages working it out later and then off with the belt, then off with the tensioner assembly (2 x 12mm bolts) and into the workshop to swap the pulley over, it's held on with a single T40 torx bolt, so no problem there. While the belt was off it was easy to check for any roughness in the aux belt idler pulley too, and although it probably wasn't making the noise I could hear it did feel a little rough so I decided to change that too. A bit of a fiddle getting your hands down the narrow gap, but after prising off the conical cover over the centre of the old one another single 12mm bolt and it's off, a little bit of fiddling to get the new one to line up with the bolt hole and it's back on again, 5 minutes work. Then back on with the main tensioner assembly, again a bit of a fiddle to get the lower bolt in but nothing too hard, tighten it all up and pop the belt back on - again, a bit fiddly but not too hard at all in the grand scheme of things. Started it up again and the engine is now running as sweet as a nut, very quiet and sounding exactly as Volvo intended. An hour and a half, including taking my time and coffee breaks, and a great result at the end of it, so yet again I'm chuffed with me Volvo - hopefully good for another 150k miles! I'm glad I did this job as soon as I heard the noise, because if the pulley let go completely it's quite possible that the belt could go wild and damage the cam belt, with amusing consequences, so definately a case of "a stitch in time" as they say. No photos of this today, but if anyone has any questions then fire away. Cheers!
__________________
Some people are like Slinkies, they serve no useful purpose but they still bring a smile to your face when you push them downstairs. |
|
|

|
| The Following 4 Users Say Thank You to Luxobarge For This Useful Post: |
|
|
#286 | |
|
Senior Member
Last Online: May 24th, 2016 14:11
Join Date: Dec 2002
Location: Romford, U.K.
|
Hi Luxobarge
Thanks very much for that light-hearted, yet very informative, post. A question: is it only possible to swap the tensioner-pulley with the unit out of the car? I ask because working space with it still in seems an impossibility? Thanks. Reevo Quote:
__________________
Reevo Anders 1994 2.0L 20v 850SE Manual, 206000miles, no mods (EX!!) 1994 2.4L 10v 850SE Auto, 47000miles, no mods 2009 Renault Clio III, 1.2 16V, 52000 miles (ex: 1985 2.3L 740GL, 266000miles, no mods) |
|
|
|

|
|
|
#287 |
|
Aged Volvo Lover
Last Online: Sep 16th, 2021 10:19
Join Date: Jan 2011
Location: A place in mendip-land famous for its cheese - and its gorge
|
It's nice that you keep us up to date on your car!
I envy you your skills and patience and that nice garage to work in! But I suppose I've got to that stage where my skills and physical ability ain't up to a lot of those sort of things anyway - but sure as heck like reading about them so that I know what to expect when I pay a visit to my local (and extremely good) indy
__________________
Our children don't inherit the world from us. We are borrowing it from them. |
|
|

|
|
|
#288 | |
|
Premier Member
Last Online: Yesterday 22:48
Join Date: Jan 2011
Location: Horne (Nr. Horley)
|
Quote:
I guess it might be possible to do the job with the tensioner assembly still in the car but I can't for the life of me think why you'd want to do that. The belt has to come off either way of course, and removing the whole tensioner is only two 12mm bolts, and the access to these is far better than the access to the T40 torx in the centre of the idler pulley would be, so it's probably much easier to take it out. Also, when you undo the torx bolt the tensioner arm moves against its spring, which would make it more tricky and frustrating if you did it still attached to the car. Out of the car you can grip the moving part of the tensioner in a vice and undo the torx bolt nice n'easy. Cheers!
__________________
Some people are like Slinkies, they serve no useful purpose but they still bring a smile to your face when you push them downstairs. |
|
|
|

|
|
|
#289 |
|
Premier Member
Last Online: Yesterday 22:48
Join Date: Jan 2011
Location: Horne (Nr. Horley)
|
Thanks for the kind comments Chris - it honestly wasn't a hard job at all. Actually I do have a ncie garage, but it was full of Jaguar that day, so I did this job outside where the Ovlov normally lives and I can tell you it was friggin' cold. At least running the engine for a while to do the diagnosis meant that the engine bay was warm.....
__________________
Some people are like Slinkies, they serve no useful purpose but they still bring a smile to your face when you push them downstairs. |
|
|

|
| The Following User Says Thank You to Luxobarge For This Useful Post: |
|
|
#290 | |
|
Senior Member
Last Online: May 24th, 2016 14:11
Join Date: Dec 2002
Location: Romford, U.K.
|
Yes, makes sense....
Thanks again. All the best. Reevo Quote:
__________________
Reevo Anders 1994 2.0L 20v 850SE Manual, 206000miles, no mods (EX!!) 1994 2.4L 10v 850SE Auto, 47000miles, no mods 2009 Renault Clio III, 1.2 16V, 52000 miles (ex: 1985 2.3L 740GL, 266000miles, no mods) |
|
|
|

|
 |
| Currently Active Users Viewing This Thread: 1 (0 members and 1 guests) | |
|
|