
|
|||||||
| 700/900 Series General Forum for the Volvo 740, 760, 780, 940, 960 & S/V90 cars |
 Information
|
|
Chris1Roll's return to 700 ownershipViews : 12671 Replies : 145Users Viewing This Thread : |
 |
|
|
Thread Tools | Display Modes |
 Jul 23rd, 2023, 15:07
|
#81 | |
|
Premier Member
Last Online: Yesterday 23:31
Join Date: May 2012
Location: Lakenheath
|
Quote:
An old felt tip pen could sacrifice its body in a similar way as well. 
__________________
Cheers Dave Next Door to Top-Gun with a Honda CR-V & S Type Jag  Volvo gone but not forgotten........ Volvo gone but not forgotten........
|
|

|

|
| The Following 3 Users Say Thank You to Laird Scooby For This Useful Post: |
|
Jul 23rd, 2023, 16:44
|
#82 | |
|
Go redblock or go home

Last Online: Yesterday 21:29
Join Date: Feb 2012
Location: UK
|
Quote:
Just found that so maybe every single one I've seen has been completely missing then! |
|
|
|
|
| The Following 4 Users Say Thank You to 360beast For This Useful Post: |
|
Jul 23rd, 2023, 17:00
|
#83 | |
|
Premier Member
Last Online: Yesterday 23:31
Join Date: May 2012
Location: Lakenheath
|
Quote:
 With Rover SD1 using plastic (PVC?) they lasted longer but were often thicker so when they went, gear selection became a real problem!  Volvo would probably have done it more with NVH in mind than Rover did on the SD1, they would have settled for some noise and vibration from the selector and a bit more life from the bushes. All a compromise! Just rose-joint them and have done! 
__________________
Cheers Dave Next Door to Top-Gun with a Honda CR-V & S Type Jag Volvo gone but not forgotten........
|
|
|
|
|
| The Following 4 Users Say Thank You to Laird Scooby For This Useful Post: |
|
Jul 24th, 2023, 14:31
|
#84 | |
|
Senior Member
Last Online: Jun 4th, 2024 15:55
Join Date: Aug 2006
Location: Cannington
|
Eh, Houston we have a problem.
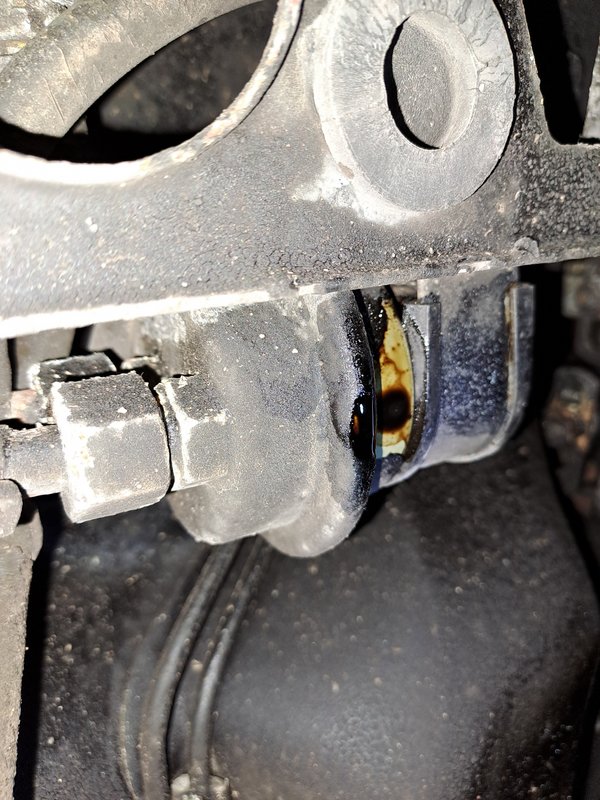 Leaking from the fuel accumulator where it is crimped together. When I was under there the underseal on it looked gooey - knowing that it stays sticky indefinitely after it has got petrol on it, I cleaned it off, ran the car for 10 minutes and it stayed bone dry. All good I thought, probably just from the last filter change. Yesterday we went for a cinema and subway trip, and when we got back something just made me take another look. Apparently it wanted to leak then. Definite fail for any fuel leak so I guess I'll be pushing the MOT back.  VIDA says part number 462547. I'll try and get the bosch number off it tonight but from seaching so far it doesn't look like there is any UK stock, which is a bit of a pain. Loads in Lithuania for some reason?  Ah well, thats what comes from putting low mileage old cars into regular service I guess. Quote:
There should defintely be bushes on mine, the slop isn't in the adjustable parts, it's where the bushes belong on the linkage. In gear, you can wiggle the shifter back and forth enough to make the indicator disappear. Last edited by Chris1Roll; Jul 24th, 2023 at 14:44. Reason: Clarity and Correction |
|
|
|
|
| The Following 5 Users Say Thank You to Chris1Roll For This Useful Post: |
|
Jul 24th, 2023, 22:26
|
#85 |
|
Senior Member
Last Online: Jun 4th, 2024 15:55
Join Date: Aug 2006
Location: Cannington
|
Neighbours must think I'm insane.
Not content with rolling around under it in the drizzle on Saturday, I've just been out in the dark with a torch under it scraping all the crud off the accumulator. Bosch part number is 0 438 170 001. Oof, they are awfully expensive for a tube with a diaphragm and a spring in it! No UK stock means the shipping is a bit of a killer too. Found this, with part number lookups etc in it: https://www.bosch-classic.com/de/med...icher_2017.pdf After a bit of cross-referencing, I've found one listed under it's VW Part number, for a reasonable amount less than the others listed under the Volvo or Bosch number - plus shipping from Germany, should be here early next month - that will have to do. It seems to be an intermittent leak - after an hour today, it was still bone dry (but of course these things never get better). I popped into the garage on the way past, ostensibly to cancel the MOT, but his recommendation is to put it in, if its dry when tested its a pass, if anything else is wrong I have more time to get other parts etc, so I've left it for Thursday for now. |
|
|
|
| The Following 4 Users Say Thank You to Chris1Roll For This Useful Post: |
|
Jul 27th, 2023, 20:46
|
#86 |
|
Senior Member
Last Online: Jun 4th, 2024 15:55
Join Date: Aug 2006
Location: Cannington
|
Woot!
  Only the expected advisories, and the fuel accumulator stayed dry. It must be in the early stages of failure. Apparently it attracted quite a few (nice) comments when parked outside the garage. I thought it might be an idea to make a list of the jobs required/that I want to do to it over the next few months: 1) Replace Fuel Accumulator - On its way. Might as well do filter at the same time. 2) Replace Distributor Seals and clean the mess it has made. 3) Balance Wheels - booked in for Tuesday 4) Complete some more gearbox drain and fills. 2 done so far. 5) Replace shifter linkage bushings. 6) Grind out rust on rear wheel arch inner lips, Bilt Hamber and repaint/underseal - you'll never stop it, but you can slow it down. 6) Replace crazed header tank and old grey expansion cap (preventative maintenance) 7) Replace heater control valve before winter. 8) Investigate making a working fuel guage. 9) Replace and reseal rear lights. 10) Get dent in rear wing by bootlid pressed out. (This might not happen for years tbh!) |
|
|
|
| The Following 5 Users Say Thank You to Chris1Roll For This Useful Post: |
|
Jul 27th, 2023, 21:31
|
#87 |
|
Premier Member
Last Online: Yesterday 23:31
Join Date: May 2012
Location: Lakenheath
|
Congrats on the pass!
__________________
Cheers Dave Next Door to Top-Gun with a Honda CR-V & S Type Jag Volvo gone but not forgotten........
|
|
|
|
| The Following 4 Users Say Thank You to Laird Scooby For This Useful Post: |
|
Aug 5th, 2023, 20:51
|
#88 |
|
Senior Member
Last Online: Jun 4th, 2024 15:55
Join Date: Aug 2006
Location: Cannington
|
Payday = a few more volvo parts, a busy few hours and a lengthy update to my blog.
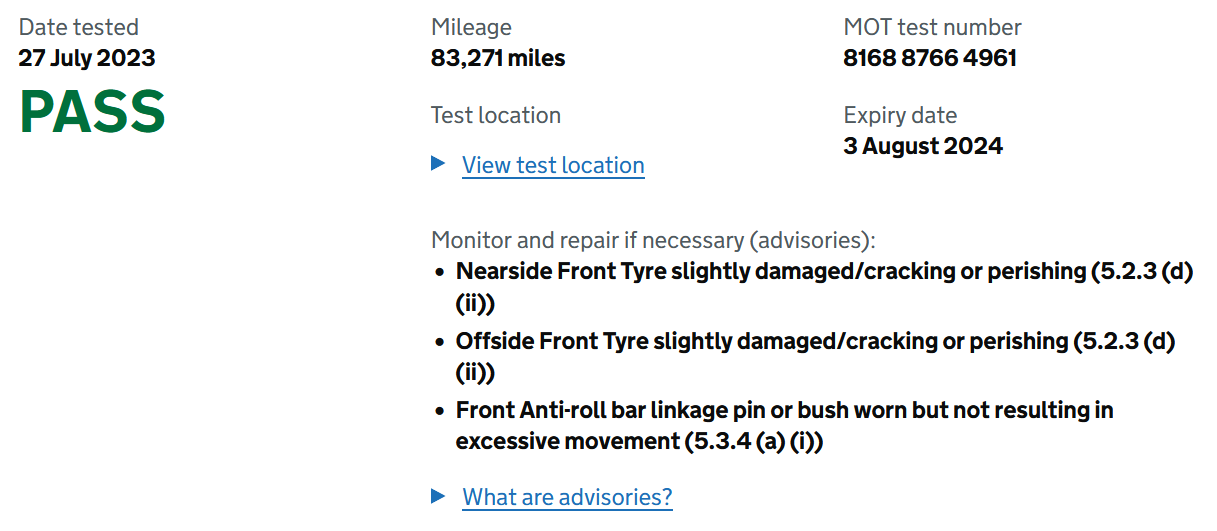
Hopefully someone might find it useful in future With a fortnight off now, I want to use the car quite a bit, so last night I made a start on ticking a few bits off the list. The fuel accumulator arrived quite quickly from Germany, and that being the most important fix to do, was what I started on first of all. To be honest I wasn't particularly relishing the thought of doing this, I've never particularly liked petrol vapours (and back when it was still 4 star or with the lead replacement additive in it, getting any on my skin would make me feel sick) and I've always got an image of it turning into the beginning of Cheech and Chongs Next Movie (incidentally, possibly the worst film I've ever watched?) In reality, it wasn't too bad, I just had a slight headache for a while. Once I had the passenger front corner up in the air and securely, I dropped the carrier down onto a support, and after a bit of fiddling managed to get the electrical connectors to the pump to come undone.  2x17 mm spanners undid the union on the engine side of the filter. I had left the car for 24 hours so there was no pressure in there. The hose clamp onto the back of the pump was never going to come undone without a fight - a phillips headed screw with no hex-head on it. I was on the verge of cutting it off and replacing the whole hose when I realised I had access to the threaded portion of the screw, and was able to undo it with a pair of grips:  And with that, the whole lot was out.  I devised a 3 spanner method for getting the unions off the accumulator. If anyone is unfamiliar with these pipes, they are rubber covered hard vinyl plastic. At the ends you can sometimes slide the rubber back enough to see the vinyl section. I have seen people use a pair of grips to prevent the union from rotating, which if you are particularly ham-fisted risks chewing into the vinyl. if you break the seal between the vinyl and the barb on the union, you pretty much won't ever be able to make it seal again so you'll be replacing the pipe. I found that a 10mm spanner fits the square end of the pipe on the accumulator and you can then use one spanner to hold the counterhold on the accumulator, one to undo the union and the 10mm to stop the pipe rotating if the union binds up on it.  I was also replacing the fuel filter, same method for undoing the unions either end of that - I think the biggest counterhold on the filter is 26mm - I had a 27mm spanner that worked just fine. One of the bolts that hold the accumulator in is slightly hidden - but you can flex everything enough on the rubber dampers to access it no problem:  The old accumulator if you tapped it you could hear the spring resonating inside, the new one this wasn't audible. I cleaned up the banjo bolts and unions a bit with some carb cleaner, then refitted the filter with new copper washers (good job I bought a selection pack from Amazon a while back). Then followed a bit of tweaking and adjusting to get the pipes all sitting nicely in terms of the rotation of the accumulator and the fore-and-aft positioning of the filter, then some more three spanner method to tighten everything back up. 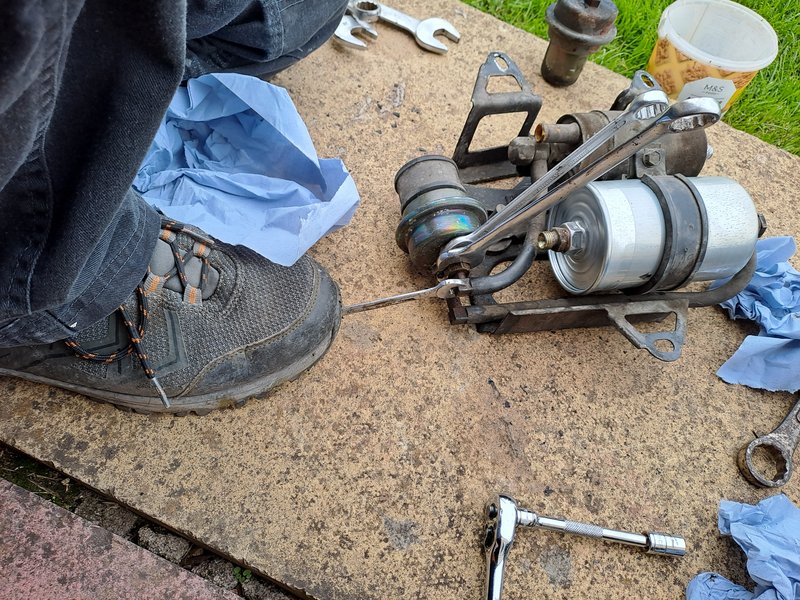 It was at this point, that I realised that I didn't have the correct size hose clamps to fit the feed to the pump:  I had intended to use a couple of the T-bar type clamps that I had left over from a job on the XC, but the hose on the 740 is much bigger than I was first expecting. Makes sense, as this side of the pump is high volume, low pressure, to ensure the high pressure pump doesn't cavitate. For reference, the outer diameter of the factory pipe is 20mm, and the diameter of the feed on the pump is 12mm. It was now abut 19:30 so no chance of getting a clamp, so I turned my attention to the gear shift bushes. I had done a bit of reading and read about people struggling to fit the hard plastic bushes into thir location and cutting them etc. It turns out there are two types, a hard plastic one and a rubbery one. Brookhouse listed both (under their 240 section) with the description intimating that one type was used at the lever end, and the other at the gearbox end. On checking VIDA, for my car it lists the same, rubbery type for both ends, so two of those were ordered - part number 381704. The hardest part of this job was getting the first circlip off, with the sun having gone behind the hill, and a torch that would not stay in the right place! It turns out, having finally managed it with a pair of long nose pliers on either 'end', that there is in fact a cut out at the rear of the circlip that a small screwdriver could have been used to pull it off. With that out of the way, I could then see the end of the shift lever.  The rubbery bush pushed in quite nicely by hand, and here is what it should look like: 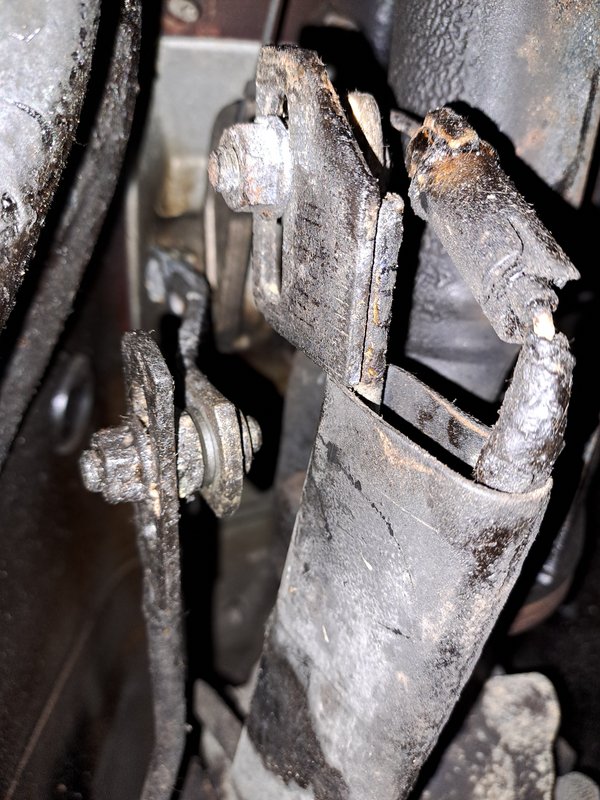 (Ok, perhaps it shouldn't be quite so oily and sticky down there, but this is what the bushed linkage shoud look like!) I found access a little tighter at the gearbox end, and ended up gently using a wide bladed screwdriver to finish pressing it in.  Oh my, what a difference. Its a shame one doesn't shift much in an auto, as it feels soooo much nicer! It also doesn't make a metallic clang sound when shifting, which I had originally put down to a characteristic of the box! The light was really fading by this point, so that was enuugh for one evening. **** After a trip to the local Mill Auto this morning for some 12-20mm jubilee clips, I could carry on and finish the fuel job. Before I hooked up the hose I thought I would check that the intank pump actually functioned. My car does not pre-prime the system (and looking at the wiring diagrams it seems that is how it is) so I have never heard it. A quick check of the wiring green book I got from 360beast told me the 12v feed to the pump was the pink wire in this connector here:  I ran a length of speaker wire driect off the battery to the pump side of that connector (once disconnected so as not to back feed anything). It pumps out quite some volume quite quickly. I then refitted the hose and new clips, and used the same method to run the in tank pump for a few seconds until I heard it change pitch, in order to fill the high pressure pump. No point running it dry for no reason. About 15 seconds or so of cranking and the engine fired up, and I could check for leaks. None were apparent. The line from the filter to the front of the car passes just above the square part of one of the accumulator unions. I could see that it had at times touched just enough to put a small divot in the rubber outer. To prevent any further rubbing, I cut another piece of hose and slipped it over filter line and cable tied it in place. While I was under it, I drained the gearbox again. Its still coming out quite brown, but I guess the new fluid is doing quite a bit of cleaning. Also the design of the pan means you can't get any debris that may be in there out without removing it, and that is not hapenning if I can avoid it! This was 63% new fluid:  Because I had just had the car running, I only got 2.2 litres out this time. Whats in there now is 74% new:  I've got it down to a fine art now, and the fluid is cheap enough that I'll probably keep going until it looks clean. Its certainly impoved the box, regardless of what it look like. Next up, replace this crazed header tank, and the old grey cap. 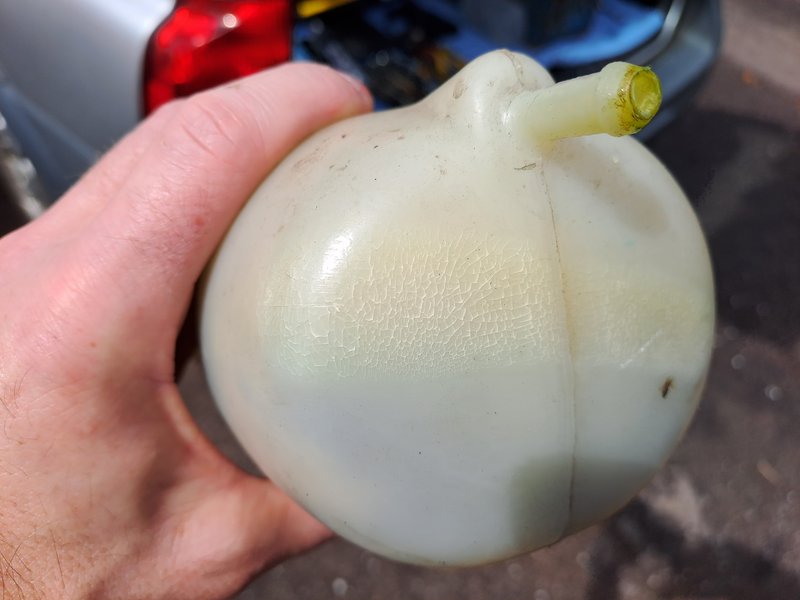 Easy to do without draining down - unmount the tank, and pour it out into a jug. keeping the hoses above the top of the rad, remove them and transfer to the new tank, and bolt it in place. Pour contents of jug into newe tank.  Genuine volvo header tank, and a second-hand genuine Volvo cap. That might sound a bit pikey, but a new one is half the price of the tank. I did buy a new febi branded cap for my C70 for about a tenner and it lasted a fortnight before it literally fell apart. A decent second hand volvo one was a fiver and will be much better quality. I had spotted that this mount for the fuel distributor was broken:  So I added one of those to the brookhouse order. I was expecting there to be a nut on the end you can't see, but it turns out that it is threaded directly into the fuel distributor. With the left hand end removed, I was able to use a pair of grips to get the remnant undone. There was just enough room to remove it. Refitting the new one was a bit trickier. With the mount on the other side of the distributor loosened off, and the 'k-jet boot' also removed, there still wasn't enough movement available to thread in the new mount. New plan - undo the bracket holding the warm-up regulator, rotate that up at the same time as pressing the fuel distributor down and thread on the mount. This worked, but hang on, have I just made myself more work? What I hadn't accounted for was that the bracket also covered up a hole in the block, where presumably the fuel pump would mount on carbed motors. complete with a very fragile looking rubber seal:  I very gingerly removed the rubber seal, very gingerly cleaned it up, very gingerly lubricated it, and very gingerly pressed it back into the recess on the bracket. Lets hope that doesn't leak!! With that done, everything was bolted back in place: 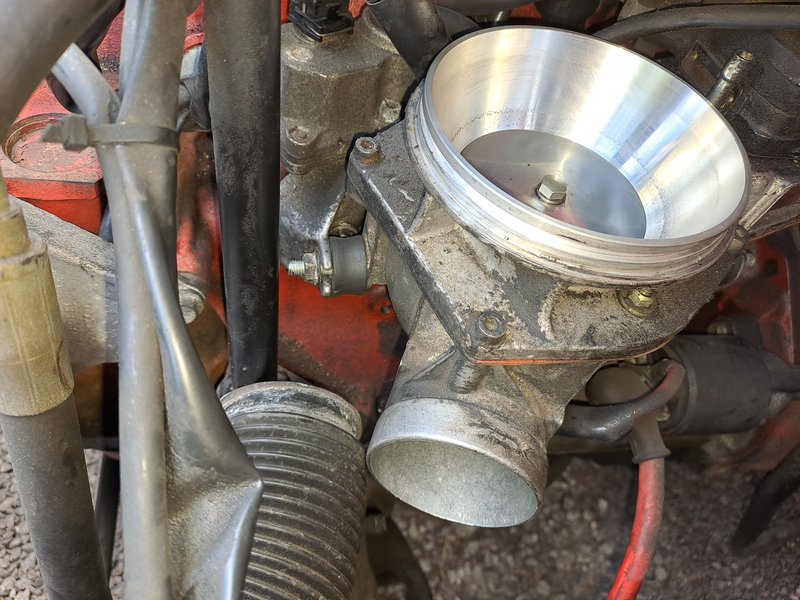 (I had given the metering plate a bit of a clean at this point, but there wasn't much on it) Last job was the distributor seals. Sticker applied before I started:  New cap and rotor arm definitely required next service!  but it is 25 years old (manufacture date of 98, and 99 on the rotor arm) With the distributor removed, I cleaned up the end of the head  Similar cleaning was performed on the distributor and the old seals removed and the new ones fitted with a little lubricant and the distributor refitted. I cleaned up the rotor arm with some 240 grit sandpaper, and cleaned the cap as best as possible with contact cleaner etc. I took it on a test drive to get some groceries and fuel, and actually it feels a bit smoother at idle. It also returned 25.2mpg over the last 200 miles. On getting back, another check of the fuel lines for leaks (although with a minimum 5 bar working pressure it would have shown itself pretty damn quickly) It also seems I have gotten away with disturbing that seal behind the warm-up regulator bracket. Reviewing/adding to the list: 1) Replace Fuel Accumulator - On its way. Might as well do filter at the same time - DONE 2) Replace Distributor Seals DONE and clean the mess it has made (Not done) 3) Balance Wheels - booked in for Tuesday DONE - apparently they were way out. It's like a different car now 4) Complete some more gearbox drain and fills. 2 done so far. 3 done now 5) Replace shifter linkage bushings. DONE 6) Grind out rust on rear wheel arch inner lips, Bilt Hamber and repaint/underseal - you'll never stop it, but you can slow it down. 6) Replace crazed header tank and old grey expansion cap (preventative maintenance) DONE 7) Replace heater control valve before winter. 8) Investigate making a working fuel guage. 9) Replace and reseal rear lights. 10) Get dent in rear wing by bootlid pressed out. (This might not happen for years tbh!) 11) Replace ARB drop links that were MOT advisories. 12) Check/adjust tracking. |
|
|
|
| The Following 6 Users Say Thank You to Chris1Roll For This Useful Post: |
|
Aug 13th, 2023, 22:35
|
#89 |
|
Senior Member
Last Online: Jun 4th, 2024 15:55
Join Date: Aug 2006
Location: Cannington
|
I bloody love this car
Some 300 miles done in it this week, with all the solid dependability I remember, and the fuel consumpton seems pretty consistent at ~25mpg. I know the 2litre Autos come in for some hate, but to be honest it's fine. It does what it does, and if you ask it to do more, it just makes more noise - but what it does is... adequate. It's been up Cheddar Gorge and Burrington Coombe, been up Blagdon Hill, sat on the motorway for 30-odd miles at a time at an indicated 70-80 (so, really 65-75  ) been up and down the hills on the North Devon link, and I've not got in anyones way or sat there jumping up and down in frustration. ) been up and down the hills on the North Devon link, and I've not got in anyones way or sat there jumping up and down in frustration.Attracted a couple of comments from people in car parks Its getting a break now as the V70XC (which seems to be fully functioning as a car again now that I have put the correct gearbox oil in it - bloody idiots, I should have done the box myself!  )takes us and the dog and the roof box off for a week . )takes us and the dog and the roof box off for a week .Another thing to add to the list - replace bulbs behind the heater controls, switches and gearshift indicator - the only bits other than the instruments that are currently illuminated are the radio, the heated rear window switch, and the belt buckles. Last edited by Chris1Roll; Aug 13th, 2023 at 22:41. |
|
|
|
| The Following 4 Users Say Thank You to Chris1Roll For This Useful Post: |
|
Sep 4th, 2023, 21:36
|
#90 |
|
Senior Member
Last Online: Jun 4th, 2024 15:55
Join Date: Aug 2006
Location: Cannington
|
Nothing much to report at the moment, as 'the list' is all non-urgent, and the 740 continues to function as intended, now approaching 2,000 miles since the cambelt incident.
(So this month I've spent some money on the major service parts for the XC instead - the spark plugs for that are damn expensive!) We had a package to drop off in Dorset at the weekend, so we did that and then went and found about 20 geocaches in the area. Lots of stopping and starting around the little lanes of Dorset. At one of them, I thought the lighting made the car look pretty good so I snapped this pic. 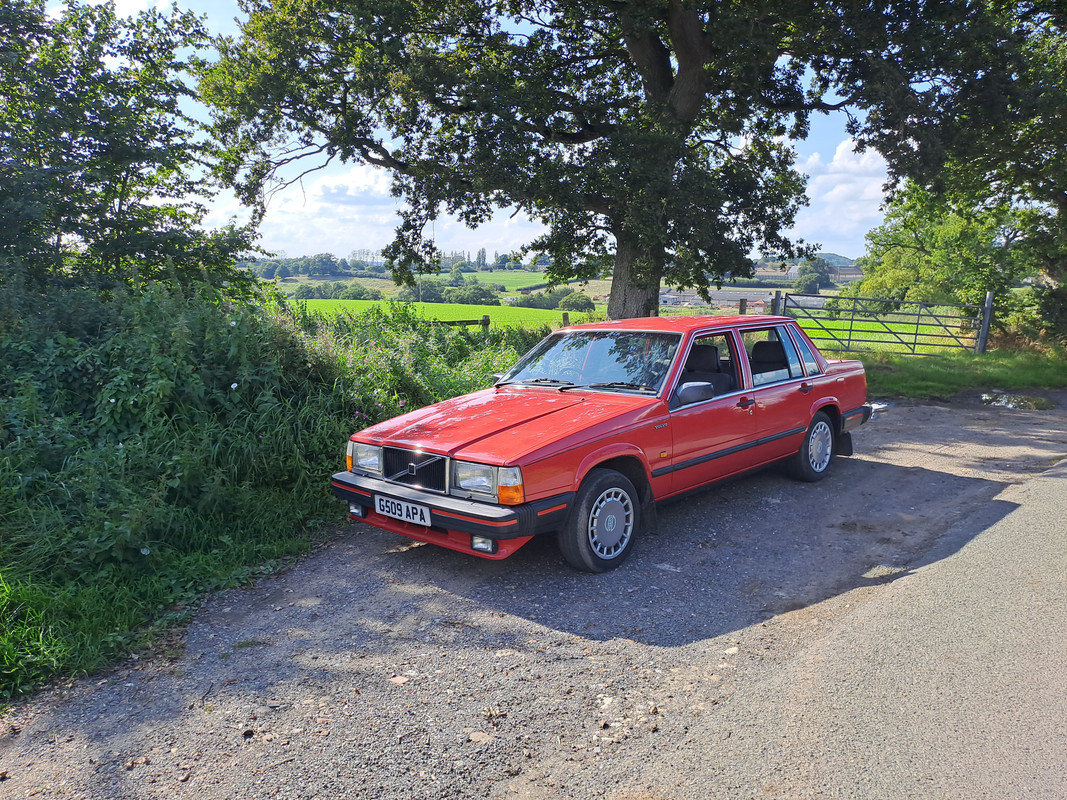 Along with that and a trip for work today It's done the best part of 300 miles in 2 days
|
|
|
|
| The Following 3 Users Say Thank You to Chris1Roll For This Useful Post: |
|
| Currently Active Users Viewing This Thread: 1 (0 members and 1 guests) | |
|
|


 Linear Mode

