

|
|||||||
| x40 S1 Articles Article posts pertaining to x40 S1 Articles series Volvos |
 Information
|
|
GUIDE: Removing headlights and headlight strip downViews : 9883 Replies : 0Users Viewing This Thread : |
 |
|
|
Thread Tools | Display Modes |
|
|
#1 |
|
Premier Member
Last Online: Oct 27th, 2020 10:45
Join Date: Nov 2011
Location: -
|
Hi all,
First guide here so go easy  I've had a few PMs recently about xenons and how to go about removing them from the car so I thought I would do a brief write up which should hopefully explain a bit. What you'll need: Headlight repair kit - IIRC around £15 - Part #30621936 for dual lens (needed if replacing gasket or broken black yaw adjuster) Flat head screwdriver Socket set Hex screwdriver heads Patience! Optional Swear jar First of all you need to make sure nothing is turned on in the car as xenons, take over 20,000 volts when powering up - Not something you want running through you! I tend to make sure the bonnet is open, car is locked, key is in my pocket and wait till the car checks it's locked. If you want to be 100% sure you're not going to get frazzled then disconnect the battery - Make sure you have your radio code though. First things first, remove the 2 power cables - There is a main cable just under the ballast and a smaller clip cable just under, that powers the motor (sorry no picture of this but it's easy to find) To remove the headlights you'll first need to undo the screw on the top edge of the headlight and remove the indicator - You only need to loosen it as the indicator slides in behind the screw. 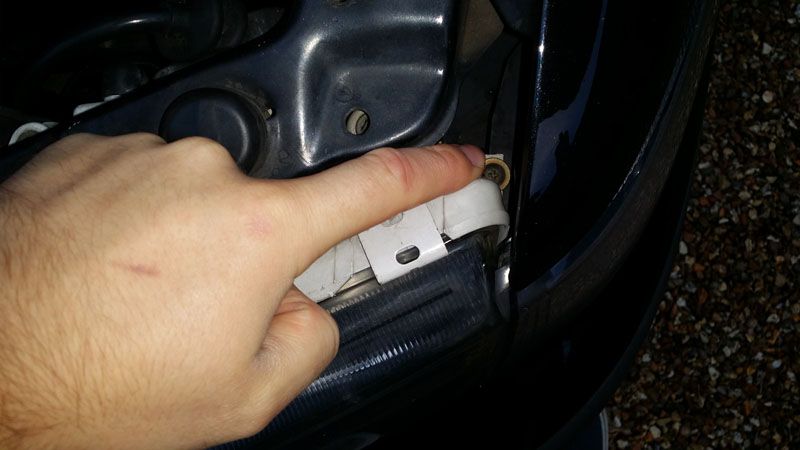 Once the screw is loosened you can pull the indicator back which'll reveal two nuts on the side that need to be undone. 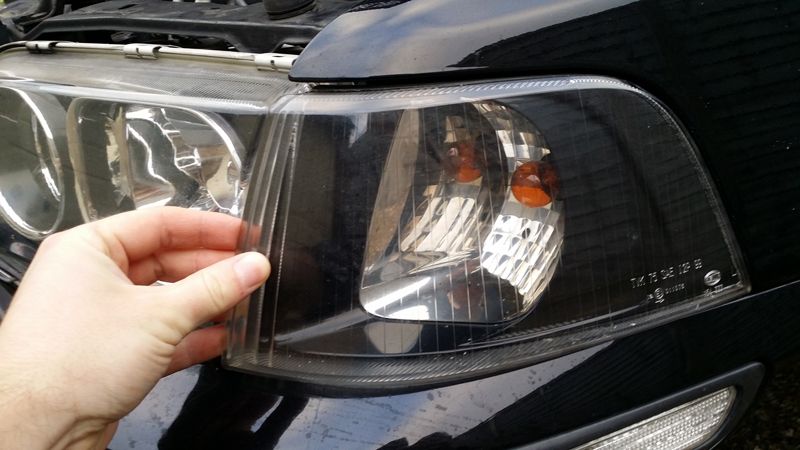 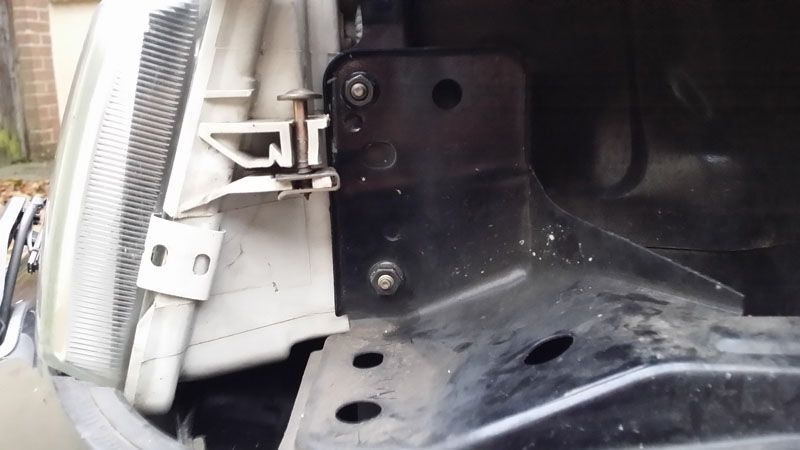 There are two more screws pointing towards the engine that also need to be undone. Take care not to drop these as you may have to jack the car up and remove the engine tray to get them back - As shown from the picture, the one circled in blue on my car is gone and was never to be found again  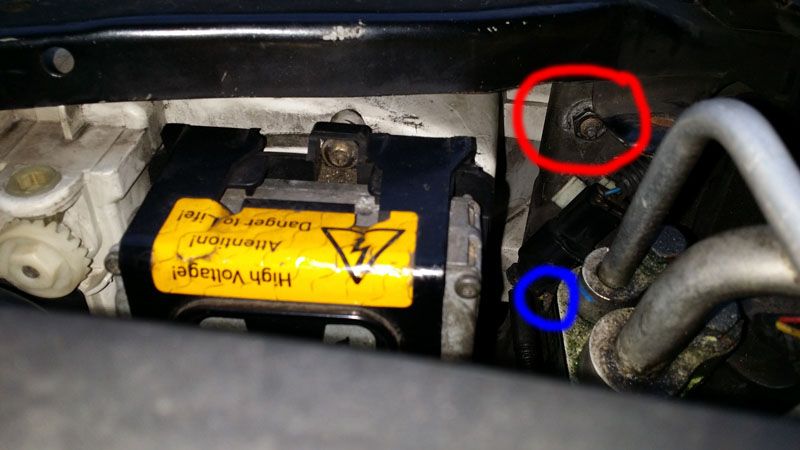 That's it! The headlight is free, now comes the tricky part. To remove the unit from the chassis you'll have to pull the unit towards you slightly so the bolts facing the engine are free from the chassis, then it's a case of gently wiggling the unit around till the bolts from the side of the chassis come free from where the indicator sits - This took me a long time to get right and lots of rude words the first time I did it. Once you've got the hang of it though, you can have the whole unit in and out in few minutes  The headlight is free! 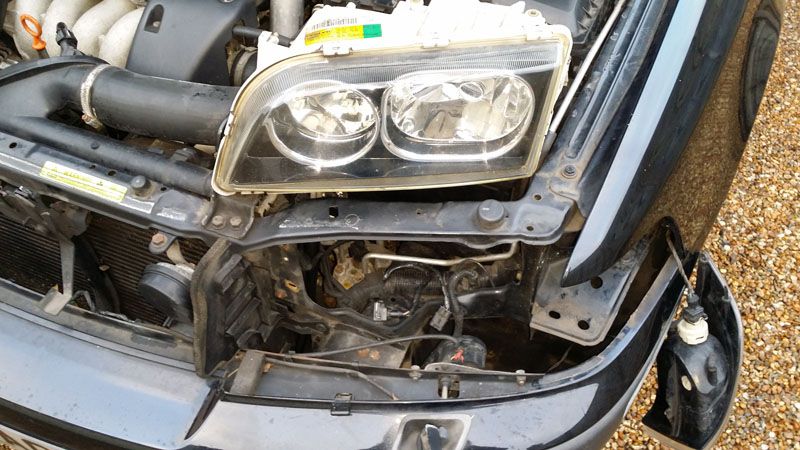 Back of headlight unit 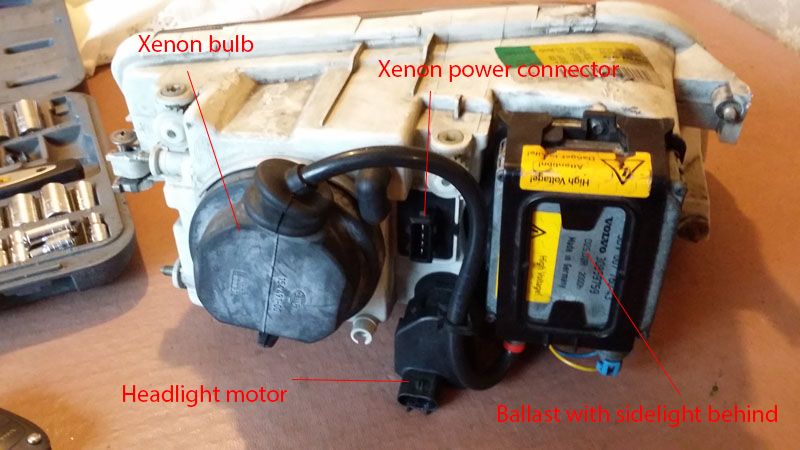 Changing bulbs Dipped bulb To change the main xenon bulb you'll have to remove the rubber cover and undo the 3 screws (circle in red) with a hex screwdriver. Be very careful when applying pressure onto the screws as it doesn't take much to snap the yaw connector on the other side of the reflector - This happens a lot! You'll know you've broken it when the whole reflector becomes wobbly. 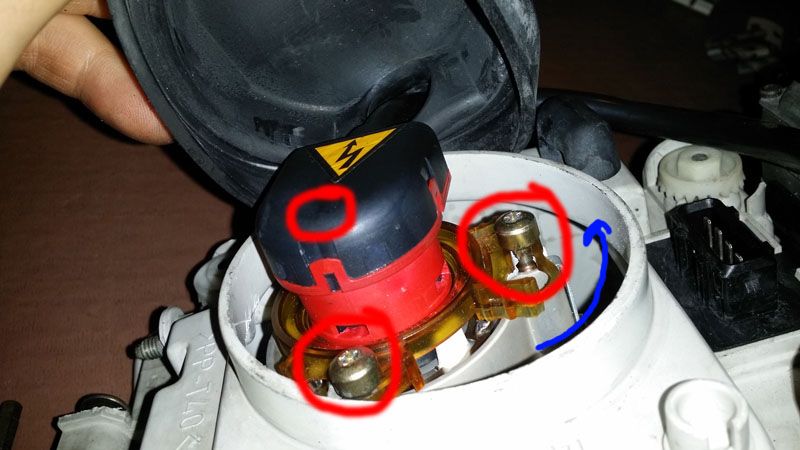 Once the 3 screws are out, make note of the position of the brown locating mechanism, twist the mechanism and remove from unit. Both the bulb and locking assembly should now be out. Remember to take care to not touch the bulbs as grease from our fingers can reduce the life of it. Refitting is a reverse of removal, just take extra care when tightening those screws. For those interested, standard Volvo xenon bulbs are D2R 4300k. Sidelights and Main beam To change the side light and main beam there are 3 hex screws to remove. Undo the circled screw on the bottom of the ballast. This will release a plastic clip mechanism from the ballast allowing you to move it out of the way. 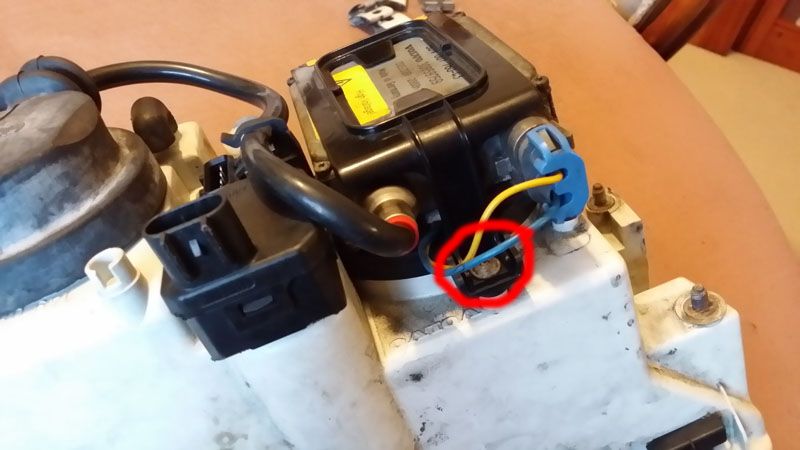 The ballast is now free to be moved. Under it there are two more screws that need to be taken out. 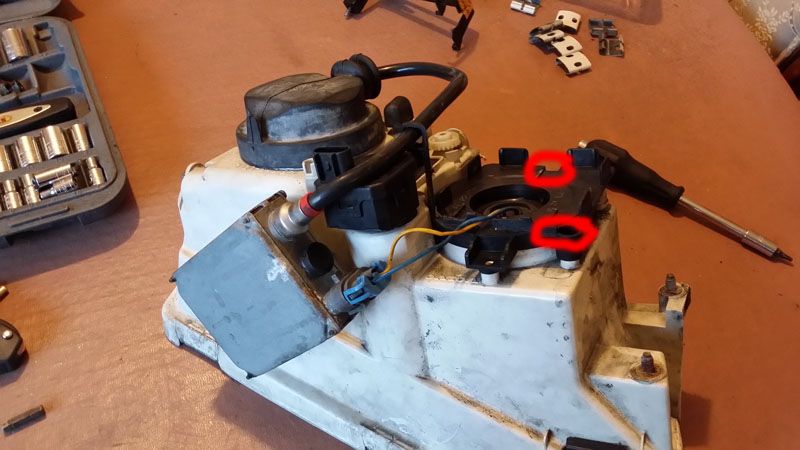 Once removed the plastic ballast enclosure can be lifted and the side lights and main beam bulbs can be changed. The yellow and pink wires are for the sidelights - If fitting with an LED bulb, be sure to check the polarity before fitting other wise you'll be stripping it apart to swap it round again. Refitting is just the reverse of removal. 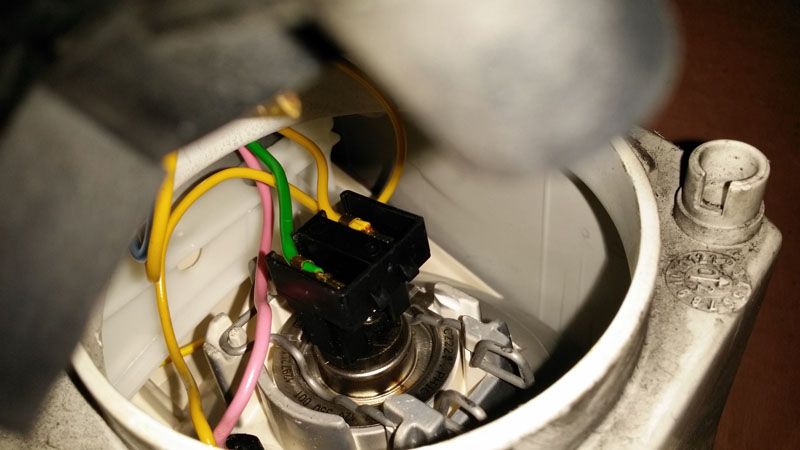 Headlight disassembly + broken yaw adjuster repair The yaw adjuster is the thing that breaks the most on xenons, it's very fragile, I've got through 4 of them in the year or so I've owned my car. I don't have too many pictures for these steps as I had no repair kit so I didn't want to risk breaking mine....again  To strip the light apart, remove the 8 clips circled in red with a flat head screwdriver, take care not to slip and damage the glass. The best method I've found is to wedge the screwdriver in the side of the clip with your hand over it and twist the screwdriver slightly, they should just pop off with ease. 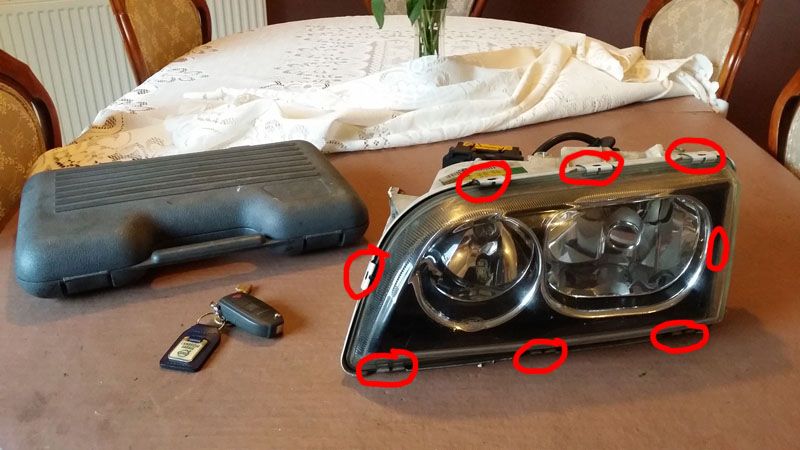 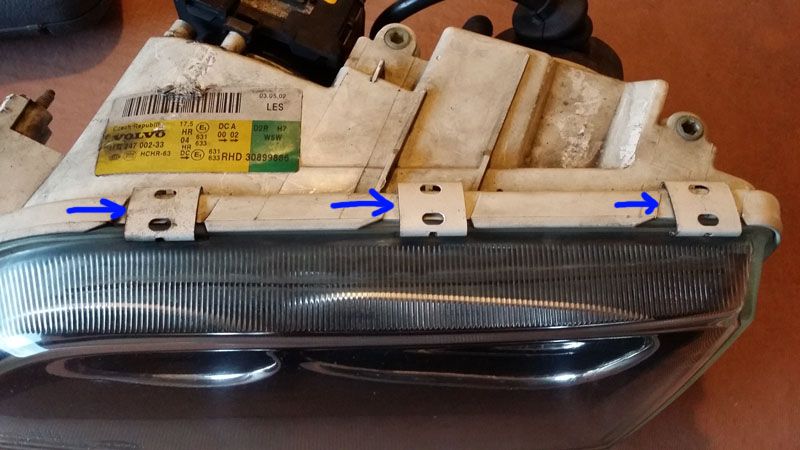 The next stage is to remove the black bezel - Be careful with this too as everything inside the head light breaks very easily. There are 3 locating clips for the bezel that are circled in the picture, put two fingers around the circled areas and pull the bezel towards you slightly and it'll pop out from the unit. 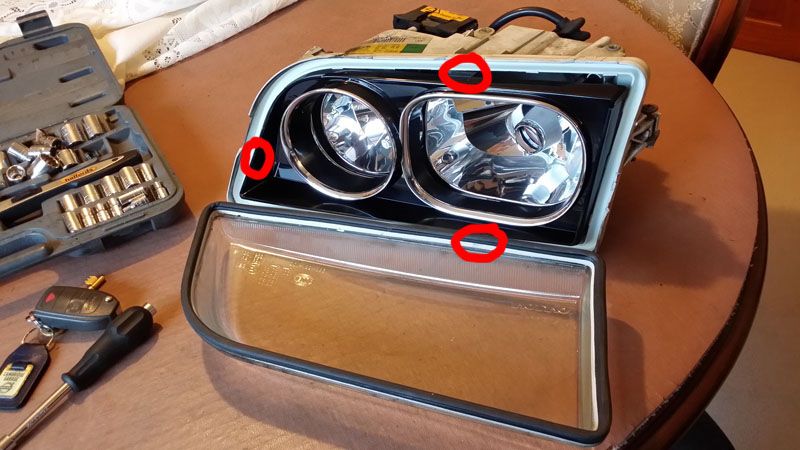 There are two main ball joint connections behind the reflector that control the alignment. The red is the manual adjuster that we have access too from the top of the unit, the blue is attached to the motor which is controlled via the self levelling system on the passenger rear suspension arm (xenons only). The black piece circled in green is attached from the reflector to the yaw adjuster (controls the horizontal position of the reflector) 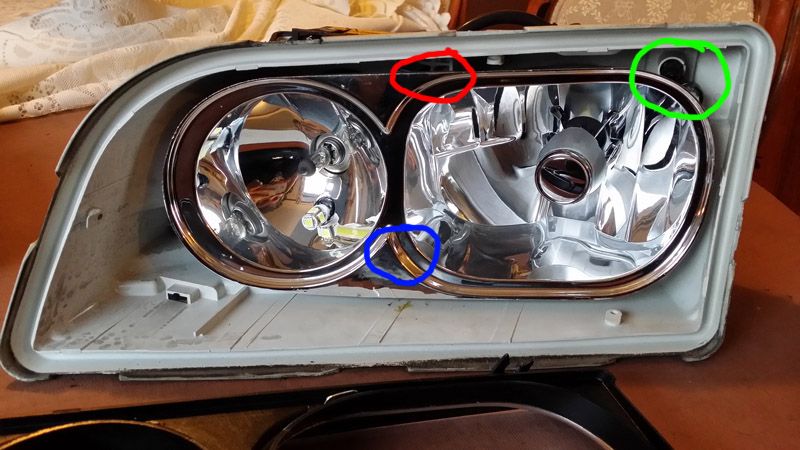 To pop the motor ball joint, turn the unit around and twist the motor assembly counter clock wise so it points towards the ballast, get a grip on the bottom of the reflector and gently pull the motor unit out of the housing until it pops from the reflector - Take a sigh of relief that nothing is broken. Next, grab the top of the reflector and carefully pull it towards you to pop it from the top ball joint. If you're doing this out of curiosity and not because of a broken yaw connector (circled in green) then 9/10 times, it will break doing this. I've yet to be successful in repairing a headlight without it snapping on me, it's pathetically fragile - This is where the repair kit comes in handy. Once the reflector is out the yaw connector can be unscrewed from the back of the reflector and the new one can be fitted. I don't have any more photos as I didn't strip down much more of the light today but refitting is pretty much the reversal of taking it apart. Be sure to grease both ball joints before pushing them back into the reflector housing and be very careful when doing so, not to break the new yaw connector (I've done this too on more than one occasion!). It's a nasty combination of quite a bit of required force and very fragile parts - Not good. When fitting the unit back to the car, make sure you slot the side bolts into the chassis first and watch the motor connector on the back of the light as you wiggle it in as it can catch on the loom and break the plastic. Hopefully this will help a few people   PS. If I'm wrong on anything let me know and I'll edit. |
|
|

|
| The Following 40 Users Say Thank You to Alex121 For This Useful Post: | 40s, AndyPants, AndyS40, Baffler, Bawls, cbarrow, CharlesStevenson, Cornishv40, dcw, Dirty Diesel, dralphs, druid, DWM, EastbourneChris, flyingtech55, gatos, gazO2V40T4, HAPPY ANGLER, Houshy, Jason989, kennygd, Kentish479, kev240, kieran40, malteser, MartinPorter, Mount vision rider, mpaton, neanderthal, ojtee, oliverpervasive, ricardoquail, Sag74, spursfatboy, thats not gone wel, twilightflyer, tytymup, V40Vinnie, Webber2629, ww1dm1 |
 |
| Currently Active Users Viewing This Thread: 1 (0 members and 1 guests) | |
|
|