
|
|||||||
| PV, 120 (Amazon), 1800 General Forum for the Volvo PV, 120 and 1800 cars |
 Information
|
|
Washer pump 661324 photos wantedViews : 805 Replies : 8Users Viewing This Thread : |
 |
|
|
Thread Tools | Display Modes |
 Sep 21st, 2022, 02:06
|
#1 |
|
Junior Member

Last Online: Sep 4th, 2023 10:59
Join Date: Jul 2022
Location: Hailsham
|
BCDC9D2C-946D-484A-907A-FDDA4D300ED0.jpeg
Can anyone help me understand the electrical end of this beautiful (seized) pump? Im really looking for a photo or two of the armature top end and its bush, cone, or bearing that fits on that riveted bent over-hanging arm (above the tapered end of the armature). The white coloured arm looks too bent to me and the flat nylon insert looks wrong too. I have straightened the arm and reassembled it and found all to be working now but theres nothing hold the top of the armature? So a photo of the bent arm and spindle end might explain the design, then I can make a new part to fix it completely. Ive got the seal and oring ordered so Im in heading down the right track. Any advice sought. Thanks in advance. |

|

|
|
Sep 21st, 2022, 18:04
|
#2 |
|
Master Member
|
https://vp-autoparts.com/en/artiklar...b18/index.html
Googling the part number will show some assembled units
__________________
Cowboy used to be a trade , now it means lack of one. Last edited by Bob 1967; Sep 21st, 2022 at 18:08. |
|
|
|
| The Following User Says Thank You to Bob 1967 For This Useful Post: |
|
Sep 21st, 2022, 19:27
|
#3 | |
|
Junior Member
Last Online: Sep 4th, 2023 10:59
Join Date: Jul 2022
Location: Hailsham
|
Quote:
The shame is that I still cant see or imagine what holds the far end (in that drg.) of the armature on the bent over-arm in my photo. Damn close but still in the dark. 🫤 |
|
|
|
|
|
Sep 22nd, 2022, 13:20
|
#4 |
|
Junior Member
Last Online: Sep 4th, 2023 10:59
Join Date: Jul 2022
Location: Hailsham
|
These two photos explain the mysterious gap in between the (straightened white coloured) over-arm and the end of the armature. The plier is holding the nylon disc which was located under the (previously bent) over-arm crushing against the cone on the end of the armature.
So what is in the gap? What is holding the armature? A photo (or two) of a working pump would be enough for me to understand the design and enable a serviceable washer pump. image0.jpg image1.jpg |
|
|
|
| The Following User Says Thank You to Sunnysoutheast For This Useful Post: |
|
Sep 22nd, 2022, 14:22
|
#5 |
|
Member
Last Online: Yesterday 10:24
Join Date: Feb 2019
Location: Oswestry
|
Really makes one appreciate this forum and all its knowledgable members, Great detail.
|
|
|
|
|
Sep 22nd, 2022, 15:03
|
#6 |
|
Premier Member

Last Online: Today 13:22
Join Date: Jul 2007
Location: Connecticut, USA
|
SSE;
Compliments on detailed pix! I'm not certain if this answers your question, but that white nylon part is clearly a Thrust Bearing...it looks in very good condition with low wear. A clean, machined steel surface to nylon is a low friction interface, but when reassembling the motor, I'd still put a dab of synth-grease on the contact point to keep friction and wear at a minimum. ...and BTW...construction of that motor is quite similar to the 544 Wiper Motor shown here, if that helps (the nylon TW is not nearly as clearly visible as in your pic!): 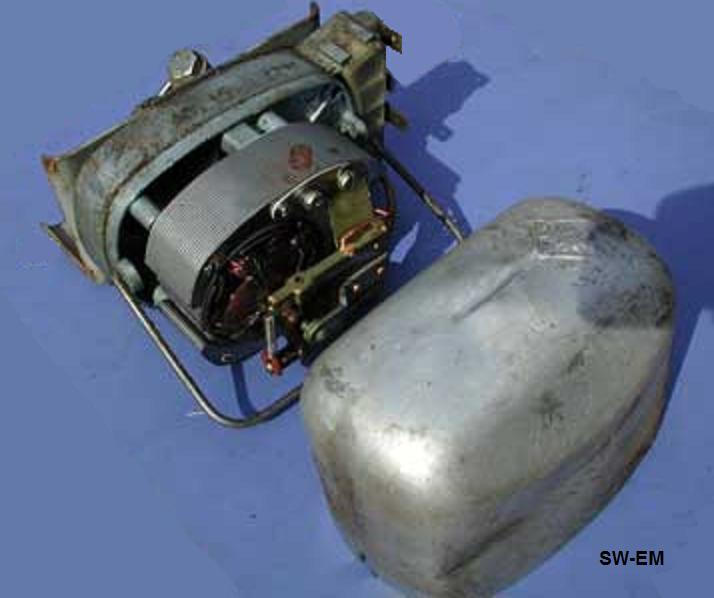 Source: https://www.sw-em.com/544%20Wiper%20Info.htm Cheers Last edited by Ron Kwas; Sep 22nd, 2022 at 15:49. |
|
|
|
|
Sep 22nd, 2022, 16:03
|
#7 | |
|
Junior Member
Last Online: Sep 4th, 2023 10:59
Join Date: Jul 2022
Location: Hailsham
|
Quote:
Thanks. PS Photo snaps taken on my old iPhone. 
|
|
|
|
|
|
Sep 23rd, 2022, 16:14
|
#8 |
|
Premier Member
Last Online: Today 13:22
Join Date: Jul 2007
Location: Connecticut, USA
|
SSE;
I'd advise careful (necessary, and temporary only) bending to reassemble the Armature with that Thrust Bearing in place...! Have you freed the "seized" rotating parts? ...yeah...that pic was taken with one of the early electronic cameras ...the one in my phone now has a hundred times that resolution...I'll have to renew that pic sometime... Cheers |
|
|
|
|
Sep 23rd, 2022, 16:35
|
#9 |
|
Junior Member
Last Online: Sep 4th, 2023 10:59
Join Date: Jul 2022
Location: Hailsham
|
Youre right with your recommendation for care.
The seizure was a badly positioned metal girdle and now everything is as free as a bird. As for the phone cameras; its absolutely amazing how far theyve gone since the first phone cameras which were pathetic. I had a very keen interest in 35mm photography from a young age, progressed to digital but now the image quality on my iPhone is more than satisfactory. So have a play and re-image those parts. Kind regards Dave C |
|
|
|
|
| Tags |
| 121, 131, amazon, p1800, washer pump |
| Currently Active Users Viewing This Thread: 1 (0 members and 1 guests) | |
|
|


 Linear Mode

