
|
|||||||
| 200 Series General Forum for the Volvo 240 and 260 cars |
 Information
|
|
Any Advice, Part 2!Views : 46434 Replies : 671Users Viewing This Thread : |
 |
|
|
Thread Tools | Display Modes |
 Feb 25th, 2021, 20:14
|
#411 |
|
Senior Member
Last Online: Apr 15th, 2024 14:34
Join Date: Jan 2020
Location: Cardiff
|
In the expectation that tomorrow will go as well as today
 , I'm just checking torque settings for final tightening. , I'm just checking torque settings for final tightening. In Haynes I've found: Shock absorber nuts/ bolts: 63 ft/ lbs (85nm) Spring lower mounting nut: 168 in/lbs (19nm - should we have used loctite on this one?!) I can't find the trailing arm to axle bracket nut/ bolt torque, but 63 ft lbs is specified for the rear stabiliser nuts, so I guess that's the figure we're aiming for? |

|

|
| The Following User Says Thank You to Chris152 For This Useful Post: |
|
Feb 25th, 2021, 20:48
|
#412 | |
|
Premier Member
Last Online: Today 12:22
Join Date: May 2012
Location: Lakenheath
|
Quote:
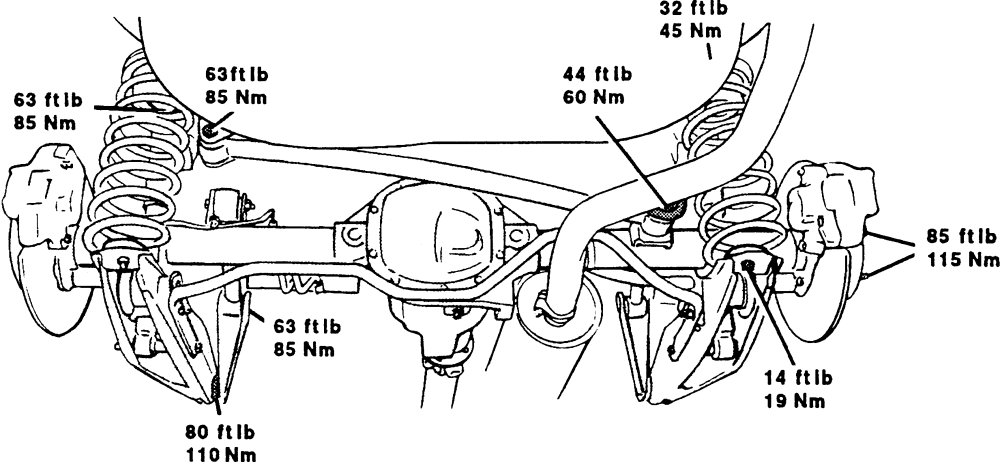 I believe that's the correct one Chris, 168in.lb is in fact 14ft.lb, however the torque on that diagram for that part is specified as 14lb.ft or 19Nm so looks like Haynes was right, albeit in a convoluted way of saying it! Trailing arm to axle bracket bolt, 63lbft is probably right if it's the same diameter bolt as the damper bolts. The ARB to trailing arm i believe are about 35lbft although the front ones are shared with the damper lower bolt i think on yours.
__________________
Cheers Dave Next Door to Top-Gun with a Honda CR-V & S Type Jag  Volvo gone but not forgotten........ Volvo gone but not forgotten........
|
|
|
|
|
| The Following User Says Thank You to Laird Scooby For This Useful Post: |
|
Feb 26th, 2021, 08:15
|
#413 |
|
Senior Member
Last Online: Apr 15th, 2024 14:34
Join Date: Jan 2020
Location: Cardiff
|
Thanks for that Dave - where's the pic from? I'm surprised how hard it is trying to find the torque settings for different bolts.
ps I'd not come across inch lbs before and at first read it as ft lbs! Seemed a bit heavy for such a small nut... We'll take it back off and put a bit of loctite on just in case. Last edited by Chris152; Feb 26th, 2021 at 08:18. |
|
|
|
| The Following User Says Thank You to Chris152 For This Useful Post: |
|
Feb 26th, 2021, 09:24
|
#414 | |
|
Premier Member
Last Online: Today 12:22
Join Date: May 2012
Location: Lakenheath
|
Quote:
As a side note, usually the hex head/spanner size is 1.5 times the thread size, sometimes with 1mm added on for a convenient spanner size - e.g. M8 thread = 8 x 1.5 = 12mm spanner size (common Japanese size for M8 threads) but we tend to use 13mm instead. The M10 is a bit of a maverick though as the spanner size is usually 17mm, M12 is a 19mm spanner, M14 is 22mm (1.5 x thread then add 1mm for convenience, same as M12/19mm spanner), M16 is 24mm etc. I think i'd go for a drop of Loctite on that nut as well, more as a "belt'n'braces" thing, it shouldn't come undone even at that low torque setting but i'd rather know it's unlikely to shake loose with the addition of Loctite. 
__________________
Cheers Dave Next Door to Top-Gun with a Honda CR-V & S Type Jag Volvo gone but not forgotten........
|
|
|
|
|
| The Following User Says Thank You to Laird Scooby For This Useful Post: |
|
Feb 26th, 2021, 10:57
|
#415 |
|
Senior Member
Last Online: Apr 15th, 2024 14:34
Join Date: Jan 2020
Location: Cardiff
|
I did a search for 'Volvo 240 rear suspension torques' and didn't really get anything! Anyway, thanks for that Dave, really helpful.
Is there a direct correlation between bolt dimensions and torque? Meanwhile, the lad's doing online lessons this morning meaning we can't get on with it. So I've been looking at the rear sill (pic attached) - the metal is solid but has surface rust. The plan's to get to that sort of thing once it's through its MoT and the weather's generally warmer, but I'm trying to think ahead a bit. So, with surface rust like that, what's the procedure? Is it wire brush then sand back to bare metal, prime and top coat? It seems fine behind (inner sill?) but I guess the same treatment there? I've also felt behind the rear mud flaps, not nice, couple of small holes so that could easily turn into a bigger job! That space isn't well designed for resisting rust, is it. Seems pretty clean on the inside ( spare wheel / tools storage), we'll see. All good learning tho. |
|
|
|
| The Following User Says Thank You to Chris152 For This Useful Post: |
|
Feb 26th, 2021, 12:00
|
#416 | |
|
Premier Member
Last Online: Today 12:22
Join Date: May 2012
Location: Lakenheath
|
Quote:
With surface rust like that, rotary wire brush in your drill and clean it so it's all bright and shiny. Then apply something like Kurust or Jenolite, following the instructions. The inner sills are what you will find if you lift the carpet inside the car, in profile/cross-section the inner and outer sills can almost be represented by [) or [ and ) for the inner and outer respectively. Not quite accurate in terms of exact shape, more to illustrate the idea of creating a sort of tubular section for rigidity along its length. If you lift the trim piece off the threshold between the outer sill and where the carpet meets it inside at the top, you'll see where the inner and outer sills are joined. Whichever way you look at it, earlyu action will help to avoid a bigger job later. If you remove the trim from the inside where the mudflaps will be you can also treat that area too.
__________________
Cheers Dave Next Door to Top-Gun with a Honda CR-V & S Type Jag Volvo gone but not forgotten........
|
|
|
|
|
| The Following User Says Thank You to Laird Scooby For This Useful Post: |
|
Feb 26th, 2021, 12:06
|
#417 |
|
Senior Member
Last Online: Apr 15th, 2024 14:34
Join Date: Jan 2020
Location: Cardiff
|
That's brilliant - thank you Dave.
I think work might have stopped. I decided to loosen the bolts while waiting for the schoolboy, and struggled with the spring retaining one. It took the tops off the thread (see pic), I've cleaned it up and the nut goes on and off ok now, but I'm not happy to just crack on. And Brookhouse aren't answering the phone - the spring retainers I bought didn't come with bolts/ nuts. Hmm... Edit - Brookhouse are sending one with bolt and nyloc nut fitted first class. We've put the old spring retainer back on so we can refit the wheel and drop it down, and crack on with it over the weekend or as soon as it arrives. The rest have all loosened off fine, so hopefully no more hitches! 
Last edited by Chris152; Feb 26th, 2021 at 12:58. |
|
|
|
| The Following User Says Thank You to Chris152 For This Useful Post: |
|
Feb 26th, 2021, 12:58
|
#418 | |
|
Premier Member
Last Online: Today 12:22
Join Date: May 2012
Location: Lakenheath
|
Quote:
__________________
Cheers Dave Next Door to Top-Gun with a Honda CR-V & S Type Jag Volvo gone but not forgotten........
|
|
|
|
|
| The Following User Says Thank You to Laird Scooby For This Useful Post: |
|
Feb 26th, 2021, 13:01
|
#419 | |
|
Senior Member
Last Online: Apr 15th, 2024 14:34
Join Date: Jan 2020
Location: Cardiff
|
Quote:
|
|
|
|
|
| The Following User Says Thank You to Chris152 For This Useful Post: |
|
Feb 26th, 2021, 13:48
|
#420 | |
|
Premier Member
Last Online: Today 12:22
Join Date: May 2012
Location: Lakenheath
|
Quote:
I'd suggest when the new one arrives, if it's a natural (even BZP or similar) finish, prime it and paint it black to match the rest but more importantly, protect it from corrosion. Mask the threads to avoid any complications on tightening torque (although the Nyloc may need to be tighter anyway to overcome the resistance of the nylon insert) and after fitting either put a smear of silicone grease or maybe even a light coat of paint on the thread to protect it.
__________________
Cheers Dave Next Door to Top-Gun with a Honda CR-V & S Type Jag Volvo gone but not forgotten........
|
|
|
|
|
| The Following User Says Thank You to Laird Scooby For This Useful Post: |
|
| Currently Active Users Viewing This Thread: 1 (0 members and 1 guests) | |
|
|


 Linear Mode

