
|
|||||||
| S40 / V40 '96-'04 General Forum for the Volvo S40 and V40 (Classic) Series from 1995-2004. |
 Information
|
|
GUIDE - Changing your oilViews : 3872 Replies : 17Users Viewing This Thread : |
 |
|
|
Thread Tools | Display Modes |
 Aug 28th, 2007, 08:02
|
#1 |
|
Senior Member
Last Online: Oct 20th, 2013 20:24
Join Date: Aug 2007
Location: Derbyshire
|
Oil is probably the most important lubricant in a car. It ensures bearings are held in a lubricated state and also provides internal cooling for the engine. Without oil, the metal surfaces of rods, bearings and crankshafts would soon destroy an engine so it's important to regularly change this and keep it fresh. Intervals of 12 months are probably adequate but I personally would go for 6 to improve longevity of the engine and for what it costs (about £20 and half an hour) I think it's worth it.
Note that you should have the engine warmed up to do an oil change because the oil will flow out better (the oil will be thinner when warm). If for some reason you can't do this then don't worry, the oil change will still work just fine. If you get it too hot you'll just end up with burned fingers so leave it to cool for a few minutes. Step 1 - Jack the car up nice and high (give yourself plenty of room to work in). Use an axle stand as a safety measure should the jack fail  Step 2 - Looking underneath on the driver's side (offside) of the car you'll find a bunch of little studs holding the undertray on. These consist of two components, one that pushes through the centre of another to expand it (similar to a raw plug in a wall) and retains the cover in place. These need to be removed either by hand or with a bit of persuasion 
Last edited by JSeaman; Aug 28th, 2007 at 08:38. |

|

|
|
Aug 28th, 2007, 08:02
|
#2 |
|
Senior Member
Last Online: Oct 20th, 2013 20:24
Join Date: Aug 2007
Location: Derbyshire
|
Step 3 - The best technique I found was to insert a flatblade screwdriver and flick the retainers free in a sharp movement although some of them really didn't want to let go. For the really stubborn ones you may need to use mole grips or similar but risk breaking the soft plastic.
 Step 4 - Remove all the retainers except this last one, it will allow the undertray to pivot out the way and is one less clip to remove!  Step 5 - Rotate the undertray right round so you can see the underside of the engine  Step 6 - Now the oil filter will be revealed to you and you will see the underside of the engine (the sump where the oil sits when the engine isn't running). 
Last edited by JSeaman; Aug 28th, 2007 at 08:39. |
|
|
|
|
Aug 28th, 2007, 08:03
|
#3 |
|
Senior Member
Last Online: Oct 20th, 2013 20:24
Join Date: Aug 2007
Location: Derbyshire
|
Step 7 - To start with we need to remove the 17mm sump nut. This will let all the oil drain from the engine. Note that it might be very hard to 'crack off' this nut but then it will be very easy to undo
 Step 8 - Place a suibtable vessel underneath the car to catch the oil and undo the sump nut with your fingers. There's a bit of an art to undoing the nut without it either flying off into the oil (in which case you have to hunt around in the oil to find it!) or getting completely covered in oil! After a few attempts you will get used to it  Step 9 - Once the nut is out, leave the oil to drain until it has slowed to a weak drip. This should probably take about 10 minutes and gives you a chance to move onto the oil filter. Try to make sure you don't spill any of the oil because it contains some nasty chemicals 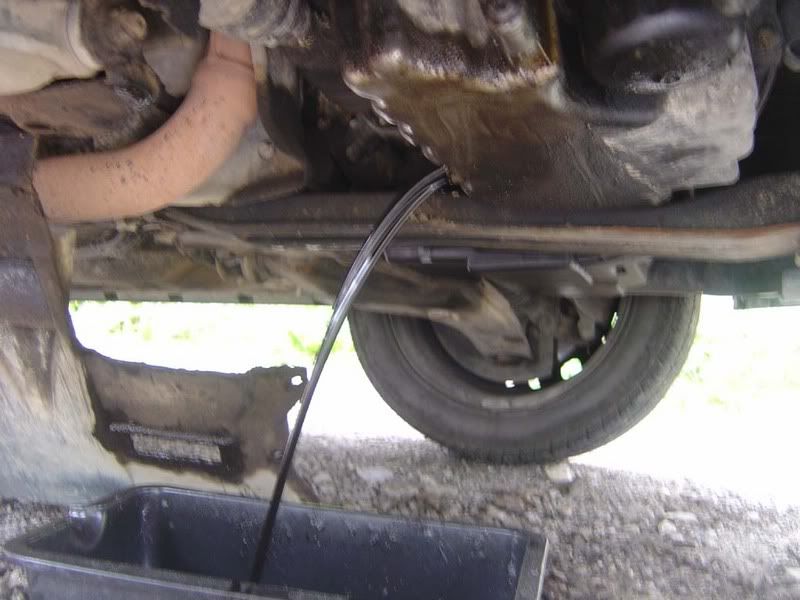 Step 10 - Note that the sump plug will also have a copper washer on it, this should be replaced on each oil change but you can re-use it if you haven't got one. 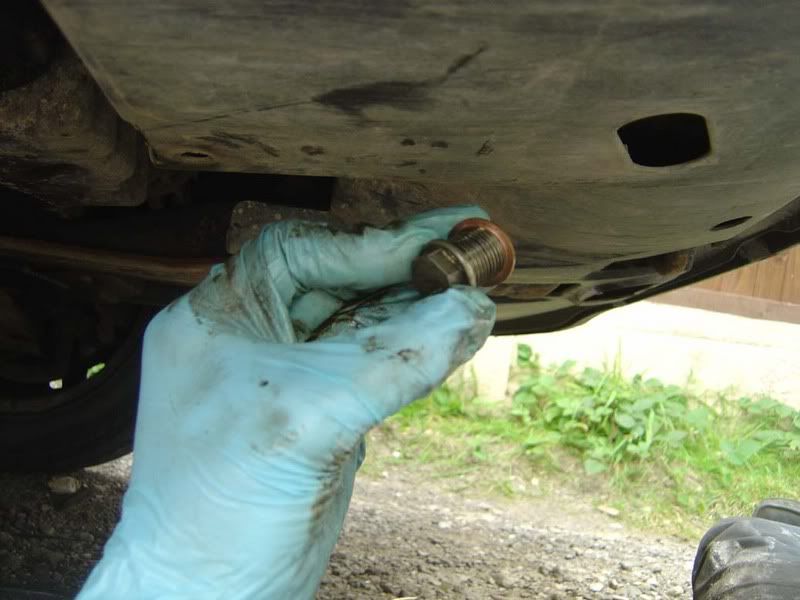
Last edited by JSeaman; Aug 28th, 2007 at 08:40. |
|
|
|
|
Aug 28th, 2007, 08:03
|
#4 |
|
Senior Member
Last Online: Oct 20th, 2013 20:24
Join Date: Aug 2007
Location: Derbyshire
|
Step 11 - Get yourself one of these. It's an oil filter wrench and will make your life so much easier
 Step 12 - Hook the wrench over the oil filter as shown and rotate anti-clockwise (looking at it from underneath) to undo the filter  Step 13 - Once you have broken the seal with the filter wrench you should be able to remove the filter by hand  Step 14 - Be prepared to catch some more oil that will come falling out when the filter body is removed 
|
|
|
|
|
Aug 28th, 2007, 08:04
|
#5 |
|
Senior Member
Last Online: Oct 20th, 2013 20:24
Join Date: Aug 2007
Location: Derbyshire
|
Step 15 - Remove the filter body from under the car and leave your drip tray catching oil from the sump and filter housing
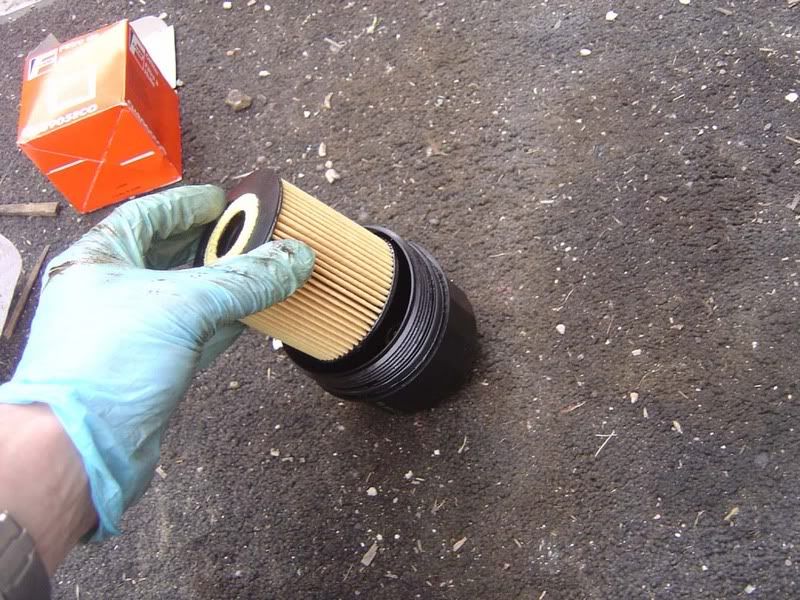
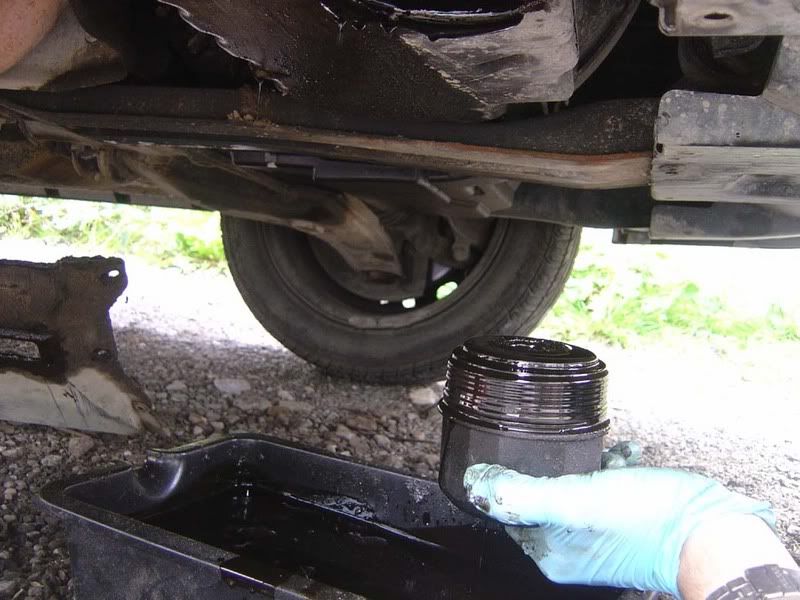 Step 16 - The S40 filter is not like standard oil filters in that you only replace the filter element inside it rather than the whole housing. Here you can see the old filthy filter being removed   Step 17 - Now clean up the housing which will be covered in dirty oil, don't get too carried away but make sure it's reasonably clean inside and out so you don't muck up the new filter before you even start the car. Kitchen towel is ideal for use when doing an oil change. 
|
|
|
|
|
Aug 28th, 2007, 08:04
|
#6 |
|
Senior Member
Last Online: Oct 20th, 2013 20:24
Join Date: Aug 2007
Location: Derbyshire
|
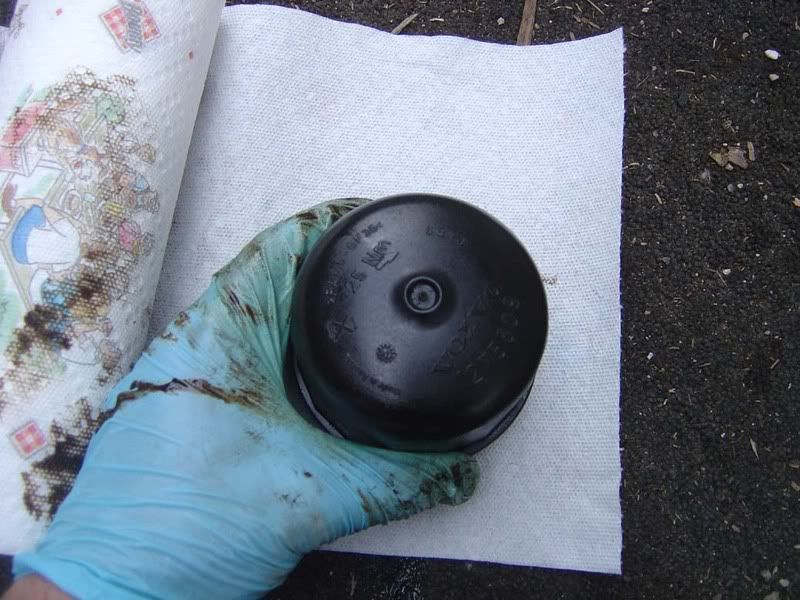
Step 18 - Once it is reasonably clean you'll be able to see that Volvo even print the torque value (25nm) for the filter on the housing - very nice of them! There is a rubber O ring seal that goes around the outside of the housing. You can remove this by hand or use one of the cut outs provided and a screwdriver to do this
|
|
|
|
|
Aug 28th, 2007, 08:05
|
#7 |
|
Senior Member
Last Online: Oct 20th, 2013 20:24
Join Date: Aug 2007
Location: Derbyshire
|
Step 19 - Now clean the area underneath the o ring
 Step 20 - Get yourself a nice new filter and O ring (I used a Fram unit from my local auto factors for about £5)  Step 21 - Gently slide the O ring over the housing, it isn't a tight fit but don't stretch it any more than you have to 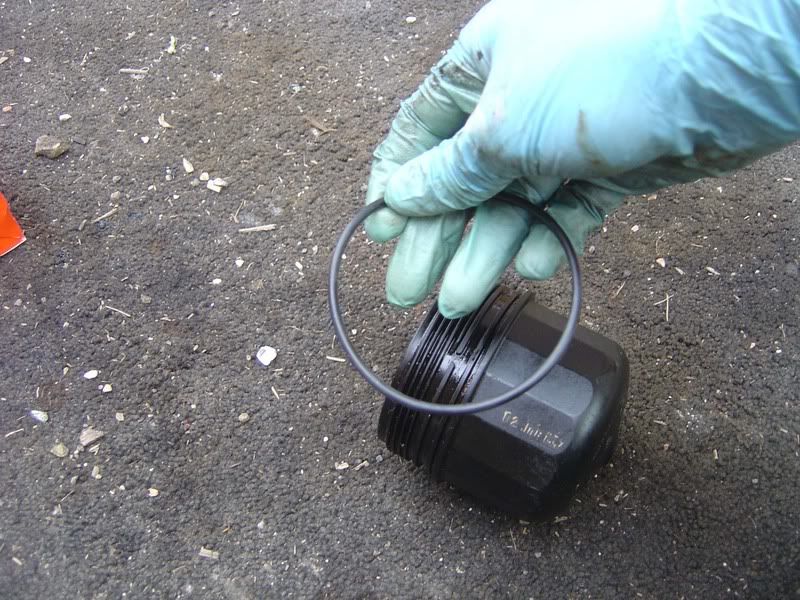
|
|
|
|
|
Aug 28th, 2007, 08:05
|
#8 |
|
Senior Member
Last Online: Oct 20th, 2013 20:24
Join Date: Aug 2007
Location: Derbyshire
|
Step 22 - Now drop the new filter into the housing (picture 1). There is a recepticle the filter should push onto so make sure it is gently but firmly pushed into place, it should look like the one shown in the second picture
  Step 23 - Use some kitchen towel to wipe away any oil that splashed onto the sump and you can also give the threads a wipe but be careful not to leave any tissue behind on sharp edges.  Step 24 - Offer up the new filter and screw it in position. Strictly speaking you should get a special tool and tighten it up to 25nm but if you do it by hand it will be fine but make sure you do it nice and tight so that the O ring seal properly 
|
|
|
|
|
Aug 28th, 2007, 08:06
|
#9 |
|
Senior Member
Last Online: Oct 20th, 2013 20:24
Join Date: Aug 2007
Location: Derbyshire
|
Step 25 - By this time the flow from the sump should be a light drip so we can put the sump plug back in
 Step 26 - Once you've put the sump plug in hand tight, wipe the surrounding area with some kitchen towel and then tighten up with the wrench. This should be pretty tight to prevent oil leaks but don't get too carried away or you'll regret it next time you come to undo it!   Step 27 - Next drop the car down so it is level, we are going to fill it with oil and don't want to give a false reading 
|
|
|
|
|
Aug 28th, 2007, 08:07
|
#10 |
|
Senior Member
Last Online: Oct 20th, 2013 20:24
Join Date: Aug 2007
Location: Derbyshire
|
Step 28 - Oil choice is a common query, I go for a 10w40 semi synthetic and found that this GM one is nice and cheap but good and I also recommend Millers. I have used the expensive and cheap oils, generally speaking anything under £10 is awful and anything over £20 is overpriced. I won't debate the ins and outs of using Mobil 1 etc, suffice to say a decent motor factors should give you what you need for about £15.
 Step 29 - Pour about 4 litres in then use the dipstick to get the level to half way between max and min. Try not to overfill it but it's better to have over half than under half.  Step 30 - Now jack the car back up so you can see underneath, start the engine and watch for leaks. You want to pay attention to around the filter and the sump plug nut, if you see a leak turn the engine off and tighten the offending part accordingly. After about 30 seconds if you haven't seen a drip you probably aren't going to. At this stage you should understand why we wiped down the area around the filter and sump plug - if you leave the oil oil/muck there it's hard to spot new leaks.   
|
|
|
|
| The Following 9 Users Say Thank You to JSeaman For This Useful Post: |
|
| Currently Active Users Viewing This Thread: 1 (0 members and 1 guests) | |
|
|


 Linear Mode

