
|
|||||||
| S40 / V40 '96-'04 General Forum for the Volvo S40 and V40 (Classic) Series from 1995-2004. |
 Information
|
|
Guide: How to change the wiper linkageViews : 21670 Replies : 26Users Viewing This Thread : |
 |
|
|
Thread Tools | Display Modes |
 Apr 30th, 2012, 23:17
|
#1 |
|
Master Member
Last Online: Dec 30th, 2018 08:33
Join Date: Oct 2010
Location: Craigavon area
|
This guide was made because a few Volvo owners (including me) complained about a ''squeaky noise'' coming from the windscreen/windshield wipers, but its not actually wipers that are making the noise, it's the worn out wiper pivot that is making the noise. More info in this link
Tools that you will need: Size 10 socket Size 13 socket Flat head screwdriver Back to black plastic bumper paint* (optional) Time needed to complete the job: 20-50 minutes* (it took me an hour and half to fine tune the linkage) 1. Use the screwdriver to remove the caps from the wiper arm to get to the bolt and undo the bolt using size 13 socket.  2.Use a flat head screwdriver to lift up and remove the black plastic rivets* closer to engine compartment. * there are 5 of them NOTE: You WILL damage/scratch ether the plastic rivet/s or linkage cover OR a white plastic rivets underneath the linkage cover, be aware of that. once you have removed rivets closer to engine bay, remove the rivets on the left and right hand side of the linkage cover. Best way for me was to slightly lift up the cover and the rivet will just pop out.  3. Remove the linkage cover from the rivets by sliding and lifting cover upwards. Note that it is very likely that you will brake a rivet/s so before doing this buy few rivets. 4. Once you have detached the panel you need to use a reasonable force to slightly bend the plastic cover to remove it.  once you have removed the one side, the other side should come out without any resistance. 5. Once you have removed the plastic cover clean it and then you can spray paint it back to black* (optional) In the image above it is already painted. 5.1. Once you remove the panel you will see 3 bolts holding each wiper pivots in place, undo them using size 10 socket. Before you remove the linkage note the position of the arms on the wiper linkage itself and the position on the wiper linkage motor, it might be different on your volvo.  undo the bolt from the wiper linkage motor using a size 13 socket and remove the whole unit  and this is how wiper linkage looks like  Now comes the hardest part, putting everything back together... To make sure that everything works like it should you need to do the fallowing. When you insert the new linkage make sure that if you look from the inside of the car towards the front of the car that the linkage which is connected to the linkage motor is extended to the right as much as possible (or 3 o'clock) and then hand tighten the bolt and then make sure that the passengers side wiper pivot's arm/joint (metal bar that connects linkage motor with two wiper pivots) is at around 2 o'clock, the same thing goes for the drivers side wiper pivot. Now once you have tightened all the bolts that hold wiper pivots in place turn on the wipers and make sure that the wiper pivot shafts are moving in one direction. Once you are happy enough with the movement install the wipers and pour some water on the windscreen/windshield. If the wipers move slightly down before they move up it means that you need to slightly adjust the angle of the linkage bar that is connected to the linkage motor. if everything is ok then tighten the bolt and install everything in reverse order. The text above might be a bit confusing, If it is, then once I will get my new linkage I will make a video explaining how it should work. No more squeaks!!!!!! Job well done.
__________________
Useful threads and information Guide: How to change/adjust timing belt Guide: Fitting LED's This is how S40 1.9 TD engine components looks like Information regarding EGR, problems and solutions A.K.A. Hesitation, sluggishness etc. |

|

|
| The Following 21 Users Say Thank You to Biotoxic For This Useful Post: |
|
Apr 30th, 2012, 23:32
|
#2 |
|
Premier Member

Last Online: Nov 15th, 2022 21:34
Join Date: Apr 2010
Location: London / Essex
|
Fitting them back in can be a bit of a PITA
__________________
Current car: 2002 S40 1.9D, 1992 240SE Nullius in Verba
|
|
|
|
|
May 1st, 2012, 07:49
|
#3 |
|
Premier Member

Last Online: May 2nd, 2018 08:14
Join Date: Sep 2011
Location: DownSouth
|
Thanks for the guide, as I will have to change mine some day as the arm touches the bonnet when opened. I filed off a small part and touched up the paint with black enamel.
If your only concern is the noise, then I suspect cleaning off the corrosion on the shaft and greasing it would solve the issue and if you are in the budget bodge it club and are thinking of selling your car to some person you don't like then the arm hitting the bonnet can be solved by using a hot glue gun or expoxy rapid to coat the lower half of the worn plastic bush after placing grease proof paper around the shaft so it does not stick. A better bodge job is to cut a small strip of Delrin or other bush use hard plastic and glue in a half shell to keep the arm higher up. That will last a long time if done properly, but to be honest it would be better to find a good used linkage or an equivalent part. The one I have ordered cost 96 Euros, plus a new arm. No Volvo part listed on the site I used, but I suspect that might be more expensive. |
|
|
|
|
May 1st, 2012, 07:58
|
#4 |
|
Master Member
Last Online: Dec 31st, 2016 22:43
Join Date: May 2011
Location: JER
|
When I replaced mine I didn't see that motor bolt
 I just used a huge ass pry bar to undo the rod from the socket joint lol. I just used a huge ass pry bar to undo the rod from the socket joint lol.I only managed to press it back because of a 350lb bench press. That was a real challenge ! : I guess that is why I didn't need to align anything ? Last edited by Volvoline; May 1st, 2012 at 08:01. |
|
|
|
| The Following User Says Thank You to Volvoline For This Useful Post: |
|
May 17th, 2012, 03:37
|
#5 |
|
New Member
Last Online: Sep 25th, 2012 03:03
Join Date: Apr 2012
Location: Birmingham
|
I was wondering if the video got made by biotoxic.
I need adjustment to linkage. I have it in, just need to line up properly |
|
|
|
|
May 17th, 2012, 12:38
|
#6 |
|
Master Member
Last Online: Dec 30th, 2018 08:33
Join Date: Oct 2010
Location: Craigavon area
|
No, I haven't made a video because can't see those parts properly. It Will be just too confusing.
Start from the wipers. If you look at the windscreen from the front if the car. ....... I am on the phone, just read the text at the end of thwarting guide. When I removed the first time I thought that I Will buy a new linkage from volvo, but since they asked 74£ for that, I just removed the old ones, dismantled them and I put the cooper grease on the shafts. It cured the problem So I just left the old ones one. I was thinking about getting a new linkage, but since the cost of the new one is a bit dear I Will get rid of the car and I Will buy a different one. (its not just because of the wiper linkage)
__________________
Useful threads and information Guide: How to change/adjust timing belt Guide: Fitting LED's This is how S40 1.9 TD engine components looks like Information regarding EGR, problems and solutions A.K.A. Hesitation, sluggishness etc. |
|
|
|
|
May 17th, 2012, 14:21
|
#7 |
|
Senior Member
Last Online: Sep 23rd, 2014 23:59
Join Date: Apr 2010
Location: Yorkshire
|
Biotoxic this one of those wonderful guides... of the highest quality, to match other scribes of the forum
I've just noticed something on the 1st photo, but it may well not have any effect at all. You appear to be using Bosch Aero wiper blades (or similar) and they do look as if they're overlapping. I've got 21" driver and a 20" passenger side Bosch Aero's and mine don't touch, but it looks to me as if they "might" do on yours. Does it cause any sort of problem... what year is the car you did the guide on?
__________________
Year 2004 V40 1·6s |
|
|
|
|
May 17th, 2012, 22:21
|
#8 | |
|
Master Member
Last Online: Dec 30th, 2018 08:33
Join Date: Oct 2010
Location: Craigavon area
|
Quote:
Yes, I bought a wiper blades that were supposed to be for S60 (if my memory serves me correctly) they were quite cheap, around 2.99 (I think) for a set of 2. I used the included adapter which fits really well. In the first picture they are aligned, before that it didn't looked so good. It is actually the last picture that I took, normally the plastic doesn't look so good and its not that black. I think that I am using a 22'' at the moment, but the maximum that you might be able to fit would be around 24'' BUT it might hit either the roof support column or the other wiper.. its everything to do with the wiper alignment. Here, a older picture how it looked like before, you might notice that the wiper is slightly in upwards position than it is now. Year 2003 by Volvo 2002 by DVA... 
__________________
Useful threads and information Guide: How to change/adjust timing belt Guide: Fitting LED's This is how S40 1.9 TD engine components looks like Information regarding EGR, problems and solutions A.K.A. Hesitation, sluggishness etc. |
|
|
|
|
| The Following User Says Thank You to Biotoxic For This Useful Post: |
|
Oct 27th, 2013, 18:16
|
#9 |
|
I do like a V40

Last Online: Dec 1st, 2018 19:03
Join Date: Oct 2013
Location: North Surrey
|
First off, thank you Biotoxic for this guide, it gave me the confidence to have a go myself as I'm definitely more of a driver than a mechanic (had a few bikes in my time though and they always require you to get a spanner dirty).
Got my linkage and motor from a breaker on eBay for £15 delivered!  They were disconnected at the spigot rather than the bolt...  ...and I also tried undoing the bolt on the motor fitted to my car but it seemed quite stiff and the access is poo. I didn't really want to break the motor as mine is a year newer than the one I got from the breakers, so like Volvoline I used the crowbar technique to get the arm off (thanks Volvoline)  Despite using a piece of wood to lever off, I did bend the edge of the bay. Happy to say this doesn't appear to have made any difference to anything and could probably be bent out again but doesn't seem to matter. To put it back on, I used a rack clamp but a large G-clamp would probably work just as well, I gave everything a good coat of copperslip and it popped in very easily.  Re the linkage alignment, I took your advice and marked the angle of the arms  but here are pics of the linkages in case it helps anyone else. This is looking in while standing by the front N/S (UK passenger) wheel... N/S linkage  O/S linkage looking from UK N/S passenger front wheel  Both spline arms were down at 7ish o'clock, the motor arm looking from the front of the car was at past 11 o'clock (in the picture above of the motor, the closest side is the top). As Volvoline mentioned, you don't need to worry about aligning the motor if you go for the prybar I also took the opportunity to clean out a small bird's nest from beneath the windscreen pillars whilst the cover was off  I was fine removing the lower external rivets from the cover, one of the top ones was already broken and siliconed in and I did break the other one but these four internal ones caught me out (shocking dirty engine cover, my excuse is I have just bought this car! Have cleaned  ) )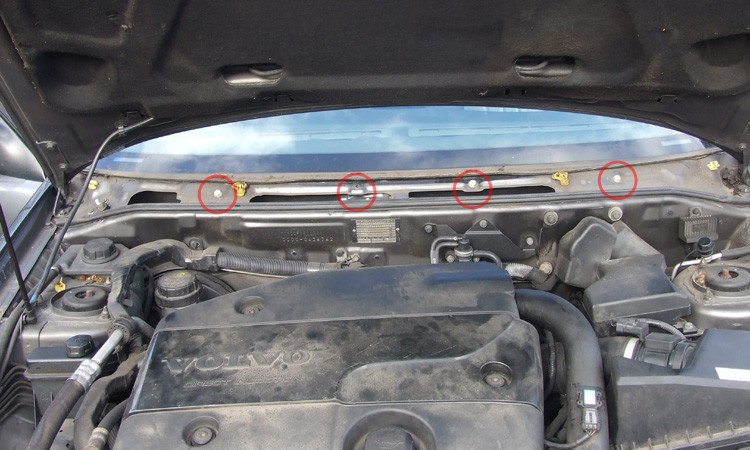 After lifting the bottom of the cover, I think if you initially push it up in the same direction as the windscreen, the rivets would slide out of the mounts and you'd be ok - I pulled it up and away towards me and it went snap, this is what happened to a couple of the rivet mounts on the rear of the cover 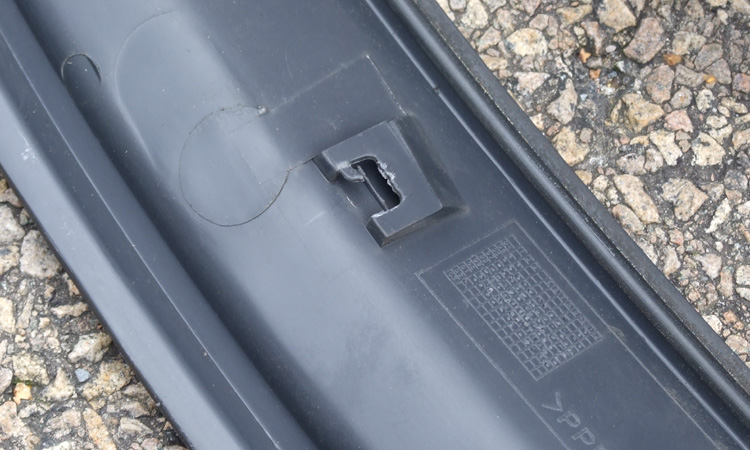 The rivets did go back in  but the seal to the windscreen isn't quite as tight as it was so I may have to re-visit another time (although the two small top rivets on the outside broke/were broken as well so will replace those first and see if it sorts it). And no disrepect to your guide at all, as I mentioned I wouldn't have done it without, but I did take up your advice to spray the plastic cover with black restorer. Can I add that you shouldn't bother using Astonish Black Shine Restorer because as soon as I tested, the screenwash did this to it   Very happy though, no more wiper touching bonnet. It took me about an hour to do. Thanks again Biotoxic  . Thanks also to my son Leo for helping and taking the action pics . Thanks also to my son Leo for helping and taking the action pics
|
|
|
|
| The Following 3 Users Say Thank You to v40alex For This Useful Post: |
|
Oct 27th, 2013, 18:24
|
#10 |
|
I do like a V40
Last Online: Dec 1st, 2018 19:03
Join Date: Oct 2013
Location: North Surrey
|
P.S. to Admins, this guide doesn't show up in the Articles section, does it need to be stickied/moved?
|
|
|
|
| The Following User Says Thank You to v40alex For This Useful Post: |
|
| Tags |
| squeaky wiper, worn wiper pivot |
| Currently Active Users Viewing This Thread: 1 (0 members and 1 guests) | |
|
|


 Linear Mode

