
|
|||||||
| 200 Series General Forum for the Volvo 240 and 260 cars |
 Information
|
|
Window Motor Not WorkingViews : 744 Replies : 6Users Viewing This Thread : |
 |
|
|
Thread Tools | Display Modes |
 Aug 27th, 2019, 20:28
|
#1 |
|
Premier Member
Last Online: Yesterday 19:44
Join Date: Sep 2017
Location: STANDISH LANCASHIRE
|
1988 Volvo 240:~
The passengers side electric widow motor has stopped working. After going through various tests I find that power is reaching the motor or just as the wires enter the same (test bulb used & lights up as the switches are operated- both sides etc.) My question is- can these motors be dismantled for a repair? Anyone done it. Thanks Bob. |

|

|
|
Sep 3rd, 2019, 07:17
|
#2 |
|
MY 240 DRIVES ME!

|
Hi Bob..my old bus has manual windows so i dont really know what the motor looks like but start with a cheap fix by spraying electrical contact cleaner (nothing oily) by any means into the motor and if possible whilst drying turn maually..I used brake disc cleaner on my wiper motor.Worked a charm..Good luck.hj.
|
|
|
|
|
Sep 4th, 2019, 13:49
|
#3 |
|
Premier Member
Last Online: Yesterday 19:44
Join Date: Sep 2017
Location: STANDISH LANCASHIRE
|
Many thanks for the reply: ~ I can now answer my own question regarding a motor repair- yes they can, will do a bit of a How to shortly- but all working fine now.
Regards Bob. |
|
|
|
|
Sep 9th, 2019, 12:25
|
#4 |
|
Premier Member
Last Online: Yesterday 19:44
Join Date: Sep 2017
Location: STANDISH LANCASHIRE
|
Electric Window Motor (Front Passenger Side)
Volvo 240 1988 GL. Problem:~ motor had stopped in the up position but I had a live feed to the same when switches operated- use a test probe- test bulb is fine here across the two wires. Suspected a seized regulator/motor.[/I] Markings on the motor- Bosch 058. FPE 12v 0130821036. Brose 68-24362-0 The process of elimination to find the fault had been- check all fuses 10 & 12. Check wiring to include flexing problems within the doors- solenoid also eliminated. You can check all the switches by substituting or swopping from one side to the other. Remove the door card as manual guidance. The wires to the motor are red & black, reversing the polarity will make the motor run in different directions i.e. up/down. Rather than remove the loom I decided to cut the wires near to the black cable cover attached to the top of the motor and replace with a bullet type connector including soldered terminals. Remove the regulator & motor as a unit, clamp the regulator with G clamps and remove the motor. Access to the internals of the motor are made by removing the black cable cover (snaps on) and two small bolts holding the rotor cover- you will need to tap out & lever the nylon cable terminal fitting complete with the brush mechanism brushes are copper (similar to a starter motor) and should be in good condition only requiring a general clean, lubricate the rear bearing when reassembling and the front of the motor shaft as it enters the main body holding the operating cogs- reseat the rubber gasket. Check the gasket that is under the rotor cover- grease up when fitting back. To remove the motor as a full unit you will need to take the metal cover of the main box- a press fit etc., tapping a knife blade around the same should result in the cover coming away. You can either expand the fitting lugs or drill out for small self-tapping screws when replacing. I used the screws as it secures the top better. Inside the box you will find the motor shaft extension & driving cog plus an end bearing with a push in plastic cover. This on my car needed a thorough clean & grease to allow normal operation. You can also test the motor at this stage and it should run quite fast in both directions. Inside the main body you will find a large nylon cog that is driven by the motor- check that this is free running and replace the grease as necessary. This part had also become very reluctant to move and regardless of oiling it needed to be removed so the cog shaft could be properly cleaned. To remove this tap the spigot from the top of the nylon internal wheel outwards- you will see two small metal grips that make it an interference fit. Clean the shaft that goes through the body and grease all parts, when it goes back together do not knock the nylon wheel too far in as it may make it run tight-if so just release a little- a spring washes is under the wheel acting as a spacer aiding free movement etc. Fasten the motor back onto the regulator and release the clamps- grease all working parts and reinstate the unit back into the door frame for testing. After completing the above the window works fine and has improved as the grease gets spread through the working parts. Trust it helps. Bob. |
|
|
|
| The Following User Says Thank You to Bob Meadows For This Useful Post: |
|
Sep 9th, 2019, 20:57
|
#5 |
|
Junior Member
Last Online: Oct 6th, 2019 23:13
Join Date: Sep 2019
Location: cambridge
|
this photo is of a replacement motor unit that is said to fit volvo 240, 740 models, as well as some SAAB models too
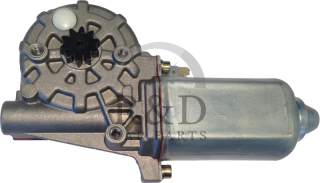 If this is the sort that is found in most 240 models then its one that has guts virtually identical to the ones in a BMW I have owned. Unsurprisingly after twenty or thirty years the grease inside the gearbox does dry out! I used some grease in which the lubricant is a synthetic oil and the grease also contains PTFE; my experience is that this grease doesn't dry out or change colour even after twenty years or so. Probably there are other greases that have similar properties. BTW these motor units usually contain a screw adjuster in the housing which is in line with the motor shaft. This adjuster controls/adjusts the end float in the 'worm' gearbox shaft. Since there seem to be many Bosch motor/gearbox units which differ only in detail, I think it is often possible to (say) swap motors between units which are found in quite disparate cars; there may be minor internal differences between (say) a volvo and BMW motor/gearbox, and differences in the gearbox housing and wiring connectors. Probably other makes of car us similar parts too. Thus quite a lot of swapping about should be possible. cheers |
|
|
|
|
Sep 9th, 2019, 22:19
|
#6 |
|
Premier Member
Last Online: Yesterday 19:44
Join Date: Sep 2017
Location: STANDISH LANCASHIRE
|
Yes it certainly looks the same:~ the Volvo unit also has the end float screw adjuster but I had no need to remove the actual screw as access had already been made once opened up.
(Probably a useful greasing point as well for the end bearing) Bob. |
|
|
|
|
Oct 29th, 2019, 19:04
|
#7 |
|
trhains
Last Online: Apr 3rd, 2024 18:55
Join Date: Apr 2011
Location: Leeds
|
Thanks your instructions were perfect, 1990 240 estate now has fully working Drivers electric window, thanks again
|
|
|
|
| The Following User Says Thank You to trhains For This Useful Post: |
|
| Currently Active Users Viewing This Thread: 1 (0 members and 1 guests) | |
|
|


 Linear Mode

