
|
|||||||
| PV, 120 (Amazon), 1800 General Forum for the Volvo PV, 120 and 1800 cars |
 Information
|
|
Sheared suspension boltViews : 1187 Replies : 20Users Viewing This Thread : |
 |
|
|
Thread Tools | Display Modes |
 Feb 6th, 2019, 15:49
|
#11 |
|
marches on his stomach
Last Online: Feb 11th, 2022 03:15
Join Date: Jan 2018
Location: Somewhere in the Netherlands
|
Depending on how tight the bolt is in there because you have a bit sticking out you can afford to mess about with "cutting a slot" for a flat bladed screwdriver. On the whole because the shank of the bolt isn't hardened this doesn't always work - but you know with a bit of scraping around the threads where they go into the box section (which is where the corrosion is most likely to have taken hold) you might get lucky.
__________________
1961 Volvo PV544 the quick and easy in between project(!) 1981 Mercedes 300D <=> 230 diesel to petrol conversion project 1965 Series 2a Station Wagon mega build 1992 Mercedes 190E The car that works! 
|

|

|
| The Following User Says Thank You to Army For This Useful Post: |
|
Feb 6th, 2019, 16:05
|
#12 |
|
Member
Last Online: Apr 16th, 2024 17:09
Join Date: Jul 2016
Location: Bridport
|
Thanks for the diesel tip, didn't know that.
Army, yes considered cutting a slot and if it breaks down then we will be drilling it anyway. I think I know which way is forward now. Thanks all. |
|
|
|
| The Following User Says Thank You to Uplander For This Useful Post: |
|
Feb 6th, 2019, 19:06
|
#13 |
|
Premier Member

Last Online: Today 11:51
Join Date: Jul 2007
Location: Connecticut, USA
|
Simon;
A 50/50% mix of ATF and acetone is also supposed to be an excellent penetrating cocktail...I'd apply lots of heat to loosen things up first, but if you broke that huge bolt in the process of removal, just imagine the torque that took, and that is locking it in place now...I'd see about spinning it back in the other direction... Good Hunting! |
|
|
|
| The Following User Says Thank You to Ron Kwas For This Useful Post: |
|
Feb 7th, 2019, 16:06
|
#14 |
|
member
Last Online: Jan 22nd, 2024 21:45
Join Date: Aug 2012
Location: austin, texas
|
That's a bugger.. I've normally had good success with welding a stubby bolt onto the remains ....rather than a nut.
dean |
|
|
|
|
Feb 13th, 2019, 19:40
|
#15 |
|
Member
Last Online: Apr 16th, 2024 17:09
Join Date: Jul 2016
Location: Bridport
|
Here's an update for those interested in the remarkable stubbornness of rusty, broken bolts.
With the 3mm remaining I managed to cut a notch in the bolt and got a small cold chisel on it. I hit it clockwise and anti clockwise. The gap around the thread opened a little so I sprayed it with Plus Gas which it started to drink willingly so at least it was going to the right place and not on the floor. After some unsuccessful efforts to coax the bolt remnants to move, the bits I was hitting broke off and I was left with a flush bolt. Enter the neighbour with a right angled drill and cobalt bits. A hole was drilled and an easy-out put in but the suspension hanger bracket was perfectly placed to inhibit any meaningful effort. We even ground down a pair of molegrips to try and get a hold of the wretched thing but the access proved too difficult and still the bolt would not shift. The next move will be to drill a bit larger and remove the bolt that way and gently re-tap the hole. If that fails we're thinking about a Helicoil insert. What are the thoughts on using a Helicoil in that particular application? If that isn't an option I'm not sure where we go next... Thanks! Simon |
|
|
|
|
Feb 13th, 2019, 20:26
|
#16 | |
|
marches on his stomach
Last Online: Feb 11th, 2022 03:15
Join Date: Jan 2018
Location: Somewhere in the Netherlands
|
Quote:
More solid inserts such as time-serts are considered to be stronger but:- #1 They are flipping expensive particularly for the larger diameters #2 Position is everything when fitting these things - you're going to struggle to get a good fit for any thread repair system I personally advocate struggling on with the easy outs - with a view to trying to save the original thread. Heat would be my next choice (but you really need to judge it yourself as I can't tell from my armchair here in Holland how much metal there is on the "chassis" part of the structure - no sense in warping the 'eck out of it just to save the bit you might have to cut and weld back together anyway)
__________________
1961 Volvo PV544 the quick and easy in between project(!) 1981 Mercedes 300D <=> 230 diesel to petrol conversion project 1965 Series 2a Station Wagon mega build 1992 Mercedes 190E The car that works!
|
|
|
|
|
|
Feb 13th, 2019, 21:50
|
#17 |
|
Premier Member
Last Online: Today 11:51
Join Date: Jul 2007
Location: Connecticut, USA
|
Simon;
...oh the joys of of dealing with miserable bolts like that... My advice (oh no...another armchair mechanic!): keep drilling and easy-outing (left or right-handed, alternating), increasing the size slowly until you get movement of the remains...if you don't get movement by the time you have increased to the size of threads, you could drill it out totally, and possibly have a threaded insert welded in place (access?) similar to how Burner Welding repaired the torn out tab of my anti-sway bar mound. 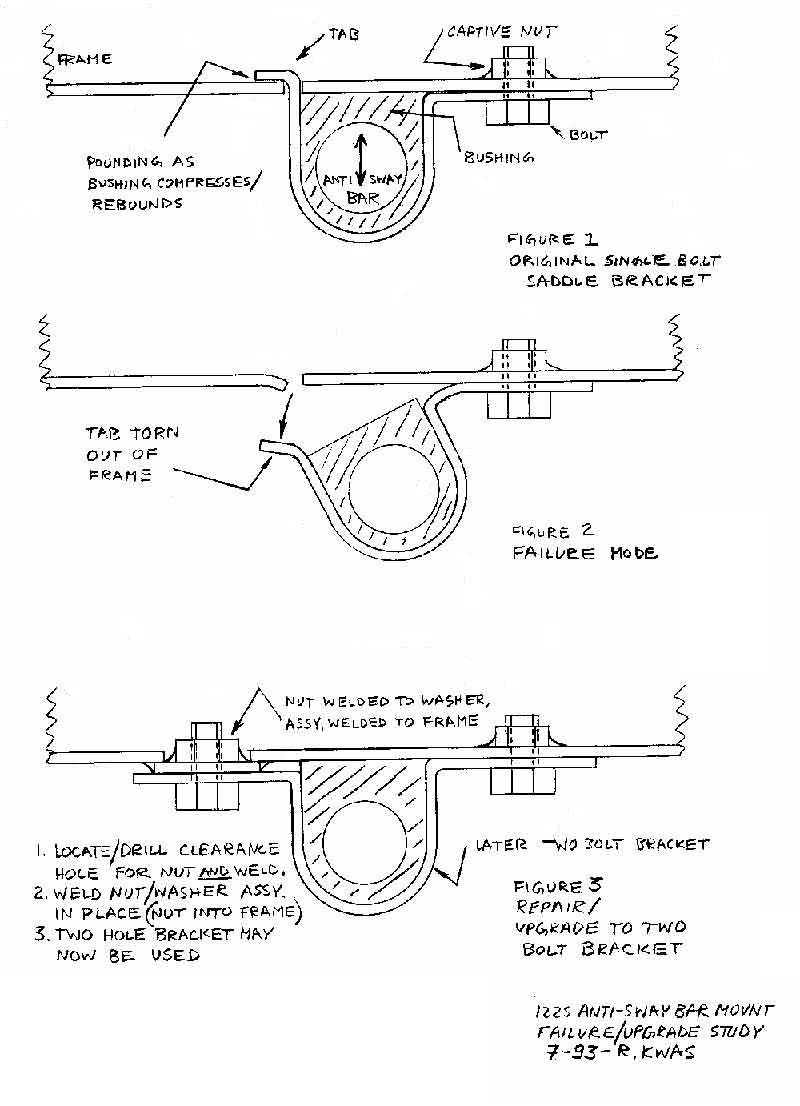 Source: http://www.sw-em.com/nagging%20clunk.htm Cheers |
|
|
|
|
Feb 13th, 2019, 23:04
|
#18 |
|
VOC Member

Last Online: Yesterday 20:59
Join Date: Jul 2006
Location: Chatham
|
I would carry on trying to get the remains of the bolt out. If you can carry on accurately drilling out what's left in very small size increases there will come a point that you should be able to spin it out. Yes, it will be a pain. Keep soaking it with the Plus Gas. If you can get a small triangular needle file in there, a nice new sharp one, you might be able to get it to break. The remains of the thread, not the file! A small nick into the threads won't be a problem. This bolt is little more than an axle for the arm and only needs to be tightened enough to squeeze the inner sleeve of the rubber bust to stop it turning. This is why you have small raised areas on each side. They help centralise the arm and keep it from rubbing on the sides of the attachment flanges. 40-50 ft/lbs should be more than enough for that. These should be tightened with the car back on the ground and in a normal static position so that the rubber can twist equally in both directions. If you tighten it with the suspension hanging it will be under torsion when back on the wheels, this will shorten its life.
|
|
|
|
|
Feb 14th, 2019, 17:54
|
#19 |
|
Member
Last Online: Apr 16th, 2024 17:09
Join Date: Jul 2016
Location: Bridport
|
I like the idea of the triangular needle file. The hole drilled is fairly large now so that might work.
Thanks all, I'll keep trying and let you know what happens. S |
|
|
|
|
Feb 25th, 2019, 19:08
|
#20 |
|
Member
Last Online: Apr 16th, 2024 17:09
Join Date: Jul 2016
Location: Bridport
|
Final update.
After an unsuccessful attempt using a file due to awkward access (the arm hanging bracket is in a perfect position to make everything awkward) we continued with the drilling. After one broken bit stuck in the hole and various other bits modified with an angle grinder (due to the aforementioned access problem) incremental progress was made. With the aid of an endoscopic camera shoved up the access hole in the chassis box section I could watch the other end of the bolt as my stronger, younger, engineer neighbour did the hard labour. Finally we could get a tap into the hole and with a few turns the bolt collapsed and wound itself out. With only minimal damage to the start of the thread the new bolt wound itself in happily and firmly. Thanks for all your help and suggestions. Now for the other side... Simon |
|
|
|
|
| Currently Active Users Viewing This Thread: 1 (0 members and 1 guests) | |
|
|


 Linear Mode

