
|
|||||||
| S40 / V40 '96-'04 General Forum for the Volvo S40 and V40 (Classic) Series from 1995-2004. |
 Information
|
|
Replacing your ball joint coversViews : 7552 Replies : 25Users Viewing This Thread : |
 |
|
|
Thread Tools | Display Modes |
 May 23rd, 2014, 21:38
|
#1 |
|
I do like a V40

Last Online: Dec 1st, 2018 19:03
Join Date: Oct 2013
Location: North Surrey
|
Does your MOT fail sheet say "ball joint dust cover excessively deteriorated/damaged"? Mine did.
Volvo don't supply replacement covers, instead you can get a whole new wishbone for £90 - no thank you. I had to try a few places before I found some at my local indy garage. He supplied me with two boots, spring clips and grease for a fiver. There seems to be a few places offering them online, some people on the forum appear to be about to take the plunge so hopefully they will report back with links. The dimensions for the replacement (measured from an original Volvo one) are: Top internal hole - 15mm Bottom internal hole - 30mm Height - 27mm The code on the original Volvo one read "TAP CFW14 V4-21509". This is what I got from my local (the code printed on them was "09-193-6"), don't forget you need special ball joint grease.  Tools required 17mm socket and breaker bar 18mm spanner & 19mm open-ended spanner Fork type ball joint splitter Hammer Jack and stands Mole Grips (possibly) Removing the Wishbone Get the car in the air, axle stand and wheel off  Clean up the thread as much as you can above the ball joint, use your favourite WD40/PlusGas/Rustola/etc to free up the nut. Ooh yes, my covers are a bit bad...  Likewise apply releasant to the other bolts holding on the wishbone  Remove the bolt on the front edge of the wishbone using a 17mm socket and an 18mm ring spanner  Remove the two bolts (17mm) at the rear edge  Now time for fun, using a 19mm open ended spanner, undo the nut on top of the ball joint. You can't undo it all the way as there is not enough clearance with the hub for it to come off, so you have to undo it half way  Insert the ball joint splitter and give it a few whacks with the hammer. BE CAREFUL using your ball joint splitter this way up! I don't really know if it makes a difference but it made a bit of dent on the edge of the ball joint surround, I think it's probably supposed to be the flat bit against the ball joint and the slope against the hub which is how I did the other side (unintentionally - the clearance was better  ) and it didn't mark that one. ) and it didn't mark that one. Once the joint is split, continue undoing the ball joint nut. When I got to the top, the ball joint started to rotate so I used a pair of Mole Grips to hold it still and finally get the nut off.  Turn the wheel out to help clear the hub and remove the wishbone. BE VERY CAREFUL from this point on that you do not pull the drive shaft out of the gearbox (so do not pull the wheel hub away from the car).  Restoring the wishbone - optional step... My wishbone was a bit rusty when I got it off, so I took the opportunity for a quick refurb. Got all the dirt and flaky rust off with a wire brush  Quick wash 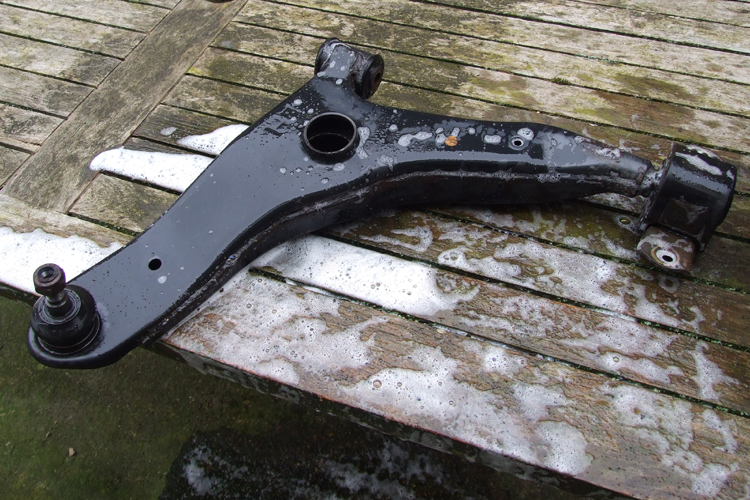 I prised the clip off with a flat bladed screwdriver 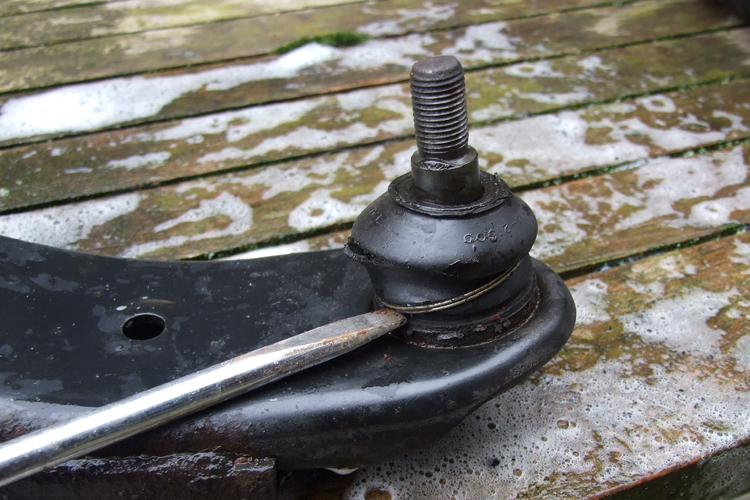 VADIS says the torque tolerance for the ball joint should be between 1 and 3Nm, but you need a special tool to measure this. Clear out the ball joint and inspect it, make sure it is serviceable before you continue (it should be a fairly tight when you try and move it and it should move evenly and freely).  Then I got the Hammerite out (top stuff ) and gave them a good lashing I also gave the insides of the wishbone and the bushes a good blast of silicon spray, be good for at least another ten years  Replacing the ball joint covers I used the top spring clips that came with my set but the larger spring clips were like cheap key rings (see how the cover is deformed on the left), the original Volvo ones were much slimmer (on the right) so I ended up re-using those.  The lower edge of the ball joint where the cover meets the wishbone was quite rusty, so I filed away the crud being careful to avoid getting any in the joint.  Work the grease into the joint  Fill up the hole  Squirt the rest in the cover  Put the cover on the ball joint, you can slide it on with the top spring clip in place. Squeeze out as much air as you can as you go  I tried various ways but this worked for me for getting the lower spring clip on... start with one end of the clip in the groove 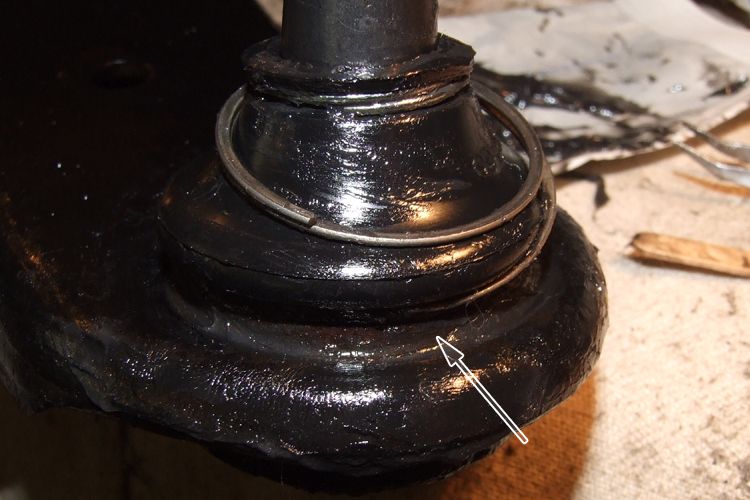 and work it around the cover, sort of pulling horizontally (partly un-spiralling it) to get it to go around. Success...  Re-installing the wishbones  Make sure the surround and hole the ball joint goes into are clean and free of grit, clean it up with a wire brush but don't forget to be careful of your driveshaft falling out.  It helps to get the wishbone in if you tilt the ball joint slightly inward before inserting  Put the inner side of the wishbone in first  Then the ball joint end 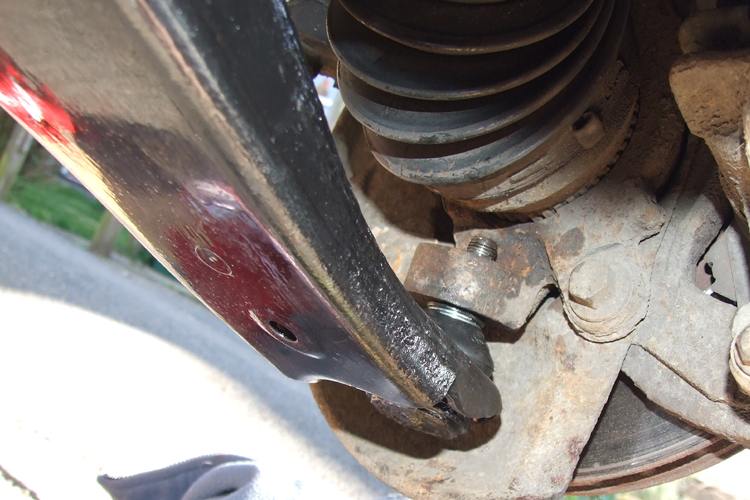 Hand tighten the bolts 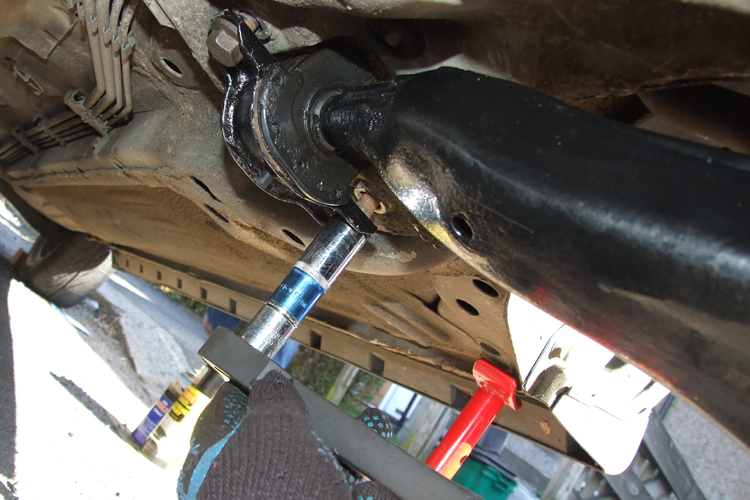 Put some weight on the ball joint end with a jack to stop it turning and tighten the nut.  Torque procedure from VADIS...  I have to say I didn't torque my ball joint nut - you'd need a crows foot socket but it hasn't fallen off yet All in a pretty easy job, go and get your retest.
__________________
Current: '02 V40 1.9TD, '02 V40 T4 Previous: '00 V40 1.9TD, '99 V40 1.9TD, '97 V40 2.0CDi, '87 240DL |

|

|
| The Following 27 Users Say Thank You to v40alex For This Useful Post: |
|
May 23rd, 2014, 22:07
|
#2 |
|
Premier Member
Last Online: Aug 1st, 2015 09:34
Join Date: Oct 2013
Location: Southampton
|
Top guide Alex. Will be used when I go to do mine
|
|
|
|
|
May 23rd, 2014, 22:08
|
#3 |
|
Master Member

Last Online: Aug 1st, 2023 20:43
Join Date: Feb 2012
Location: BATCAVE
|
Excellent guide alex..

__________________
2003 V40 1.9 D SPORT 272K 2001 V40 T4 SPORT 134K ipse se nihil scire id unum sciat |
|
|
|
|
May 23rd, 2014, 23:29
|
#4 |
|
I've Been Banned
Last Online: Mar 4th, 2023 12:36
Join Date: Aug 2013
Location: paignton
|
Brilliant guide Alex and essential money making guide,as they charge about £90 for ball joints in a garage
 ,hope people will learn from this and save a fortune thanks for putting it together ,I like youre gloves are they those grippy ones even when wet lol. ,hope people will learn from this and save a fortune thanks for putting it together ,I like youre gloves are they those grippy ones even when wet lol.
|
|
|
|
|
May 24th, 2014, 00:22
|
#5 |
|
Junior Member
Last Online: Aug 17th, 2017 18:44
Join Date: Jun 2013
Location: moved to Cleethorpes
|
Brilliant easy to follow guide posted at the right time for me as my covers are in need of replacemen thank you Alex
__________________
Geoff. current car 1999 v40 2.0 N/A petrol. 253157miles |
|
|
|
|
May 24th, 2014, 08:58
|
#6 |
|
I've Been Banned
Last Online: Mar 4th, 2023 12:36
Join Date: Aug 2013
Location: paignton
|
Money saving not money making duh meee lol
|
|
|
|
|
May 24th, 2014, 11:04
|
#7 |
|
I do like a V40
Last Online: Dec 1st, 2018 19:03
Join Date: Oct 2013
Location: North Surrey
|
No probs everyone, I knew a few people needed to do it, hope it helps to save a few pennies. Do post up a link if you confirm your online sourced boots fit. I notice this has magically appeared in the articles section, if we get any links, I'll edit them in if I can.
I've had those gloves for years Kieran, they're old Fox motocross mechanic ones
__________________
Current: '02 V40 1.9TD, '02 V40 T4 Previous: '00 V40 1.9TD, '99 V40 1.9TD, '97 V40 2.0CDi, '87 240DL |
|
|
|
| The Following User Says Thank You to v40alex For This Useful Post: |
|
May 24th, 2014, 12:18
|
#8 | |
|
Premier Member
Last Online: Aug 1st, 2015 09:34
Join Date: Oct 2013
Location: Southampton
|
Quote:

|
|
|
|
|
|
May 24th, 2014, 13:07
|
#9 |
|
Premier Member
Last Online: Jan 3rd, 2024 14:43
Join Date: Feb 2012
Location: Toronto Canada
|
Nice job - I noticed that mine will need to get done within a year as small crack is appearing in rubber. Top marks for cleverness I had been under the impression that 1) you needed to remove the axle to access the o/s nut and 2) that you had to replace the entire contol arm when this boot failed. Thank you for taking the time to put this together.
__________________
2003 V40 1.9T B4204T4, 197,000miles (sold but alive!), 2004 S60 2.5T, 160,000miles, 2010 V70 3.2, 125,000miles, 2002 V70XC 2.4, 175,000miles  Click here for my x40 and V70 P3 repair guides |
|
|
|
|
May 24th, 2014, 20:35
|
#10 |
|
Premier Member
Last Online: Aug 12th, 2020 21:26
Join Date: Mar 2014
Location: Plymouth
|
Is it really special ball joint grease? Looks just like ordinary automotive grease? Not sure the kit I'm looking at comes with grease so mine will probably get whatever grease I can find in the workshop! I have to admit I wasn't anticipating removing the wishbone to do the job. The point about the driveshaft coming out of the gearbox is very well made as I probably wouldn't have thought of it. Didn't someone have a nightmare with the ball bearings falling out of the inner cv joint? I'll be cable tying the driveshaft in place when I attempt it.
|
|
|
|
|
| Currently Active Users Viewing This Thread: 1 (0 members and 1 guests) | |
|
|


 Linear Mode

