
|
|||||||
| PV, 120 (Amazon), 1800 General Forum for the Volvo PV, 120 and 1800 cars |
 Information
|
|
New (to me) 1963 Volvo 122Views : 644723 Replies : 1365Users Viewing This Thread : |
 |
|
|
Thread Tools | Display Modes |
 May 22nd, 2022, 18:56
|
#871 | |
|
Premier Member
Last Online: Today 19:03
Join Date: May 2012
Location: Lakenheath
|
Quote:
I'd guess you'd use it more than 4 wheels worth a year, if you hit a pothole etc or otherwise think your wheels are out of balance.
__________________
Cheers Dave Next Door to Top-Gun with a Honda CR-V & S Type Jag  Volvo gone but not forgotten........ Volvo gone but not forgotten........
|
|

|

|
| The Following User Says Thank You to Laird Scooby For This Useful Post: |
|
May 22nd, 2022, 22:24
|
#872 |
|
VOC Member
Last Online: Today 19:21
Join Date: Mar 2008
Location: Northampton
|
The phase convertor to run it an a domestic supply would probably be more than the cost of the machine.
__________________
2001 V40 2.0lt Sport lux - Daily Driver. 174k miles. 2003 C70 2.4 GT Convertible - Garage Queen. 65k miles. http://www.neptuno6benagil.com |
|
|
|
| The Following User Says Thank You to ITSv40 For This Useful Post: |
|
May 22nd, 2022, 22:43
|
#873 | |
|
Premier Member
Last Online: Today 19:03
Join Date: May 2012
Location: Lakenheath
|
Quote:
Ways round most things! 
__________________
Cheers Dave Next Door to Top-Gun with a Honda CR-V & S Type Jag Volvo gone but not forgotten........
|
|
|
|
|
|
May 23rd, 2022, 05:36
|
#874 | |
|
Premier Member

Last Online: Today 11:29
Join Date: Jan 2020
Location: Corby del Sol
|
Quote:
:-)
__________________
... another lovely day in paradise. 
|
|
|
|
|
| The Following 2 Users Say Thank You to Othen For This Useful Post: |
|
May 24th, 2022, 12:35
|
#875 | |||
|
Premier Member
Last Online: Today 11:29
Join Date: Jan 2020
Location: Corby del Sol
|
Quote:
Quote:
Quote:
The starter only takes a few minutes to remove (it was easiest to unbolt to clutch slave completely and let it dangle out of the way), to reveal the starter:  It came apart easily in the vice: oil filter grips are handy to get the end off:  All 4 of the brushes seemed to be in good condition and had lots of wear left yet:  The commutator didn't look too bad either, so I just gave it a clean up with some fine emery paper (as per Dave's advice) and the lands a clean out with a small screwdriver:  I didn't test anything (electrically) but it seemed the brushes and commutator were in good order and unlikely to be causing the problem, so I turned my attention to the solenoid. I'd acquired a NOS replacement a few weeks ago (I think for only £20) so I replaced it:  There was nothing obviously wrong with the old one - apart from being old. The starter was soon back together, cleaned up and with a new solenoid:  The whole scheme was pretty quick (an hour or so I suppose) and the motor started without problems. We'll have to see whether that cures the intermittent fault. It is hard to know whether cleaning up the commutator or changing the solenoid might have been the solution (assuming the issue is banished), but thank you for the advice chaps. Alan PS. Happy Empire Day!
__________________
... another lovely day in paradise.
Last edited by Othen; May 24th, 2022 at 12:54. |
|||
|
|
|
| The Following 3 Users Say Thank You to Othen For This Useful Post: |
|
May 24th, 2022, 13:04
|
#876 | |
|
Premier Member
Last Online: Today 19:03
Join Date: May 2012
Location: Lakenheath
|
Quote:
By the way, did you clean the solenoid plunger while you had the solenoid off? Also the Comm End Bracket shouldn't need water pump pliers, it should just lift off fairly easily. Worst case scenario, a small flat-bladed screwdriver in the drain hole between it and the main body of the motor is usually enough to lever it up and away.
__________________
Cheers Dave Next Door to Top-Gun with a Honda CR-V & S Type Jag Volvo gone but not forgotten........
|
|
|
|
|
| The Following 3 Users Say Thank You to Laird Scooby For This Useful Post: |
|
May 24th, 2022, 13:55
|
#877 | |
|
Premier Member
Last Online: Today 11:29
Join Date: Jan 2020
Location: Corby del Sol
|
Quote:
The exciter terminal on the old solenoid looked a bit scabby, that could have been the problem I suppose. It wasn't really worth investigating though, the new one works perfectly, and I think I discern that the starter is spinning a bit faster on start-up (that may be wishful thinking on my part). Everything got a clean up - hopefully that will be good for a couple of decades now. I'm not to worried about the commutator cover needing a nudge with the oil filter grips to get it moving - it had probably been in the same place for something between one and six decades. I've just been out for a test drive with several starts - all seems fine. I'll have to wait until everything is cold in the morn to give it a proper test. :-) Alan PS. I'm pretty sure I won't need it, but Amazon sells the correct brush holder set for my starter (001311001) by AS-PL (SBH0122S) for only £20.08: https://www.amazon.co.uk/AS-PL-SBH01.../dp/B08WLZ3TVD
__________________
... another lovely day in paradise.
Last edited by Othen; May 24th, 2022 at 16:01. |
|
|
|
|
| The Following 3 Users Say Thank You to Othen For This Useful Post: |
|
May 27th, 2022, 23:05
|
#878 |
|
Premier Member
Last Online: Today 19:03
Join Date: May 2012
Location: Lakenheath
|
Bit of a throwback to the tyre changer Alan, this video shows the idea of a duck head on the tyre changer.
https://youtu.be/wgS0ANCLaek I used a different duck head, one that doesn't "cup" the edge of the wheel but does the same job. https://smile.amazon.co.uk/gp/product/B07LD3DLNP As for the arm, i made it out of scraps i had laying around and an offcut of exhaust pipe shimmed with dog food tins and prevented from up/down movement on the centre post with modified exhaust clamps.   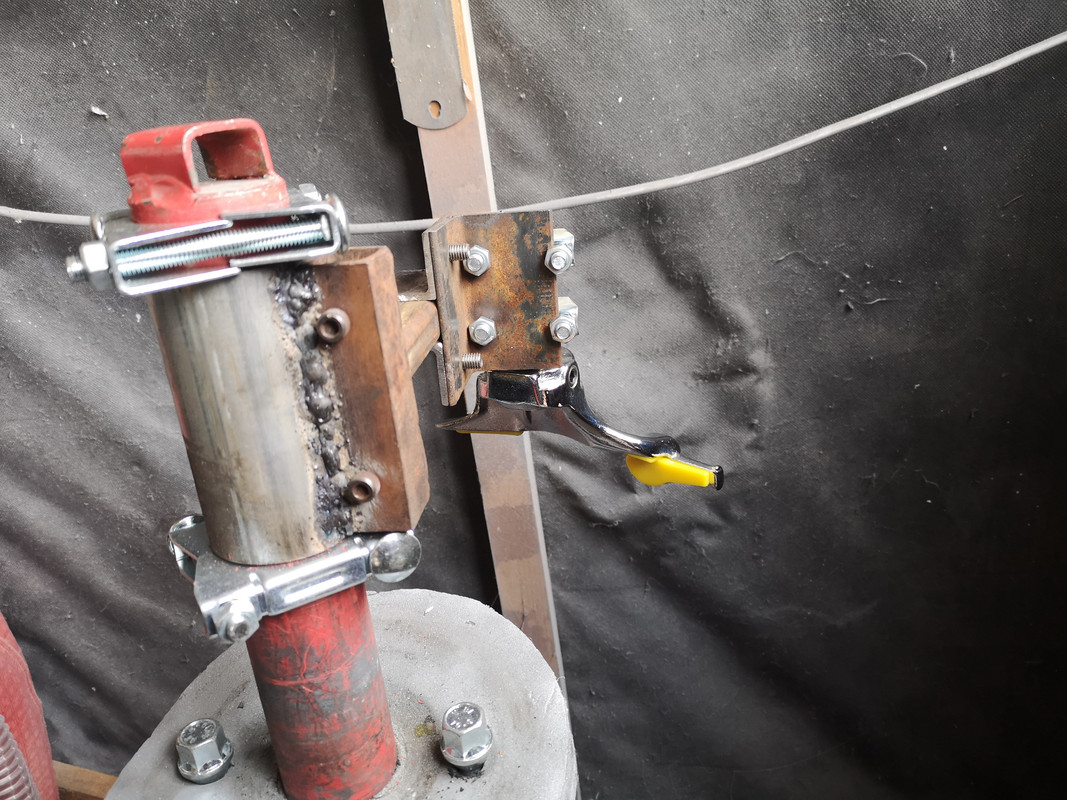 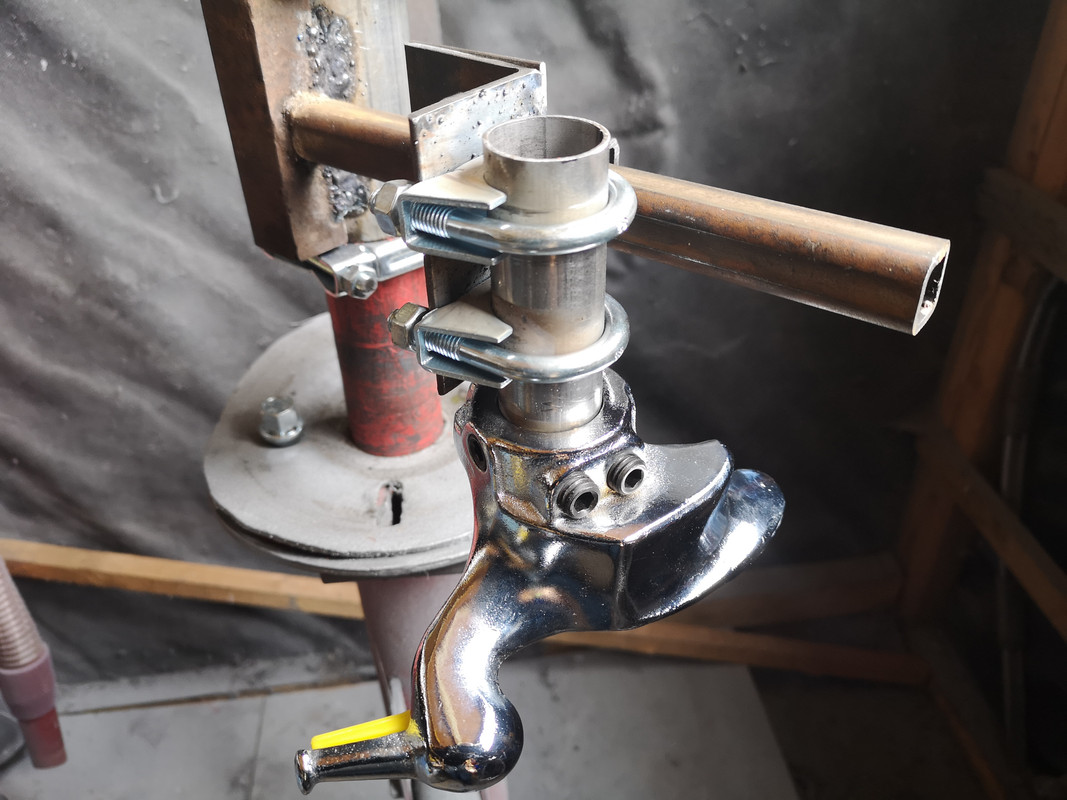 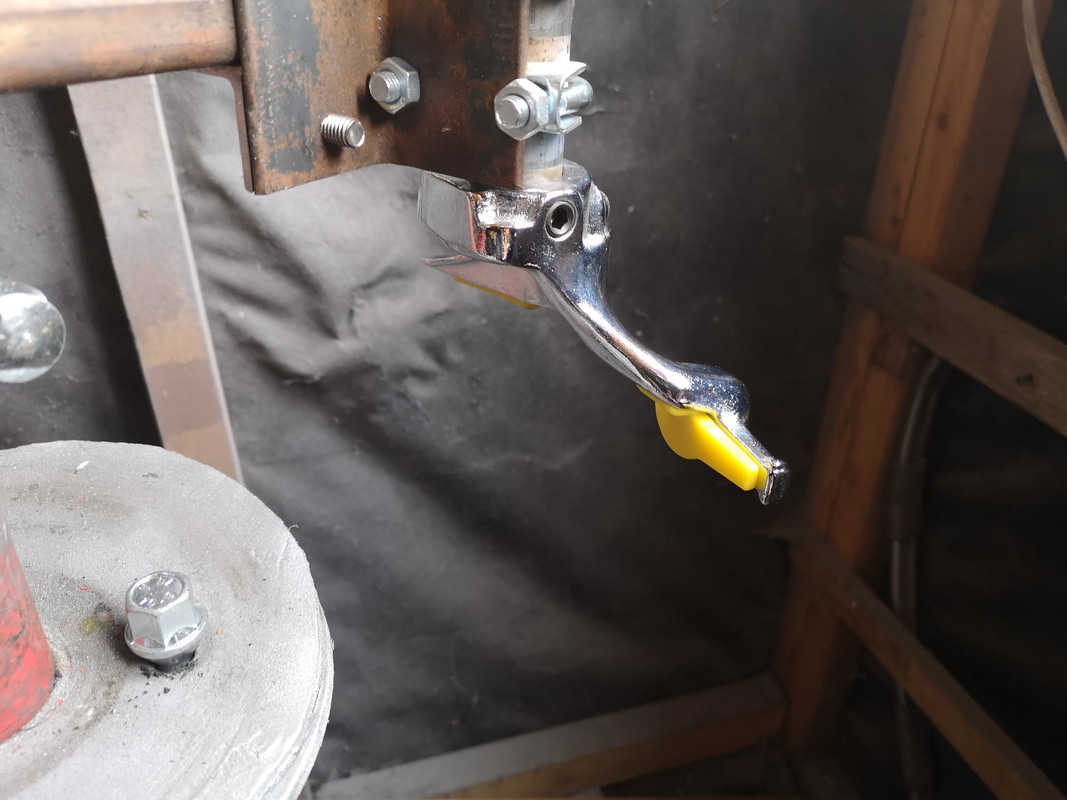 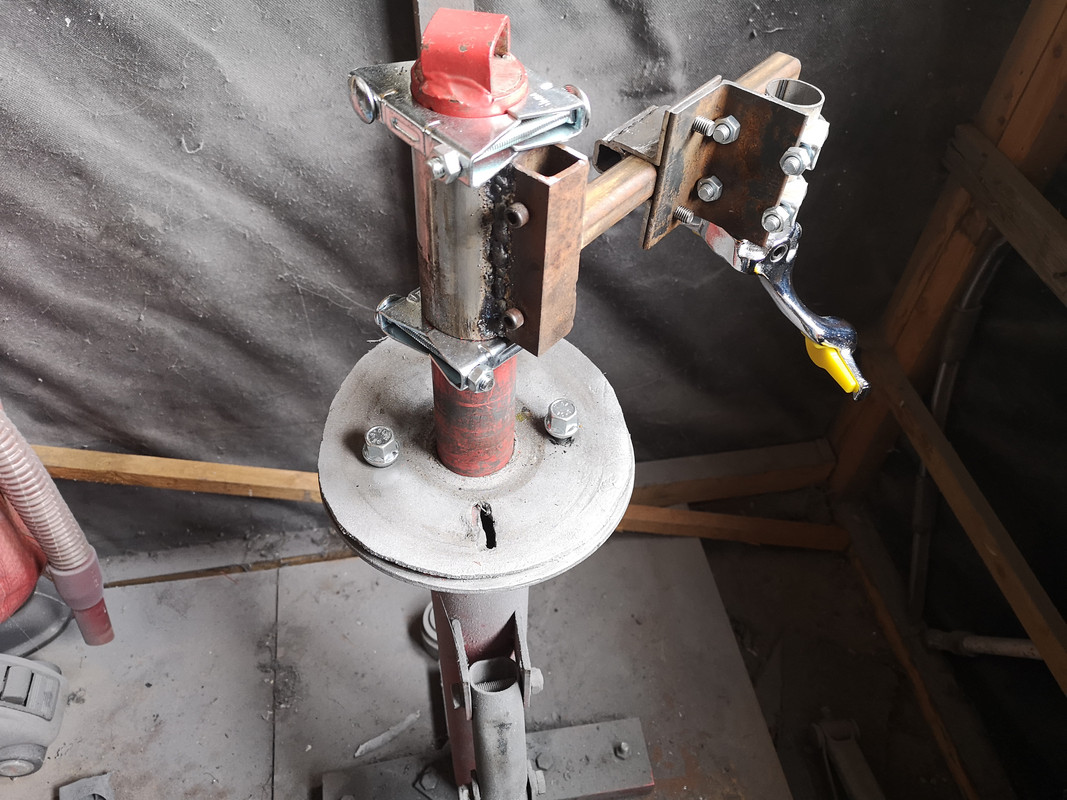 As the saying is a picture paints 1000 words, that's about 6000 words for you above! As for the bead clamp used in the video to prevent the tyre rolling round the rim when being refitted, i've not used them, i just apply downward pressure to the tyre diametrically opposite the duck head to start with the refitting - once it's going, the tyre grips the rim anyway until it's completely on.
__________________
Cheers Dave Next Door to Top-Gun with a Honda CR-V & S Type Jag Volvo gone but not forgotten........
|
|
|
|
| The Following User Says Thank You to Laird Scooby For This Useful Post: |
|
May 28th, 2022, 14:30
|
#879 | |
|
Premier Member
Last Online: Today 11:29
Join Date: Jan 2020
Location: Corby del Sol
|
Quote:
I found this demount duck head on Amazon for only £7.06 Dave: https://www.amazon.co.uk/SANON-Chang...-40&th=1&psc=1 ... at that price it might be worth getting just to experiment. Can you see any reason why this wouldn't work? If not I'll order one and fabricate something similar to the You Tube one out of bits in my scrap box. :-) Alan PS. I've gone ahead and ordered the 28mm Sanon duck head Dave - it was only £7 delivered (and I suppose if it turned out to be unsuitable I could return it for free with Amazon Prime - although I'm hardly likely to bother at that price). When it arrives I'll have a look for some scrap to weld up into the support bracket. I'll need to find some sort of cone for centreing as well (the chap in the video used an old bearing race). I enjoy projects like this :-)
__________________
... another lovely day in paradise.
Last edited by Othen; May 28th, 2022 at 14:52. |
|
|
|
|
| The Following User Says Thank You to Othen For This Useful Post: |
|
May 28th, 2022, 15:39
|
#880 | |
|
Premier Member
Last Online: Today 19:03
Join Date: May 2012
Location: Lakenheath
|
Quote:
Don't forget the arm needs to swivel around the centre post, i used an old LPG mixer to centralise it but i also then drilled and tapped the original changer wheel bed (that the wheel sits on) to go through two diametrically opposite holes for 4 stud 114.3PCD and 3 holes for 5 stud 108PCD (Volvo and Jag) at M12 x 1.5 then bought some long wheel studs M12 x 1.5 to hold the wheel in place. You can see two of the wheel bolts in the 114.3PCD holes (when i took the pics i hadn't done the extras for the 5 stud) if you look at my pics. Don't forget to turn the arm anticlockwise (viewed from above) to remove/refit the tyre, the duck heads are designed for automatic tyre changers that rotate the wheel clockwise (from above) but as the wheel is stationary, the arm has to move the opposite way. Hoping at some stage to motorise mine, perhaps with an old car alternator and a 3-phase e-bike driver. Can't decide whether to fix the arm or the wheel for that though.................... PS i did mine back in 2019 after seeing a "No-Mar" tyre changing bar on YT and searching for the bits to make one and it crossed my mind the duck head could be fitted to a bar that swivels around the cente post on the changer. I'm still working on a bead breaker that works using 8" nylon wheels to push the tyre bead down and runs on the same bar as the duck head.
__________________
Cheers Dave Next Door to Top-Gun with a Honda CR-V & S Type Jag Volvo gone but not forgotten........
Last edited by Laird Scooby; May 28th, 2022 at 15:45. Reason: PS........ |
|
|
|
|
| The Following User Says Thank You to Laird Scooby For This Useful Post: |
|
| Currently Active Users Viewing This Thread: 1 (0 members and 1 guests) | |
|
|


 Linear Mode

