
|
|||||||
| PV, 120 (Amazon), 1800 General Forum for the Volvo PV, 120 and 1800 cars |
 Information
|
|
Brake System UpgradeViews : 85610 Replies : 321Users Viewing This Thread : |
 |
|
|
Thread Tools | Display Modes |
 Dec 16th, 2009, 05:31
|
#31 |
|
Member

Last Online: Jun 29th, 2022 04:38
Join Date: Mar 2009
Location: Corvallis, Oregon USA
|
John,
Thanks for the nice comments. This project has required a pretty large amount of research so far. Volvo used all kinds of disc and caliper combos in the 700 and 900 series and it seems like the most common disc was the 280 x 26mm, which is what the majority of auto part sites sell as "fits all submodels". The single most useful tool I found for making sense of it all was the Brembo Aftermarket Disc Catalog. Looks like the 780 is the only one that didn't come with the 280 x 26mm disc. It came with either the 262 x 22mm or the 287 x 22mm, which is the size I'm after. So this is the model I've been using when looking for rotors online. Also it seems like the various different slider calipers are interchangeable with all the disc sizes, just different mounting brackets are required. However they do have either one or two inlets depending on if the car came with ABS or without, respectively. I'm glad to hear that the twin master cylinder/balance bar system doesn't need a servo. My estate requires quite a bit of effort for emergency stops as it is now. I'm definitely looking forward to the much greater efficiency and capacity my new brake system will have. It's been raining the last couple of days here so I didn't do any fabricating until today. I spent about an hour playing with my horizontal bandsaw accurately adjusting it back to 90° from the 45° I was using on my last project and finally got around to replacing the four adjuster screws with shortened SS ones. After that was done I got down to business: Notch marked out on the main body and first piece cut.  Corner radius of notch determined and centers punched. I also cut most of the top part of the notch with the horz bandsaw.  Notch corners drilled to 3/8".  Remaining cuts done with jigsaw.  Skipping ahead a bit, this shows all the parts I made today in an exploded view. They're all shaped and deburred here.  Fit check.  Cutting the notch was much easier than I was thinking it would be. The only real PITA was that the square tubes are not really dimensionally accurate. So I had to use the bench grinder to custom mate everything for the flush fit that you see in the last pic. Guess that's to be expected with cheap steel like this.
__________________
"Why is it that there's never enough time to do it right, but there's always enough time to do it again?" |

|

|
|
Dec 22nd, 2009, 22:14
|
#32 |
|
Member
Last Online: Jun 29th, 2022 04:38
Join Date: Mar 2009
Location: Corvallis, Oregon USA
|
Update: I've almost completely finished the main body. All that's left to do is fit this into the pedal box of my estate and mark the final position of the upper pivot tube for welding.
First weld, which will be inside when assembled.  This is the main body fully welded, grinded flush, and sanded smooth. All the edges were beveled first to give good penetration.  This shows the balance bar pivot tube welded in. The other side didn't turn out as good so I'm not going to show it. ;)  And finally here's my "new" 1800 rearend before cleanup. 
__________________
"Why is it that there's never enough time to do it right, but there's always enough time to do it again?" |
|
|
|
|
Dec 23rd, 2009, 07:51
|
#33 |
|
Member

Last Online: Jun 11th, 2017 19:24
Join Date: Apr 2007
Location: Skipton
|
Looking good. Are you going to fit bushes or bearings to the pivot or have you machined the body to fit the pivot shaft?
I hope you dont mind but i will be copying your design! Heres a few pics of my ES back axle with the estate brackets welded on  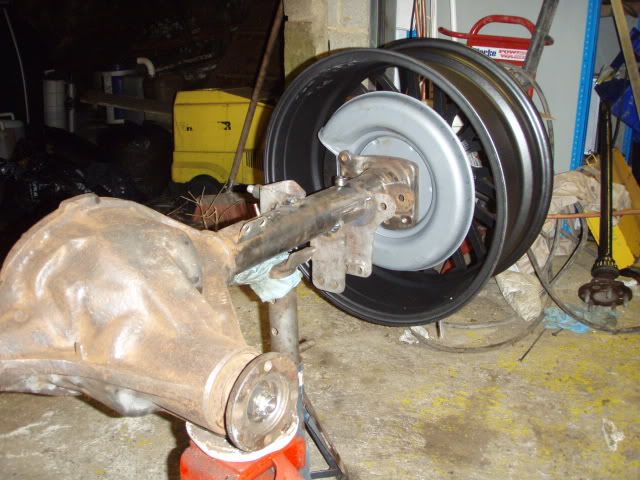 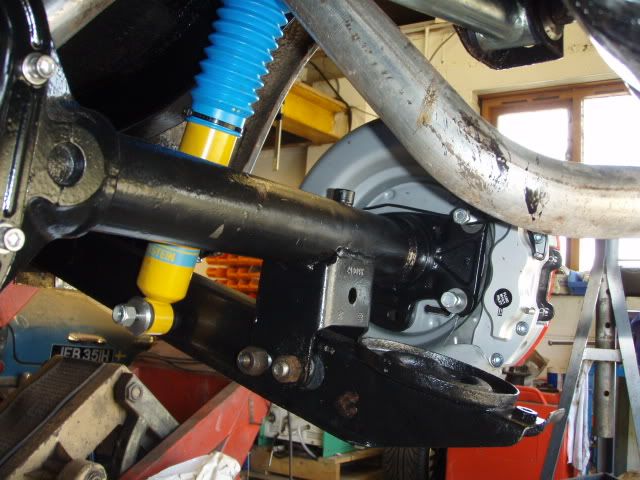
|
|
|
|
|
Dec 23rd, 2009, 08:38
|
#34 |
|
Member
Last Online: Jun 29th, 2022 04:38
Join Date: Mar 2009
Location: Corvallis, Oregon USA
|
The upper pivot tube will be welded in and it will use the stock plastic bushings to keep it simple. I appreciate the axle pics, they'll be useful for reference when that step is reached. Got a bit more done this evening:
I thought the body assembly was almost done, but totally forgot that the upper part of the body needed to be cut down around the upper pivot to clear the pedal box. The horizontal bandsaw made short work of this otherwise PITA step.   This shows the body with both the balance bar and the pivot tube & bushings. 
__________________
"Why is it that there's never enough time to do it right, but there's always enough time to do it again?" Last edited by dheming; Dec 23rd, 2009 at 08:42. |
|
|
|
|
Dec 31st, 2009, 21:48
|
#35 |
|
Member
Last Online: Jun 29th, 2022 04:38
Join Date: Mar 2009
Location: Corvallis, Oregon USA
|
I've been super busy this last week so not much progress has happened. My sister's BF was visiting and we built him a sweet custom table that he designed for his old school 9" Southbend metal lathe. Steel pipe 2.5" x 1/4" + forged fittings = lots and lots of grinding and welding compounded by the fact that I got sick half way through. Turned out pretty good though:
 During all that I did get a chance to tack the upper pivot tube into the arm body. I positioned it so that with the balance bar centered in the arm body there was equal space on either side of the threaded rod. It ended up being about a 1/4" to the clutch arm on the left and a bit less than that to the pedal box wall on the right. I might have to "massage" this wall a bit to give some more clearance or maybe just cut the threaded rod a bit.  
__________________
"Why is it that there's never enough time to do it right, but there's always enough time to do it again?" |
|
|
|
|
Jan 1st, 2010, 07:56
|
#36 | |
|
VOC Member
|
Excellent work; I love the quality of fabrication going on here!
Quote:
Cheers John
__________________
XX 
|
|
|
|
|
|
Jan 2nd, 2010, 10:50
|
#37 |
|
.
Last Online: Jul 14th, 2013 14:28
Join Date: Dec 2009
Location: MK
|
Why are you putting in an 1800 rear end? The axle needs modification to fit the 120 wagon rear suspension. The 240 axle has a far superior handbrake mechanism and is the right width, still needs modification of course.
|
|
|
|
|
Jan 2nd, 2010, 14:47
|
#38 |
|
Premier Member

Last Online: Today 00:07
Join Date: Jul 2007
Location: Connecticut, USA
|
Derek;
I normally don't chime in unless I have some useful (or useless depending on your disposition) information to add to a thread...(or even the odd wisea** comment), but I have been following this thread from the beginning and am compelled to comment that you do beautiful work!...I think we could enjoy an adult beverage together! I look forward to continuous project updates, pix, and hopefully a comprehensive wrapup when complete. Cheers from the other coast! |
|
|
|
|
Jan 5th, 2010, 00:16
|
#39 |
|
Member
Last Online: Jun 29th, 2022 04:38
Join Date: Mar 2009
Location: Corvallis, Oregon USA
|
Thank you guys for the nice comments. I take great pride in my work and I truly enjoy working with my hands. Not only that but once we're gone from this world the things we've built will be the only things physically left of us so I build accordingly. Also I feel our country is over run with cheap Chinese garbage everywhere I turn, so it really feels great to be able to build anything I need out of quality materials while avoiding buying said garbage as much as possible. There was a time when most everyone knew how to work on their own cars, built things with quality materials, and generally took pride in using high quality American made goods. That seems to have changed into trade your plastic car in every two years, rebuild every 5 years with disposable materials, outsource everything, and generally use the cheapest crap possible as much as possible. Even though I'm only 27 I feel like an old-timer in my ways!
Ron, beverages of the adult variety are one of my favorites and if you're ever in the SF area feel free to hit me up and we shall partaketh.  940_Turbo, using an 1800 rear end seemed logical as that's what everyone uses in this application and it's a good axle (Dana 30). I could of swore reading that the 240 rear was a bit wider but I haven't actually measured one to verify. I couldn't find any good pics to show the difference, care to elaborate on the handbrake? Got the pivot tube fully welded in yesterday and redid the hard to reach inside balance bar pivot tube welds: 
__________________
"Why is it that there's never enough time to do it right, but there's always enough time to do it again?" |
|
|
|
| The Following User Says Thank You to dheming For This Useful Post: |
|
Jan 5th, 2010, 05:37
|
#40 | |
|
Member
Last Online: Jun 29th, 2022 04:38
Join Date: Mar 2009
Location: Corvallis, Oregon USA
|
Quote:

__________________
"Why is it that there's never enough time to do it right, but there's always enough time to do it again?" |
|
|
|
|
|
| Tags |
| 4-link, big brakes, coilovers, spherical joints, wilwood brakes |
| Currently Active Users Viewing This Thread: 1 (0 members and 1 guests) | |
| Thread Tools | |
| Display Modes | |
|
|


 Linear Mode

