
|
|||||||
| S40 / V40 '96-'04 General Forum for the Volvo S40 and V40 (Classic) Series from 1995-2004. |
 Information
|
|
Guide: How to replace headlamp relay in CEMViews : 16008 Replies : 11Users Viewing This Thread : |
 |
|
|
Thread Tools | Display Modes |
 Nov 1st, 2014, 21:54
|
#1 |
|
Premier Member
Last Online: Jan 3rd, 2024 14:43
Join Date: Feb 2012
Location: Toronto Canada
|
Overview:
I recently went through a couple of low-beam bulbs thinking that the bulbs themselves were going bad. I did some very rudimentary analysis and determined that I had good voltage going through when the bulb was not present but the minute the bulb was inserted into the circuit, no light. I was advised by forum members that most likely root cause was a faulty relay in the CEM. I was also given some great feedback on how to troubleshoot further by KBB (see link for details: http://www.volvoforums.org.uk/showthread.php?t=216299). I decided to simply replace the relay and see if that cured my issue...it did. Job Difficulty: I would rate this a level 3/10 difficulty job. Most of the steps are quite straightforward but it does require messing with the CEM AND it involves some basic soldering on a very expensive piece of electronics. Assuming all goes well you should be done this in under an hour. Job Overview: In short, the job involves disconnecting the battering, taking two inner trim panels off from underneath the steering wheel and removal of the CEM. Once the CEM has been removed, its a matter of locating the faulty relay, removing and replacing it with a new one of similar specs. Put it all back together and you have yourself a functioning headlight! References: http://www.volvoforums.org.uk/showthread.php?t=67584 http://www.volvoforums.org.uk/showthread.php?t=216299 Tools Required: - Flashlight - phillips screwdriver - small flathead screwdriver - Soldering gun, solder, solder remover tool - 10mm socket - patience, steady hands Step 1: Purchase the relay. I purchased mine from Mouser Electronics in the US (as I'm in Canada). The relay costs about $2. I bought an extra in case my other relay fails in the future. The Mouser p/n is 769-JSM1-12V-5, , the description was 15A 12VDC SPDT. It has five pins on the bottom. See the pics below for visuals of the relay. 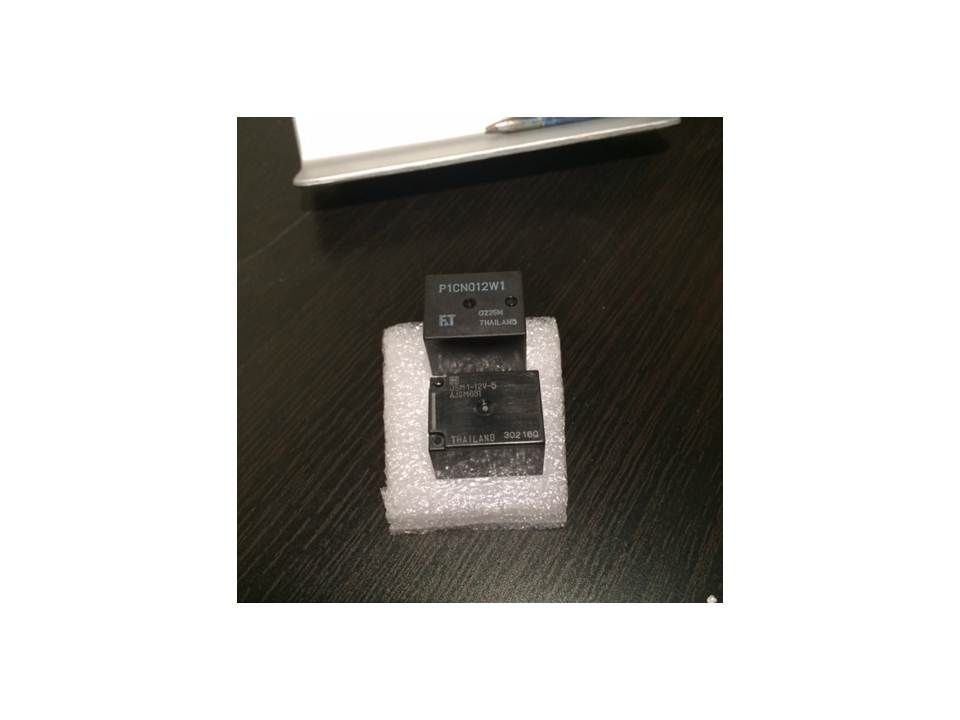 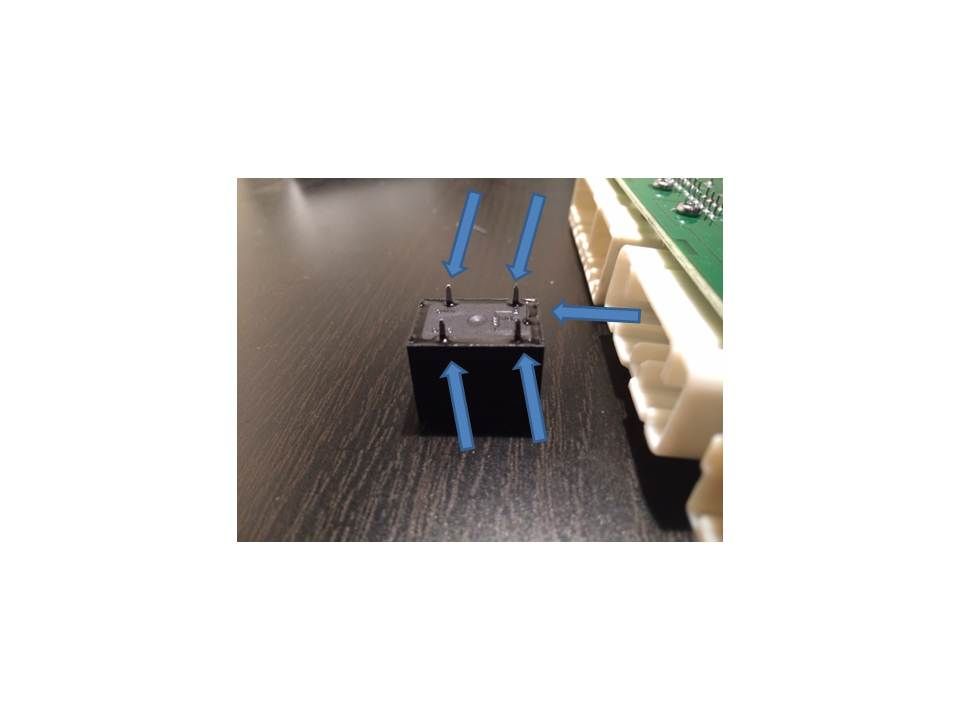 Step 2: Disconnect the negative terminal from the battery. Also make sure that you have your radio code handy. Step 3:Remove the felt trim which is immediately above the gas/brake pedals. It is removed by pullling on the two plastic tabs located towards the front.  Step 4: Remove the plastic trim immediately below the steering wheel. It is removed by unscrewing 4x phillips-head screws. Note that one is located on the bottom left (next to the hood latch) and is covered by a cap. Pop off the cap to access. Note also that there is one L shaped connector on each side a the bottom. To remove the panel without breaking these pull forward (towards the seat) and then inwards. The clip can be seen in the first pic below. Lastly be careful when pulling the panel out of the footwell as the DC connection for the footwell light will need to be unplugged before you can set the panel aside.  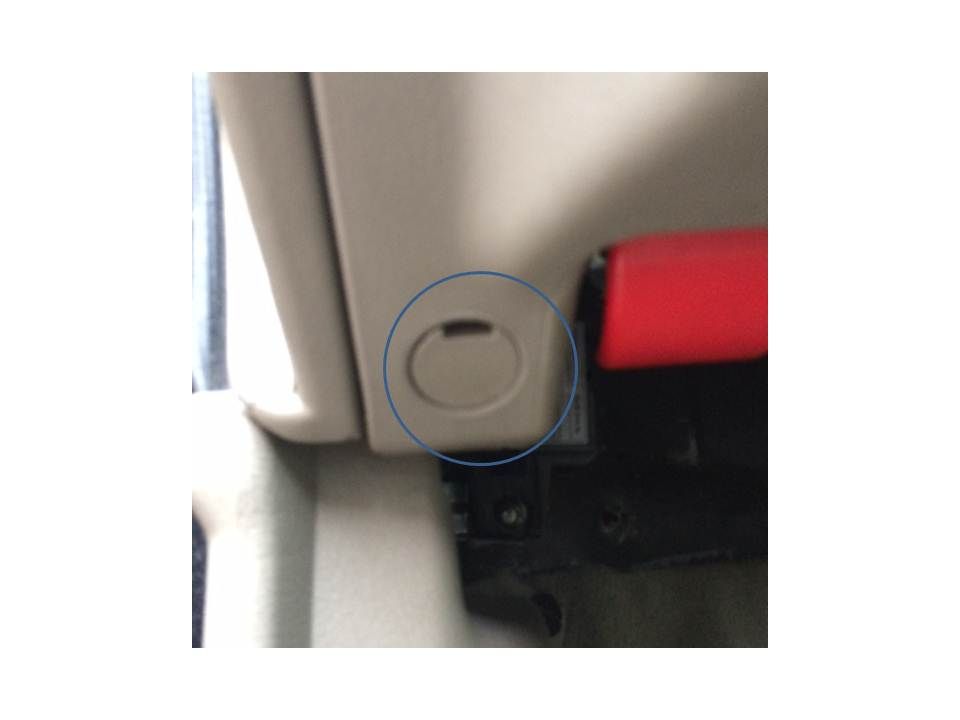 Step 5: Unplug the four connectors to the CEM. Use a small flathead screwdriver and push the locking tab inwards to disconnect each. I was unable to get all four undone without doing step 6 first but give it a go, maybe it was just me. Make sure you at least get the bottom two white connectors out. If you don't you'll have a tough time pulling the CEM out in step 6. Also, don't do what I did and get too aggressive in pushing the locking tabs inwards. I busted one.... 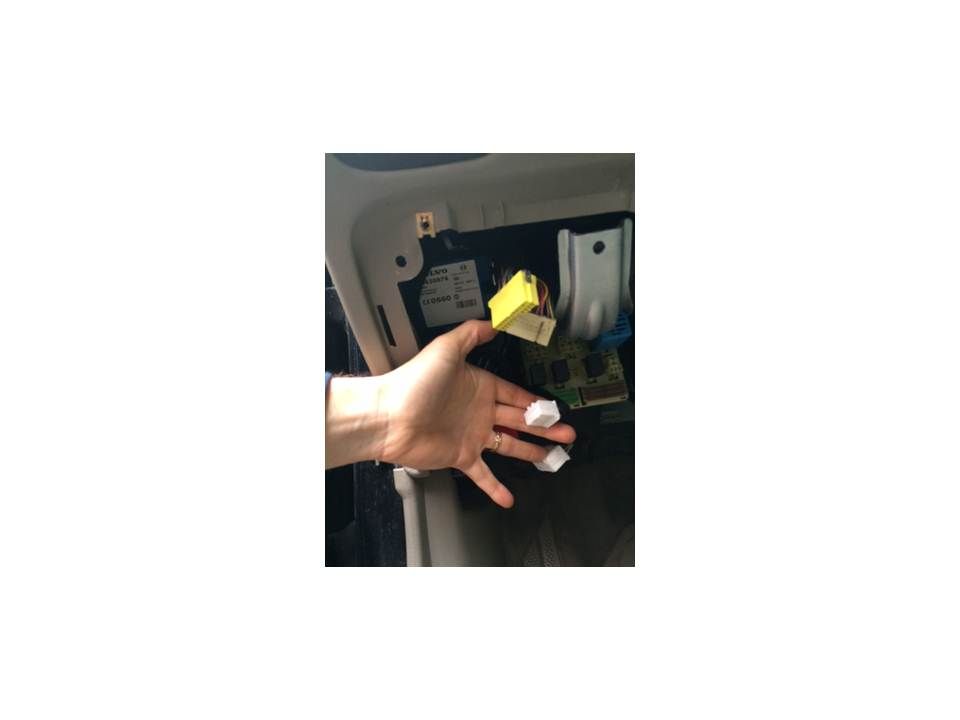 Step 6: Remove the CEM from vehicle. This is done by unscrewing the two phillips screws first. YOu then need to pull the CEM out sideways making sure that the metal brackets done get caught up on the trim. If you were not able to get all four connectors out, now is the time to do the rest. 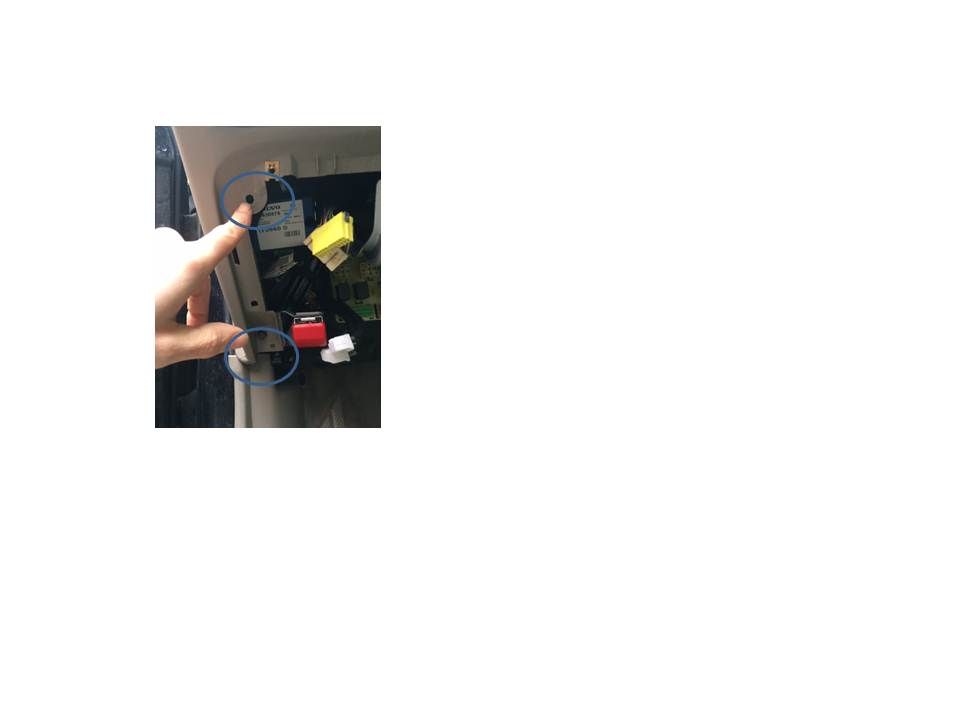 Step 7: Take the CEM appart. Don't do what I did and try to pry the two pieces apart before unscrewing the screw in the middle of the panel which for me was hidden behind the product # label. Once the screw is undone, just pry the two pieces apart carefully. 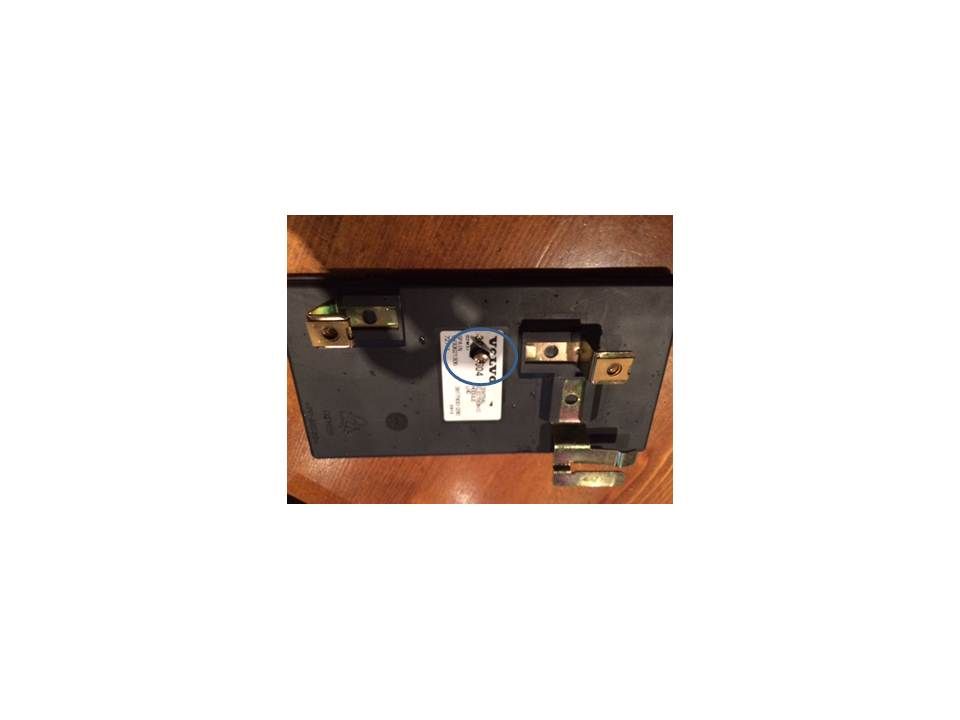 Step 8: Locate the headlamp relay. There are two. The one in the middle is for the right hand side and the other is for the left hand side. 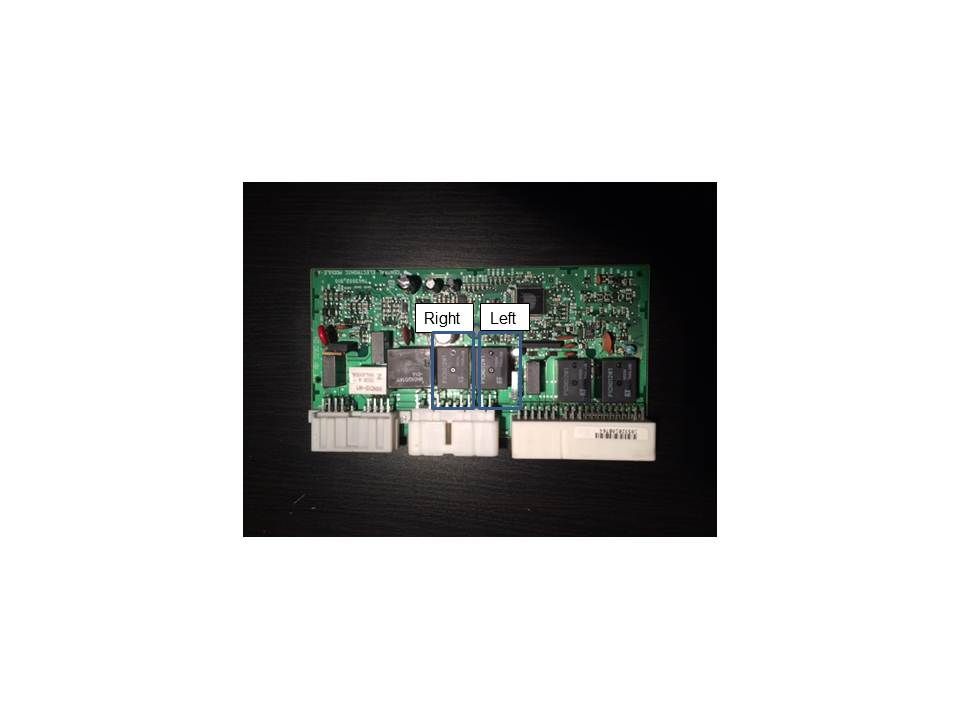 Step 9: Remove the relay. Locate the five solder points on the underside of the board and carefully remove the solder a little at a time until you can pull the relay out. I had to use a larger solder point for this vs. the one I usually use for circuit boards. It took me a good 25 minutes to get all five points clear enough that I could pull the relay out. I also cleared some of the holes up afterwards using a small drill but to make sure I could get the new one on without issue. 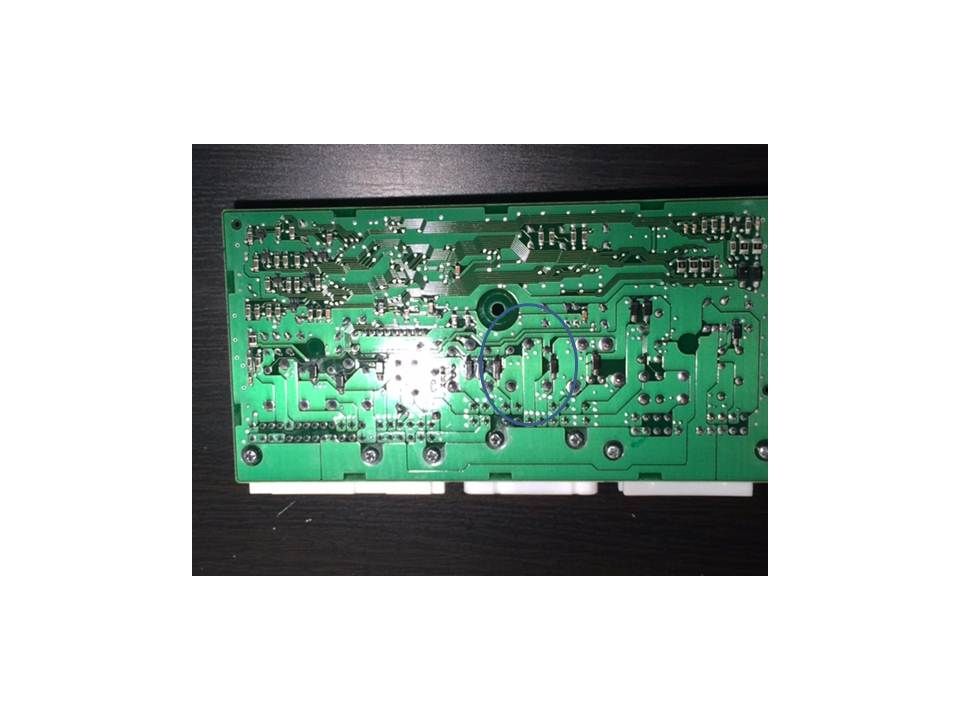 Step 10: Solder the new relay on. Simply push the new one in and solder it on. Then it's simply a matter of putting everything back together in reverse. Hope this helps someone out!
__________________
2003 V40 1.9T B4204T4, 197,000miles (sold but alive!), 2004 S60 2.5T, 160,000miles, 2010 V70 3.2, 125,000miles, 2002 V70XC 2.4, 175,000miles  Click here for my x40 and V70 P3 repair guides Last edited by pierremcalpine; Nov 1st, 2014 at 22:52. |

|

|
| The Following 18 Users Say Thank You to pierremcalpine For This Useful Post: |
|
Nov 3rd, 2014, 12:26
|
#2 |
|
Young Padawan

Last Online: Mar 15th, 2020 23:42
Join Date: May 2013
Location: Bath
|
Another great guide that covers a very common problem.
For UK people, the same relays needed can be purchased from CPC, delivered free at just over £5 delivered: http://cpc.farnell.com/panasonic-ele...Ntt=JSM1-12V-5 (In case the link ever goes down, CPC Order code: SW03934)
__________________
2001 Phase 2 V40 1.8s Manual: Family Pack, Pure Silver, 121k miles. |
|
|
|
| The Following 5 Users Say Thank You to coffeejunky For This Useful Post: |
|
Jun 23rd, 2015, 23:21
|
#3 |
|
Young Padawan
Last Online: Mar 15th, 2020 23:42
Join Date: May 2013
Location: Bath
|
Just noticed the images are dead on this guide, shame
 Also a shame that VOC does not allow editing of old posts as it could easily be fixed. We lose a lot of good content from this. They are still available on the Photobucket website it seems. Link below: http://s1318.photobucket.com/user/pi...Removal?sort=3
__________________
2001 Phase 2 V40 1.8s Manual: Family Pack, Pure Silver, 121k miles. |
|
|
|
|
Jun 25th, 2015, 17:24
|
#4 |
|
Premier Member
Last Online: Jan 3rd, 2024 14:43
Join Date: Feb 2012
Location: Toronto Canada
|
Overview:
I recently went through a couple of low-beam bulbs thinking that the bulbs themselves were going bad. I did some very rudimentary analysis and determined that I had good voltage going through when the bulb was not present but the minute the bulb was inserted into the circuit, no light. I was advised by forum members that most likely root cause was a faulty relay in the CEM. I was also given some great feedback on how to troubleshoot further by KBB (see link for details: http://www.volvoforums.org.uk/showthread.php?t=216299). I decided to simply replace the relay and see if that cured my issue...it did. Job Difficulty: I would rate this a level 3/10 difficulty job. Most of the steps are quite straightforward but it does require messing with the CEM AND it involves some basic soldering on a very expensive piece of electronics. Assuming all goes well you should be done this in under an hour. Job Overview: In short, the job involves disconnecting the battering, taking two inner trim panels off from underneath the steering wheel and removal of the CEM. Once the CEM has been removed, its a matter of locating the faulty relay, removing and replacing it with a new one of similar specs. Put it all back together and you have yourself a functioning headlight! References: http://www.volvoforums.org.uk/showthread.php?t=67584 http://www.volvoforums.org.uk/showthread.php?t=216299 Tools Required: - Flashlight - phillips screwdriver - small flathead screwdriver - Soldering gun, solder, solder remover tool - 10mm socket - patience, steady hands Step 1: Purchase the relay. I purchased mine from Mouser Electronics in the US (as I'm in Canada). The relay costs about $2. I bought an extra in case my other relay fails in the future. The Mouser p/n is 769-JSM1-12V-5, , the description was 15A 12VDC SPDT. It has five pins on the bottom. See the pics below for visuals of the relay.   Step 2: Disconnect the negative terminal from the battery. Also make sure that you have your radio code handy. Step 3:Remove the felt trim which is immediately above the gas/brake pedals. It is removed by pullling on the two plastic tabs located towards the front.  Step 4: Remove the plastic trim immediately below the steering wheel. It is removed by unscrewing 4x phillips-head screws. Note that one is located on the bottom left (next to the hood latch) and is covered by a cap. Pop off the cap to access. Note also that there is one L shaped connector on each side a the bottom. To remove the panel without breaking these pull forward (towards the seat) and then inwards. The clip can be seen in the first pic below. Lastly be careful when pulling the panel out of the footwell as the DC connection for the footwell light will need to be unplugged before you can set the panel aside.     Step 5: Unplug the four connectors to the CEM. Use a small flathead screwdriver and push the locking tab inwards to disconnect each. I was unable to get all four undone without doing step 6 first but give it a go, maybe it was just me. Make sure you at least get the bottom two white connectors out. If you don't you'll have a tough time pulling the CEM out in step 6. Also, don't do what I did and get too aggressive in pushing the locking tabs inwards. I busted one....  Step 6: Remove the CEM from vehicle. This is done by unscrewing the two phillips screws first. YOu then need to pull the CEM out sideways making sure that the metal brackets done get caught up on the trim. If you were not able to get all four connectors out, now is the time to do the rest.  Step 7: Take the CEM apart. Don't do what I did and try to pry the two pieces apart before unscrewing the screw in the middle of the panel which for me was hidden behind the product # label. Once the screw is undone, just pry the two pieces apart carefully.  Step 8: Locate the headlamp relay. There are two. The one in the middle is for the right hand side and the other is for the left hand side.  Step 9: Remove the relay. Locate the five solder points on the underside of the board and carefully remove the solder a little at a time until you can pull the relay out. I had to use a larger solder point for this vs. the one I usually use for circuit boards. It took me a good 25 minutes to get all five points clear enough that I could pull the relay out. I also cleared some of the holes up afterwards using a small drill but to make sure I could get the new one on without issue.  Step 10: Solder the new relay on. Simply push the new one in and solder it on. Then it's simply a matter of putting everything back together in reverse. Hope this helps someone out!
__________________
2003 V40 1.9T B4204T4, 197,000miles (sold but alive!), 2004 S60 2.5T, 160,000miles, 2010 V70 3.2, 125,000miles, 2002 V70XC 2.4, 175,000miles Click here for my x40 and V70 P3 repair guides |
|
|
|
|
Jun 18th, 2016, 17:48
|
#5 |
|
New Member
Last Online: Apr 16th, 2024 21:53
Join Date: Oct 2015
Location: Newport
|
Left hand dipped headlight went a few weeks ago - ordered a replacement relay (from RS in the UK), got the CEM out, desoldered the old relay, soldered in the new one, put it all back together, headlamps are perfect again. Thanks for the tips, especially for getting the CEM out from the car, the brackets are a pain in the butt!!
|
|
|
|
| The Following User Says Thank You to rad01wel For This Useful Post: |
|
Mar 15th, 2017, 13:46
|
#6 | |
|
sjsvolvo
Last Online: Mar 28th, 2017 12:51
Join Date: Mar 2017
Location: Tring
|
Hi
Thanks for link, just ordered this....hope it works for me. Quote:
|
|
|
|
|
|
Nov 25th, 2017, 23:03
|
#7 |
|
New Member
Last Online: Nov 25th, 2017 23:07
Join Date: Nov 2017
Location: Warwickshire
|
I've just completed this job to fix the non-functioning LH headlight in my 2003 V40 (UK spec) - and it worked - so thanks very much for taking the time to post these guides.
A couple of quick notes for general info: - my n/s headlight didn't work in either dipped or main beam modes - PD with headlight bulb removed ~11.5v - PD with headlight installed = 0v - took me ~3hrs start to finish without rushing - trickiest part was de-soldering old relays off; I found best technique was to use solder sucker to get the bulk of the solder off (I didn't have any de-soldering braid but this may help a little) then apply gentle pressure to each pin of the relay in turn (whilst heating the joint with the iron) to work each relay out. I'm sure there's a better way. - I can confirm the CPC relay mentioned above by coffeejunky definitely worked for me (http://cpc.farnell.com/panasonic-ele...Ntt=JSM1-12V-5) - thanks! - UK V40s (RH drive) do have the CEM under the steering wheel side of vehicle as well, in case anyone else goes fumbling under the glove box for 10 mins Cheers all for the help. Just gotta get the radio code now.... Simon |
|
|
|
| The Following User Says Thank You to Sy924 For This Useful Post: |
|
Sep 9th, 2018, 15:51
|
#8 |
|
New Member
Last Online: Sep 9th, 2018 15:57
Join Date: Oct 2009
Location: Glasgow
|
Excellent guide. Both relays needed replaced. Right at the limit of my comfort zone but problem solved. What made it easier was practising delsodering & resoldering on an old electric component several times before doing working on the CEM. Desolder pump is useful but still had to apply soldering iron whilst working individual pins free.
Thanks again |
|
|
|
|
Sep 9th, 2018, 15:55
|
#9 | |
|
New Member
Last Online: Sep 9th, 2018 15:57
Join Date: Oct 2009
Location: Glasgow
|
Quote:
|
|
|
|
|
|
Oct 24th, 2018, 03:24
|
#10 |
|
New Member
Last Online: Oct 24th, 2018 04:41
Join Date: Oct 2018
Location: Denver
|
Will this work on a 2007 Volvo XC70?
Backstory: I'm going to be purchasing my first Volvo tomorrow, a 2007 XC70 with 131,500 miles on it, $6,500. The car is in immaculate condition according to my own mechanic. Carfax shows all scheduled check-ups and repairs were made, for example the majors @ 108K: timing belt, water pump, control arms, but when I was doing my own pre-purchase vehicle inspection I noticed that there was condensation inside the passenger headlight and the headlight was out. The dealer is a small time guy, said that it's an issue of safety and that he would take it to his repair guy and have it replaced. His mechanic couldn't figure it out because a new lightbulb didn't fix it. So dealer took it to Volvo dealership. They diagnosed it as a CEM module and are quoting $1200 for replacement. To me, it sounds as though the issue is with the fuse in the CEM Module as this forum is explaining. Anyway, dealer doesn't want to pay $1200 for new CEM and so I negotiated him down to $5,300 without the fix. Will I be able to fix this with a new fuse and some soldering!? Otherwise my thought is worst case scenario I send it to xemodex and they repair the CEM Module for <$1200? |
|
|
|
|
| Currently Active Users Viewing This Thread: 1 (0 members and 1 guests) | |
|
|


 Linear Mode

