
|
|||||||
| XC90 '02'15 General Forum for the P2-platform XC90 model |
 Information
|
|
Rear fog lights???Views : 7882 Replies : 21Users Viewing This Thread : |
 |
|
|
Thread Tools | Display Modes |
 Sep 6th, 2013, 12:08
|
#11 | |
|
Petrolhead+Lots of Diesel

Last Online: Yesterday 20:20
Join Date: Aug 2008
Location: Glasgow
|
Quote:
 well not on the one I subsequently destroyed having a look. well not on the one I subsequently destroyed having a look. 
__________________
BMW X3 Msport MHEV 2020MY & VW Beetle Design 1.2Tsi DSG 2014MY Previous XC90 D5 SELux Geartronic 2009MY |
|

|

|
|
Sep 13th, 2013, 13:30
|
#12 |
|
Older than Junior Member
Last Online: Oct 12th, 2014 09:28
Join Date: Aug 2009
Location: Twon/City
|
As promised, here's a write up on how to upgrade your XC90 form 1 Fog Lamp to Two Fog Lamps ....
Note : This guide is provided for information only, and refers to how I completed the project on my own car. The part numbers quoted refer to my particular model of XC90, and are determined by providing your Volvo dealer with your VIN number. This guide and advice within it are offered as is - I am not a trained Volvo mechanic, and accept no responsibility whatsoever if you attempt the project and anything goes wrong, breaks, or doesnt work etc. ! - You do so entirely at your own risk ! The aim of the project was to replace the existing rear ( n/s ) reflector with a Fog Lamp housing, so that there would then be two Fog Lamps at the rear of the car acting together, instead of the ( UK ) legal minimum of only one. This guide relates to a RHD car, so a LHD Fog Lamp had to be purchased. Similarly, if modifying a LHD car, then a RHD Fog Lamp would be needed. Parts : LH Drive rear fog lamp body ( 31213647 ) £21.80 Fog Lamp bulb socket / harness ( 8693010 ) £10.00 Bulb : BAY9s 12v / 21w Tools : 10mm Socket & Socket wrench Torx Screwdriver Soft faced trim removal tool Strictly speaking there is no need to remove the main light cluster, but doing so makes access easier and reduces the risk of it becoming damaged ! It is best to perform this job on a warm day - plastic trim panels need to be removed and pried apart, and if attempted when the plastic is cold and brittle there is a risk of it cracking. From inside the rear cargo area remove the small corner piece from the floor ( it lifts straight out ), and then remove the access panel which pulls outwards from the tab on its bottom edge, allowing the panel to drop and free from the upper retaining tabs. There are two elongated 10mm nuts holding the rear light cluster in place as shown :   Remove these and then gently ease the light cluster away from the body of the car. The wires should be long enough for it to be turned to the side out of harms way. The red and black fog lamp wires are now visible. The body coloured trim panel - directly underneath the main light cluster, now needs to be removed from the black plastic box that it is attached to. It is held in place by lugs moulded around the edge of the trim, and just pulls straight out towards the rear of the car. It may need a little persuasion by gently twisting, flexing, and prying around the retaining tabs with a suitable soft tool so as not to damage the painted finish.  Once removed, the wiring socket into which the new Fog Lamp will be plugged is accessible. This is a good time to check that the new Fog Lamp works by connecting it up to the socket before fitting to the car ! Assuming the new Fog Lamp works as it should, remove the existing reflector unit by inserting a flat bladed screwdriver as shown, and gently release the retaining tab behind it away from the car, allowing the complete reflector unit to be withdrawn towards the back of the car.   The box which has the wiring socket clipped to it, has a wiring channel at its rear edge, running down into the void where the Fog Lamp is fitted.  The box is secured to the car bodywork and also to the inner edge of the bumper. Unfortunately the wiring plug for the new Fog Lamp will not fit through channel unless the box part is at least partially separated from the bumper, which would ordinarily require the bumper to be released from the vehicle ! It is possible however to partially separate the box from the bumper sufficiently to allow the cable plug to pass through. Undo the 3 Torx screws as shown, securing the box to the car body work.  Noting that is best to do this on a warm day, as cold plastic is likely to crack when flexed, CAREFULLY pry the lower edge of the box away from the bumper edge with a soft faced tool so as not to cause damage to the painted finish, to release the locating lugs along the top edge of the bumper. There is a plastic shield on one edge of the wiring plug, which locks into the socket when connected. Begin to feed the wiring plug up from the fog lamp position into the channel, with the shield part facing away from the back of the car. I found that the plug fits through the channel easiest this way ! Gently pry the bumper and box apart using suitable soft faced tools / levers, at the same time as pushing the plug up into the channel from underneath, until the plug passes fully into the box.  Reclip the bumper to the box and replace the 3 screws securing the box to the bodywork. Connect the wiring plug to the socket.  Replace the trim piece. Insert a new bulb ( Type BAY9s - 12v / 21w ) into the bulbholder, and fit the bulbholder to the Fog Lamp by lining up the three lugs and twisting clockwise to lock in place. The Fog Lamp can then be fitted to the car - pushing it into the housing until it clicks as the retaining tab locks it into place. Refit the main light cluster and tighten the 2 x 10mm retaining nuts. Replace the interior panel cover and corner floor trim piece. Job Done !  
__________________
2008 XC90 D5 Executive, Sandstone Beige Leather, Active Bi-Xenons, Electric Sun Roof, Roof rails, Climate Control, Twin electric front heated seats, Volvo DTi, Full integrated phone, Westfalia Tow Bar.... |
|
|
|
| The Following 9 Users Say Thank You to Coconut For This Useful Post: |
|
Sep 14th, 2013, 10:52
|
#13 |
|
Petrolhead+Lots of Diesel
Last Online: Yesterday 20:20
Join Date: Aug 2008
Location: Glasgow
|
Spot on Coconut, narrative and pics as well, good job done.

__________________
BMW X3 Msport MHEV 2020MY & VW Beetle Design 1.2Tsi DSG 2014MY Previous XC90 D5 SELux Geartronic 2009MY |
|
|
|
| The Following User Says Thank You to TruckbusUK For This Useful Post: |
|
Sep 18th, 2013, 08:56
|
#15 |
|
Older than Junior Member
Last Online: Oct 12th, 2014 09:28
Join Date: Aug 2009
Location: Twon/City
|
Judging by the Feedback, I think it might be useful to place this in the XC90 Articles section,
to save it getting lost underneath all the the other topics, but I don't have the Privilege to do so. Anyone know how to contact someone to request this ( "Admin" doesn't accept PM's ).
__________________
2008 XC90 D5 Executive, Sandstone Beige Leather, Active Bi-Xenons, Electric Sun Roof, Roof rails, Climate Control, Twin electric front heated seats, Volvo DTi, Full integrated phone, Westfalia Tow Bar.... Last edited by Coconut; Sep 18th, 2013 at 09:11. |
|
|
|
|
Sep 29th, 2013, 12:44
|
#16 |
|
VOC Member

Last Online: May 28th, 2020 23:57
Join Date: Jun 2012
Location: Wolverhampton
|
Just a quick update.
One thing I think I should share is the part numbers for the actual fog lights differ depending on the age of the car. Pre 2006 the part numbers for the rear fog lights and harness are: Right - 8693008 Left - 8693009 Harness/Lamp holder - 8693010 The parts were delivered earlier this week and I plan to install them later today.
Last edited by Shadeyman; Sep 29th, 2013 at 12:52. |
|
|
|
| The Following User Says Thank You to Shadeyman For This Useful Post: |
|
Sep 29th, 2013, 20:31
|
#17 |
|
VOC Member
Last Online: May 28th, 2020 23:57
Join Date: Jun 2012
Location: Wolverhampton
|
15 minutes is all it took to replace the reflector with a working fog light thanks to Coconut.
One part number I did forget to mention in my previous post was the part number for the bulb which is: 989837(BAY9s) 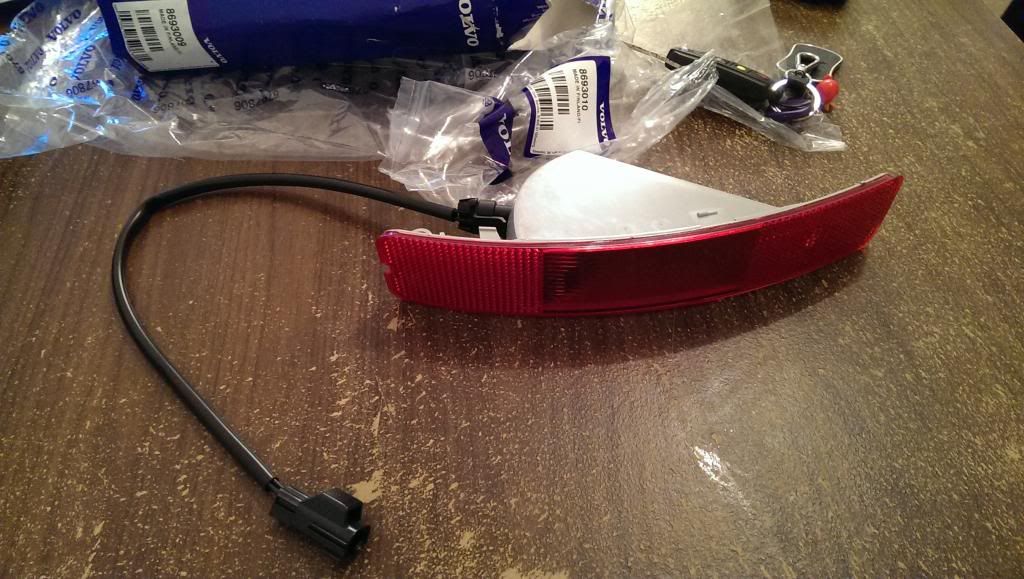 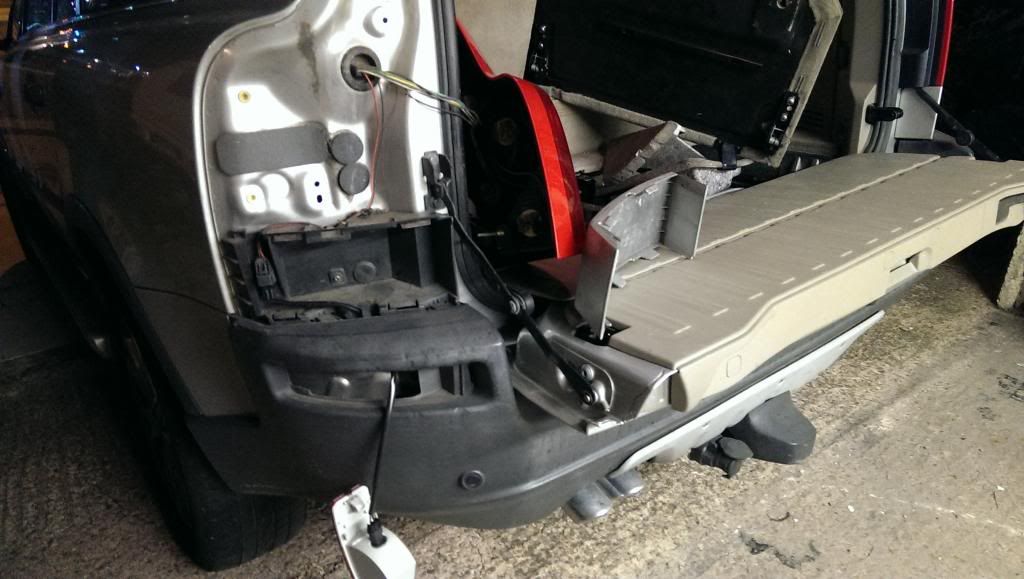
Last edited by Shadeyman; Sep 29th, 2013 at 20:34. |
|
|
|
| The Following 3 Users Say Thank You to Shadeyman For This Useful Post: |
|
Jan 10th, 2020, 14:17
|
#18 |
|
New Member
Last Online: Jan 14th, 2023 14:56
Join Date: May 2018
Location: KILKEEL
|
I had to replace my LH rear fog lens I had ordered the 30678970 volvo lens which came with a moulded blank cover over the bulb location. I drilled into this blanking moulding to see that the lens has the tabs hidden beside it. So I carfully scrapped Bach this outer cover to expose the tabs and I was then able to fit the volvo fog lamp harness and bulb. For ref the correct rear LH lens for 2007-14 is 31213647. Hope this helps.
|
|
|
|
| The Following User Says Thank You to P4P For This Useful Post: |
|
Sep 9th, 2021, 12:21
|
#19 | |
|
New Member
Last Online: Sep 9th, 2021 12:24
Join Date: Sep 2021
Location: Vught
|
Dear all i am trying to do the same as below but unfortunately i cannot see the photos related to it. Coconut or someone else do you have them and could you share again?
Quote:
|
|
|
|
|
|
Sep 9th, 2021, 12:40
|
#20 |
|
The Brit Brick

Last Online: Aug 13th, 2023 09:39
Join Date: Jul 2021
Location: Warwickshire
|
Testing has shown thst inattentive drivers can mistake 2 fog lamps for brake lights, which causes panic braking and ensuing carnage, so the reason for having only one on cars sold in Europe is considered and deliberate.
That fact that it also saves a few pence is incidental, but doubtless still welcomed by the Volvo bean counters.
__________________
2005 C70 2.4T Collection convertible. 40,000 mile sunny day toy. |
|
|
|
|
| Currently Active Users Viewing This Thread: 1 (0 members and 1 guests) | |
|
|


 Linear Mode

