
|
|||||||
| 700/900 Series General Forum for the Volvo 740, 760, 780, 940, 960 & S/V90 cars |
 Information
|
|
How To: Front End Polybush Volvo 940Views : 2433 Replies : 5Users Viewing This Thread : |
 |
|
|
Thread Tools | Display Modes |
 Aug 22nd, 2019, 21:57
|
#1 |
|
Go redblock or go home

Last Online: Yesterday 20:57
Join Date: Feb 2012
Location: UK
|
I thought I would make a little how to guide for the front end polybush job a 940 as Mark asked me to and I know a couple of people including my mate will want a little guide on how to do it so here goes.
You will need: Superflex SF422-2013KSS Superflex SF422-2012K Superflex SF422-1023KSS Classicswede Droplink Pin Kit https://www.classicswede.co.uk/Front...4_8228034.aspx Classicswede Lower ARB bush Kit https://www.classicswede.co.uk/Front..._20024697.aspx Tools: Jack Threadlock Breaker Bar Torque Wrench Pry bar 15mm socket 17mm socket 18mm socket 19mm socket 21mm socket Firstly you need to jack one side of the car up and remove the front wheel... still with me? You then need to remove the pin and undo the bottom ball joint securing nut. Undo the 2 bolts that hold it on the strut leaving the joint in the arm. As per the photo below but I did it the other way around, up to you which way you do it. 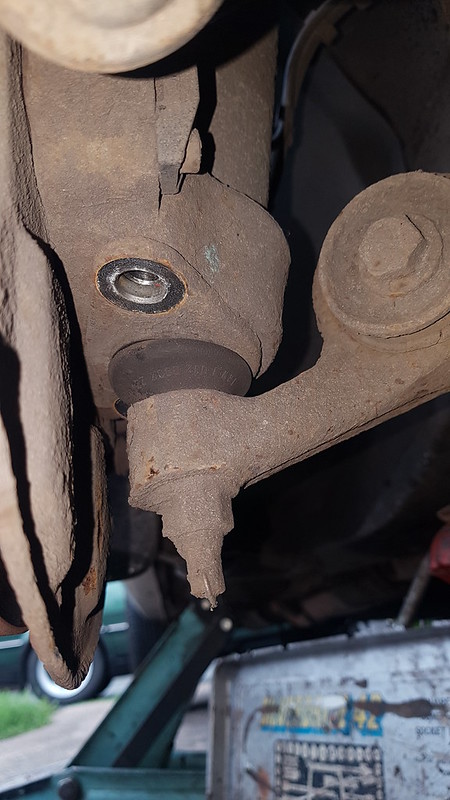 20190816_140154 by Luke Ryland - Flickr2BBcode LITE Undo the spaceship bush bolt you will need the breaker bar and 17mm socket, dont remove the bolt fully just leave a couple threads in the arm. Then put the pry bar between the chassis and ARB and push down, using the 15mm socket and ratchet undo the ARB droplink to ARB nut. The pry bar will stop the arm jumping up and potentially causing some damage.  20190816_140148 by Luke Ryland - Flickr2BBcode LITE Remove the bolt from the rear chassis bush using the 18mm spanner and 21mm socket, you will need to use the breaker bar to start it off.  20190816_140159 by Luke Ryland - Flickr2BBcode LITE Then do the same with the front bush, I can't remember the nut size I think 18mm spanner and 17mm socket.  20190816_140205 by Luke Ryland - Flickr2BBcode LITE Then the whole lot will drop off in one go, you now need to remove the ball joint from the arms. Use two hammers and hit either side of it to remove.  20190816_140918 by Luke Ryland - Flickr2BBcode LITE Now then, if like me you rebuilt a spare set of arms and fitted all of the bushes before fitting. So you can remove the old and install the new instantly no messing around. You will need to press the old bushes out except for the spaceship bushes which you can use a flat blade screwdriver to remove. You will probably have to clean up the spaceship bush mating face as it was quite rusty and pitted on mine where the water sits. To fit the chassis bushes they will need pressing in to the arms, I have a hydraulic press at work which I used to remove and fit the bushes but you could do it by burning the rubber out, cutting the sleeve and then pressing it out with a vice. The spaceship bushes can be loosely assembled by hand. Make sure to apply grease to all the contact surfaces of the bushes.  IMG-20190813-WA0009 by Luke Ryland - Flickr2BBcode LITE  20190814_173928 by Luke Ryland - Flickr2BBcode LITE Now Haynes it and refit in reverse. To torque up the bolts if you use rubber bushes then you need the weight of the vehicle on its wheels, polybushes you don't need it to be as the metal sleeve you insert in the bush spins independently so no need to. You need to apply threadlock to all the bolts you have removed from the bushes! Refit the ball joint to the strut, this has a two stage torque setting Stage 1: 30Nm Stage 2: angle tighten 90 degrees 85Nm for front metal sleeved bush  20190816_142137 by Luke Ryland - Flickr2BBcode LITE 120Nm for the rear chassis mounted bush  20190816_142117 by Luke Ryland - Flickr2BBcode LITE 100Nm for the spaceship bushes  20190816_151527 by Luke Ryland - Flickr2BBcode LITE Fit the control arm and ball joint back together and tighten to 70Nm and refit the locking pin. The droplink pin bushes just need fitting like a normal rubber one, the bottom pin bush I haven't done on mine yet but you will just need to remove the rubber and insert it in to the droplink. The rubber may need burning out I'm not sure, I believe they are bonded so will require burning out. Tighten the ball joint bolts until tight, no torque setting is supplied for these in the Haynes manual. Now it will need a wheel alignment. The settings are... Castor: 5 degrees + or - 1 degree Camber: 0.1degree + or - 1 degree doesn't say negative or positive so I assume negative. Toe: 2.2mm + or - 1mm toe-in Now then, I have had an issue with my radius arm to chassis bush where it makes a horrible knocking noise, I took it back off and discovered that the sleeve that you insert in to the bush pushed all of the grease out of the bush! As it runs dry the crosshatchings rubbing on the sleeve make the noise. So I have drilled a 5.2mm hole through the arm and polybush, tapped an m6 thread and fitted grease nipples. Hopefully once I get a grease gun and some grease this will solve it.  20190821_124327 by Luke Ryland - Flickr2BBcode LITE  20190821_124456 by Luke Ryland - Flickr2BBcode LITE Here is the bone dry bush I discovered upon removal.  20190819_172244 by Luke Ryland - Flickr2BBcode LITE Now enjoy your 940 actually being able to go through corners at speed! Last edited by 360beast; Aug 22nd, 2019 at 22:06. Reason: Photos in the wrong place and spelling |

|

|
| The Following 4 Users Say Thank You to 360beast For This Useful Post: |
|
Aug 22nd, 2019, 22:10
|
#2 |
|
Premier Member

Last Online: Yesterday 22:00
Join Date: Jul 2012
Location: Lenzie
|
Excellent write up Luke

__________________
V70 D5 SE Geartronic 215bhp Saville Grey 2012MY 940 LPT Manual 1996 740 SE 1990 |
|
|
|
| The Following 2 Users Say Thank You to griston64 For This Useful Post: |
|
Aug 22nd, 2019, 22:50
|
#3 |
|
Premier Member
Last Online: Yesterday 12:22
Join Date: May 2012
Location: Lakenheath
|
Very impressive write up Luke!

__________________
Cheers Dave Next Door to Top-Gun with a Honda CR-V & S Type Jag  Volvo gone but not forgotten........ Volvo gone but not forgotten........
|
|
|
|
| The Following User Says Thank You to Laird Scooby For This Useful Post: |
|
Aug 23rd, 2019, 11:58
|
#4 | |
|
VOC Member
Last Online: Oct 4th, 2022 16:02
Join Date: Jan 2016
Location: UK
|
Quote:
Last edited by CTCNetwork; Jun 30th, 2020 at 14:58. Reason: No need to quote, just reply. |
|
|
|
|
| The Following 4 Users Say Thank You to 827Roverman For This Useful Post: |
|
Aug 23rd, 2019, 16:56
|
#5 | |
|
Go redblock or go home
Last Online: Yesterday 20:57
Join Date: Feb 2012
Location: UK
|
Quote:
I have also managed to get a set of snow tray clips so I will have a go at making a pair for you too. |
|
|
|
|
| The Following 2 Users Say Thank You to 360beast For This Useful Post: |
|
Aug 23rd, 2019, 18:15
|
#6 |
|
VOC Member
Last Online: Feb 15th, 2024 17:04
Join Date: Dec 2006
Location: stoke on trent
|
excellent tutorial from 360 beast !
|
|
|
|
| The Following 2 Users Say Thank You to jpliddy For This Useful Post: |
|
| Currently Active Users Viewing This Thread: 1 (0 members and 1 guests) | |
|
|


 Linear Mode

