
|
|||||||
| 200 Series General Forum for the Volvo 240 and 260 cars |
 Information
|
|
240 GLT saloon restoration projectViews : 39314 Replies : 270Users Viewing This Thread : |
 |
|
|
Thread Tools | Display Modes |
 Dec 10th, 2020, 22:45
|
#11 | |
|
Senior Member
Last Online: Today 01:21
Join Date: Sep 2020
Location: Falkirk
|
Quote:
|
|

|

|
| The Following 3 Users Say Thank You to Juular For This Useful Post: |
|
Dec 10th, 2020, 23:30
|
#12 |
|
Premier Member
Last Online: Yesterday 11:32
Join Date: May 2012
Location: Lakenheath
|
You're a very brave man! I wouldn't want that amount of welding!
 You're doing a grand job of it though! You're doing a grand job of it though!  Volvo Jim : https://www.volvoforums.org.uk/showthread.php?t=300762 https://www.ebay.co.uk/itm/Volvo-240...G/254239737030 Found that 240GLT being broken on fleabay, looks to be the same colour (Blue-Green Metallic i think?) but also found these people who i've used many times for spares in Lockerbie. No idea how close that is to you but they still post things out : https://www.ebay.co.uk/itm/Volvo-240...r/401134408146 Not sure on body repair panels but in all honesty, having seen what you've done so far - make your own!
__________________
Cheers Dave Next Door to Top-Gun with a Honda CR-V & S Type Jag  Volvo gone but not forgotten........ Volvo gone but not forgotten........
Last edited by Laird Scooby; Dec 10th, 2020 at 23:31. Reason: Mintypigs (think about it - clue - anagram) |

|
|
|
Dec 11th, 2020, 09:05
|
#13 | |
|
Premier Member

Last Online: Yesterday 22:03
Join Date: Jul 2012
Location: Lenzie
|
Quote:
 I'm just down the road from you ( Lenzie ) so I know where to come now if my 940 needs any work in the future I'm just down the road from you ( Lenzie ) so I know where to come now if my 940 needs any work in the futureAs other have said Volvo Jim in Slammanan is well worth a visit. Hope to see the car floating about on the M80 at some point !!
__________________
V70 D5 SE Geartronic 215bhp Saville Grey 2012MY 940 LPT Manual 1996 740 SE 1990 |
|
|
|
|
| The Following 2 Users Say Thank You to griston64 For This Useful Post: |
|
Dec 14th, 2020, 14:17
|
#14 |
|
Senior Member
Last Online: Today 01:21
Join Date: Sep 2020
Location: Falkirk
|
Thanks for all the help so far!
Fabricating my own sill patches is a possibility and it may come to that. I am a complete amateur when it comes to bodywork but if the Brookhouse panels aren't an exact match anyway then I can't go far wrong. The difficult part is guessing what shape something should be where the metal is long gone such as on the ends of the sills. The links posted so far have helped hugely. I'm considering building a sort of wooden dolly / former in the profile of the sill and using that to beat some sheet into the correct shape for patches. This would save me having to realign a whole new sill, which will be challenging enough but currently the passenger door is off making it even more awkward. I have a bit of grot on the rear section of chassis rail next to the fuel tank that will need chopping out and replacing. Does anyone know what gauge metal is suitable for a safe repair here? It's hard to judge what with all the underseal in place. |
|
|
|
| The Following 2 Users Say Thank You to Juular For This Useful Post: |
|
Dec 14th, 2020, 16:27
|
#15 | |
|
Master Member
Last Online: May 8th, 2024 14:49
Join Date: Nov 2012
Location: London and Cambridge
|
Quote:
To be clear I'd suggest buying the replacement sill sections from somewhere and cutting patches out of them - although they're not perfect they're certainly a good starting point and can be re-angled/persuaded into the correct shape. I too am fairly amateurish at this - I did a welding course then got stuck in with the 1978 that I posted the link to before. Nothing like practise to improve though, so after working on that car and my 1988 I'm certainly better than I was! Also, although a wooden dolly might be useful, having a straight piece of bar in a vice you can hammer/bend the sill pieces over will be as useful - with the advantage that you can bend the metal 'past' the angle you want it to be so that when it springs back it's in the right place, which you couldn't do with a dolly/former. I carried out the same repair on the 1988 I still own, some more photos in the link below that may be useful. Thankfully the sill ends aren't too complicated, post some more photos if you get stuck. https://www.volvoforums.org.uk/showt...=228229&page=7 I think the chassis rails at the point you describe are 2mm steel. Cheers |
|
|
|
|
| The Following 2 Users Say Thank You to Bugjam1999 For This Useful Post: |
|
Dec 17th, 2020, 10:57
|
#16 |
|
Master Member
Last Online: May 8th, 2024 14:49
Join Date: Nov 2012
Location: London and Cambridge
|
Hi again,
I found a photo I annotated for someone else which you may find useful- the green piece to repair the inner sill is first, its vertical with a 90 degree bend in the end of it. The red piece is next, up against the green piece and cut to the right shape for the curve of the inner arch. Then the blue piece last. I make the pieces out of cardboard first, then cut them in steel. Greetings cards are excellent for this... Cheers |
|
|
|
| The Following 2 Users Say Thank You to Bugjam1999 For This Useful Post: |
|
Dec 17th, 2020, 13:28
|
#17 | |
|
Senior Member
Last Online: Today 01:21
Join Date: Sep 2020
Location: Falkirk
|
Quote:
|
|
|
|
|
| The Following 3 Users Say Thank You to Juular For This Useful Post: |
|
Dec 17th, 2020, 14:28
|
#18 |
|
Premier Member
Last Online: Yesterday 11:32
Join Date: May 2012
Location: Lakenheath
|
I might be speaking out of turn here and interpreted the photo incorrectly but it looks like the seam between the inner and outer has been welded over with a final patch above the three indicated.
I've been told (not sure but it sounds right) this isn't a great idea as it can create moisture traps in the seam area. Something to consider maybe? 
__________________
Cheers Dave Next Door to Top-Gun with a Honda CR-V & S Type Jag Volvo gone but not forgotten........
|
|
|
|
|
Dec 21st, 2020, 18:08
|
#19 | |
|
Master Member
Last Online: May 8th, 2024 14:49
Join Date: Nov 2012
Location: London and Cambridge
|
Quote:
I've already used a wire brush on the inner wheel arch area in this photo and have cut away part of the closing panel - but I've outlined in green where it extended to. Ignoring the rusty hole through to the interior that I fix first, the panel outlined in green was spot-welded in place over the vertical seam between the two panels that make up the inner arch. 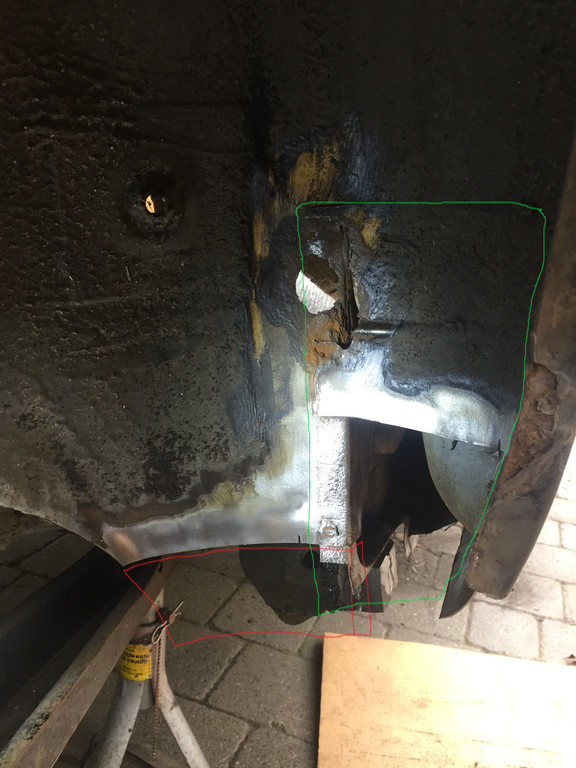 Another view - I've made a cardboard template for the repair patch, and the vertical seam between panels is clearer as I've cut away the top part of the closing panel (that I highlighted green in the previous photo)  Repair patch is welded in now and below it you can see the textured finish on the strip of metal that previously had the closing panel spotwelded over it 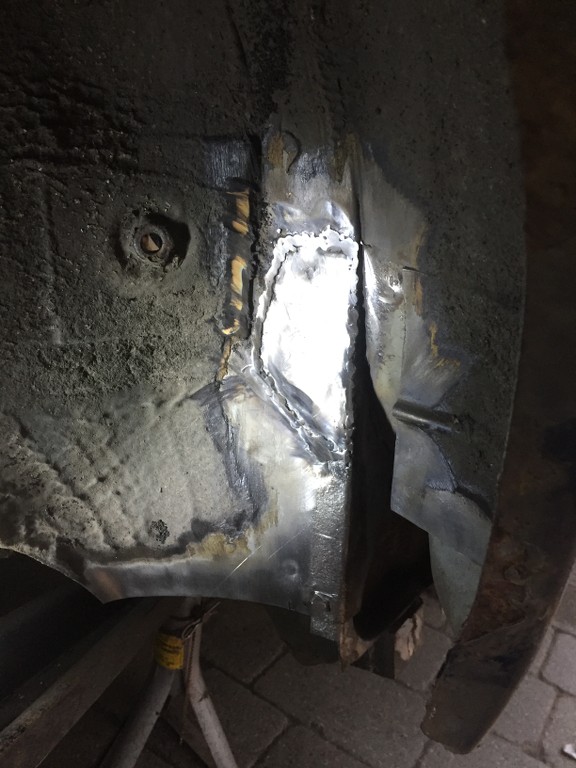 Then finally - the inner arch was repaired first, then as it was easier to make in two parts the closing panel was replaced - the lower section first, butt welded to the retained part of the closing panel, then the top section last, butt welded in place. 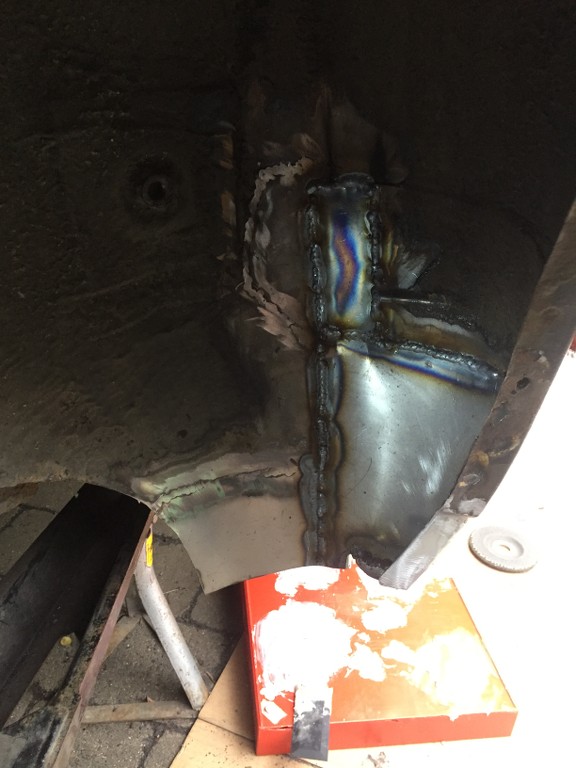 I suppose the short answer to your query is that yes the seam has been welded over, but the longer answer is that the final plate welded over other repairs replicated what was there previously. Open to comments. Cheers |
|
|
|
|
| The Following 3 Users Say Thank You to Bugjam1999 For This Useful Post: |
|
Dec 21st, 2020, 18:21
|
#20 |
|
Premier Member
Last Online: Yesterday 11:32
Join Date: May 2012
Location: Lakenheath
|
Thanks for the extra photos, they show there is drainage/ventilation so it makes less of a moisture trap. Also shows how Volvo put it together in the factory, the closing panel seems more for strengthening than looks?
__________________
Cheers Dave Next Door to Top-Gun with a Honda CR-V & S Type Jag Volvo gone but not forgotten........
|
|
|
|
| The Following 3 Users Say Thank You to Laird Scooby For This Useful Post: |
|
| Currently Active Users Viewing This Thread: 1 (0 members and 1 guests) | |
|
|


 Linear Mode

