
|
|||||||
| 140/164 Series General Forum for the Volvo 140 and 164 cars |
 Information
|
|
Dash cover removalViews : 9306 Replies : 9Users Viewing This Thread : |
 |
|
|
Thread Tools | Display Modes |
 Sep 3rd, 2008, 12:47
|
#1 |
|
Member

Last Online: May 21st, 2023 08:35
Join Date: Aug 2008
Location: Cape Town
|
Hi everybody
Does anyone know how to remove a dash cover from the dash unit? The plastic part of the dash in other words. Stupidly I cracked it and wish to repair it.  Can this be done with out removing the whole dash unit? Can this be done with out removing the whole dash unit?Thanks Dylan |

|

|
|
Sep 3rd, 2008, 14:56
|
#2 | |
|
VOC Member
Last Online: Mar 24th, 2024 16:34
Join Date: Dec 2002
Location: Nowhere.
|
Quote:
Regards, C.A. |
|
|
|
|
|
Feb 12th, 2009, 08:20
|
#3 |
|
Member
Last Online: May 21st, 2023 08:35
Join Date: Aug 2008
Location: Cape Town
|
Hi All
I've neglected this thread for a while, sorry. Ok, I'm planning a session with the dash. The crack has really got to me now. It must be gone! I am going to DIY it as funds are limmited but just out of interest, are there any firms out there that make a replacement for the '68 - '70 models? I'm looking for the RHD? Anyone? Dylan |
|
|
|
|
Feb 12th, 2009, 08:45
|
#4 |
|
Director/ Register Keeper
Last Online: Apr 10th, 2024 15:36
Join Date: Oct 2003
Location: Fareham
|
Dylan
If you are talking about the plastic insert with silver trim that runs from Passenger side to the instruement panel I am certain you remove passenger grab handle lights and fan switches and possibly couple of other nuts up behind the main panel and it comes out. I have mine to do having messed up when increasing the apeture for the radio. I suggest the best source is from car being scrapped. How have you got on with elecric fan Nigel |
|
|
|
|
Feb 12th, 2009, 08:59
|
#5 |
|
Member
Last Online: May 21st, 2023 08:35
Join Date: Aug 2008
Location: Cape Town
|
Hi Nigel
No, that is the dash plate you speak of and is made of aluminium. I am talking about the dash padding that surrounds the dash plate and instruments and covers the top of the dash. I cracked it trying to mount a 2" tacho and neglected to take the effect of the sun for the last 40 years into account. I could kick myself. As far as the electric fan goes, I'm affraid I have not fully pursued it as yet. Time has been very short lately and the resources are not as evident here in SA. One needs to dig a little before you find exactly what will work and that is what takes the time. I say this in light of the thermostat switch arrangement. But I will be getting there soon hopefully. I was chatting to a friend over the weekend who has done the conversion to his '72 V8 El Chamino and highly reccomends it! I must just ask him how he connected up and solved the thermostat switch problem and where he sourced his parts. Dylan Last edited by Dylan144GT; Feb 12th, 2009 at 09:01. |
|
|
|
|
Mar 3rd, 2009, 22:05
|
#6 |
|
renpri
Last Online: Mar 9th, 2009 21:48
Join Date: Mar 2009
Location: simpelveld
|
hello,
i also want to dismount the dash cover, because i have to replace the defect speaker and the clock. is there anyone who can explain how to do this, or has a drawing on pdf format |
|
|
|
|
Mar 4th, 2009, 18:44
|
#7 |
|
VOC Member
|
Hi Dylan,
This type of dash, yes?  If so, I think the padding is symetrical, so if you need to look outside SA to get one in good condition, a LHD dash may do the job for you. I've never removed an old type dash, but if it's any indication, the later type (as in my '73 164) needs the dash out to remove the top padding. (It might in theory be possible to remove with the dash in situ, but it would be so awkward that it would actually be quicker to remove the dash). And the old type looks harder because the padding surrounds the dash. The good news is that removing the dashboard is not the horrific job that it is on a modern car. Just work methodically and label wiring and you should be fine. A rev-counter suggestion: in my '69 164 I fitted a Triumph rev-counter into the main dashboard. It was the right diameter to fit neatly between the upper an lower padding in a hole cut next to the speedo binnacle (with the switches moved along a bit). The font looks Volvo-ish so it looked much more like a "factory" installation than a pod mounted tach would. This one's in a Stag, but they also exist in 4 and 6 cyl versions. 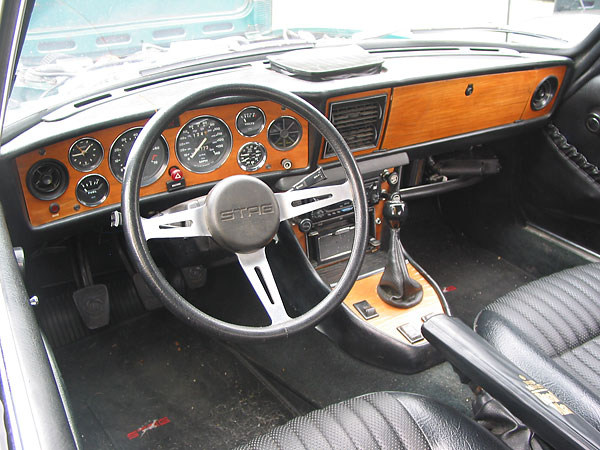 It looked good alongside the strip speedo; pretty sporty. I don't have any photos and I can't do photoshop! The nearest approximation I can find is this OE Rover P6 dash Anyway, pls let us know how you get on with the dashboard! If you need me to look in the UK give me a shout, but shipping might be prohibitive. Cheers John
__________________
XX 
|
|
|
|
|
Mar 4th, 2009, 20:46
|
#8 |
|
Member
Last Online: May 21st, 2023 08:35
Join Date: Aug 2008
Location: Cape Town
|
John
Thanks for the input. The problem with the older dash is that it isn't symetrical for LHD and RHD vehicles. There is a cut out where the steering columb intersects with the dash padding. Which is a serious pity! I don't think I'll be importing at the moment, budgets are a little tight at the moment. As is the case for most I guess. My temporary solution is to remove the dash cover and to fibre glass it straight. then to cover it in a sythetic dark grey suede. I know this is a bit far from original but I really like the look of it, and its quite sporty too!  I'll source an original when I have money because I can imagine these don't come cheap! But I suspect this will only be in a while! I'll source an original when I have money because I can imagine these don't come cheap! But I suspect this will only be in a while!I have figured out how to remove it, and unfortunately the dash must be removed. It is simply bolted to the firewall and sides. Then to remove the dash pad; there are metal strips that have been moulded into the support foam and slots cut into the face of the vertical dash strcuture behind the dash plate. The metal strips slide into these slots and are then twisted to keep them there. A really secure solution but a nightmare to try and remove without removing the dash itself. In order to save a bit of time I'll probably remove the one for my 142, because it needs the same treatment, and do the alteration on there and then swop the dashes when it goes back in! And the do the second one when it comes out of my 144. In this order because the 144 is my daily commuter. Will definately let you know how it comes along. Just back at varsity at the moment so time is a little hard to come by! But we'll soldier on! Dylan Last edited by Dylan144GT; Mar 4th, 2009 at 20:49. |
|
|
|
|
Mar 4th, 2009, 21:09
|
#9 |
|
VOC Member
|
Before removing the dash to try fibre-glass, try a local repair with car-bond (e.g. sikaflex)
http://cgi.ebay.co.uk/SIKAFLEX-221-B...1%7C240%3A1318 This is not the same as silicon sealant (which just fills holes), this is a very good adhesive and sets like hard black rubber. If you can find a way to keep the dash flat and level either side of the crack while this sets, it will hold it and also fill any holes (trim it level with a sharp blade when it's part set). Do it carefully and the repair will be very inconspicuous. BTW, what are you studying? John
__________________
XX
|
|
|
|
|
Mar 4th, 2009, 21:16
|
#10 |
|
Member
Last Online: May 21st, 2023 08:35
Join Date: Aug 2008
Location: Cape Town
|
John
Thanks for that, I will definately consider it and do some research. We do get the sikaflex range here in SA so I'll go have a look. I am studying Mechanical Engineering ... is it that much of a surprise? Dylan |
|
|
|
|
| Tags |
| dash cover removal |
| Currently Active Users Viewing This Thread: 1 (0 members and 1 guests) | |
|
|


 Linear Mode

