
|
|||||||
| 850 / S70 & V70 '96-'99 / C70 '97-'05 General Forum for the 850 and P80-platform 70-series models |
 Information
|
|
Inlet manifold removal and oil seperator/pcv hose replacementViews : 26256 Replies : 87Users Viewing This Thread : |
 |
|
|
Thread Tools | Display Modes |
 Sep 2nd, 2006, 15:41
|
#1 |
|
Phoenix from the ashes

Last Online: Apr 3rd, 2024 01:16
Join Date: Jan 2006
Location: Finchingfield
|
There has been a fair amount of talk recently regarding crankcase pressure leading to rear crankcase seal faliure so below is a step by step on manifold removal and breather system change...
Stage 1 Check the following http://www.fcpgroton.com/volvo850oiltrapturbo.htm for part numbers relating to your vehicle (by engine number), i did not bother with any of the volvo clips as i had an assortment of jubilee clips to hand, the volvo clips are a pain in the ass... the parts i went for are 1 x 1271988...oil trap £16.00 1 x 9471644...hose and assorted guff £21.40 2 x 1389574...elbow (unused) £3.60 1 x 9146266...inlet manifold gasket £6.30 1 x 9135990...throttle gasket (unused) £1.75 total inc vat £57.64 Stage 2 Identify your pcv valve on the inlet air pipe..... 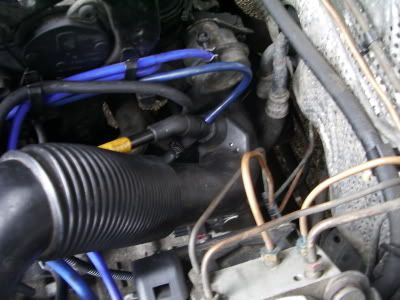 remove the crankcase ventilation pipe (larger one) , the inlet manifold blow off pipe (smaller one) and the electrical plug... Stage 3 Remove air intake pipe at the turbo, air box and intercooler pipework including the ducting to the throttle housing...(not shown removed) it is also advisable to remove the dizzy cap and the spark plug cover..(also not shown removed) 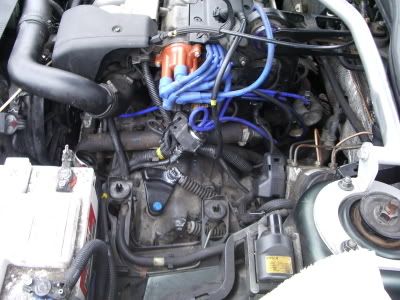 Stage 4 Release the accelerator cable from the cable drum and the linkage ball joint....remove the drum frame from the throttle housing and put aside... Then remove the one retaining bolt and remove the presure regulator hose at tree on the throttle body and then the throttle inlet hose can be removed and put aside in the engine bay.... 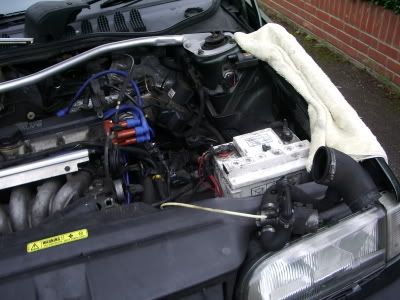 Stage 5 Remove the fuel rail cover and injector wiring and put aside in engine bay. Then remove the fuel rail clamp on the rear of the top of the engine and unscrew the fuel inlet pipe on the left of the injector rail, be prepared for a small fuel loss...the rubber hose may be left intact... Stage 6 Remove the two 10mm bolts from the injector rail and carefully pull the rail away from the inlet manifold and twist it so it can be rested upside down on the top of the engine 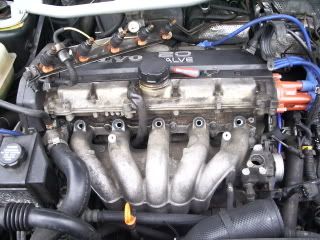 Stage 7 Using a 10mm extension socket with u/j remove the top manifold bolts and loosten the bottom ones several turns..the only real difficulty is the bottom left hand bolt that can only be accessed as shown below which means the top hose must be removed at the thermostat....it is at this stage that the 12mm dipstick to manifold bolt and the underside 12mm bolt need to be removed...note do not waste time and skin using a ratchet on these, invest in a 12mm ratchet closed spanner...and a 10mm one while you are at it..they are priceless tools 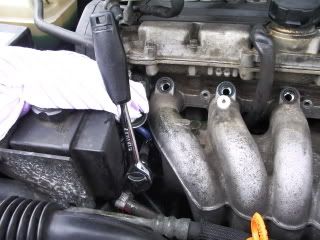 Stage 8 Lift manifold up off block and set asside removing the left hand side bleed pipe and the breather pipe from the oil seperator at the cam cover so that the manifold can be withdrawn... 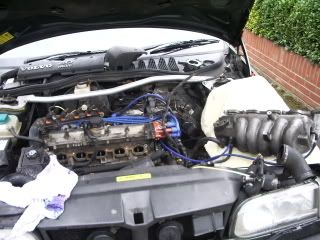 The oil seperator will now be clearly visable... 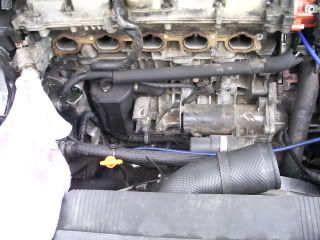 Stage 9 Remove the plug to the left hand knock sensor and remover the pipes to the pcv and discard..To remove the oil seperator from the block there are two bolts and finally the two hoses to the block are removed by breaking the clamp on the top hose and unscrewing the adjustable clamp on the bottom.. check the condition in particular of the bottom "return" hose for blockage, i shoved a piece of hosepipe in and blew to reasuure myself that the airway was clear...they were.. 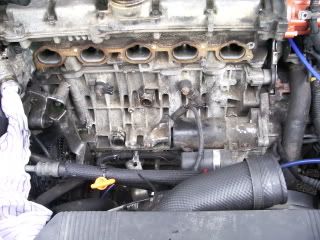 good pipe bad pipe.............................................. ....... old seperator new seperator 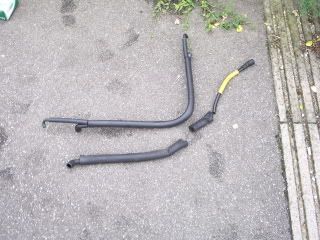 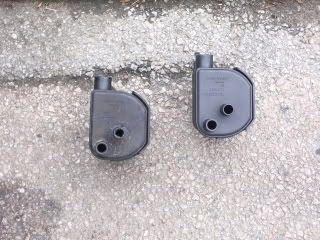 as you will see the pipework is clearly knackered but externally the seperator looks "used" only, however it was very coked inside... At this stage if you did not before remove the dizzy 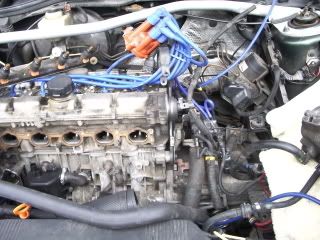 so that the new pcv and blow off pipe can be intalled in position..Put on new inlet manifold gasket and replace the dizzy cap 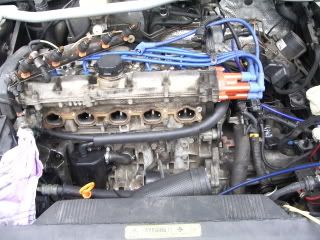 Connect the blow off pipe to the inlet manifold 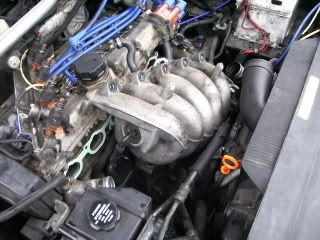 Stage 10 Repace the inlet manifold and torque to 20nm.....AFTER you have done up the inlet bottom mounting bolt... 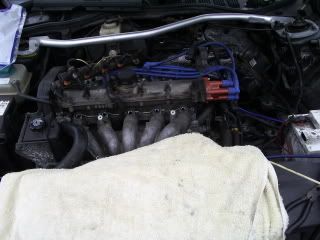 Stage 11 Replace the fuel injectors, using the two 10mm bolts, their wiring and the injector rail cover.. 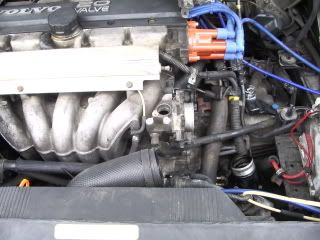 Stage 12 Replace the accelerator drum frame and reconnect the accelerator cable and the linkage 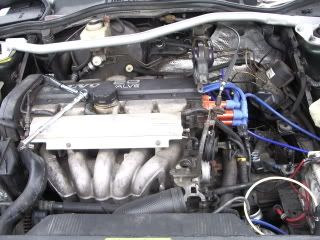 Stage 13 Replace the throttle housing and gasket if required, mine only needed a skin of instant gasket... not forgetting the pipe to the pressure regulator, and reconnect the throttle air inlet pipework. Then ensure that all electrical plugs heve been replaced 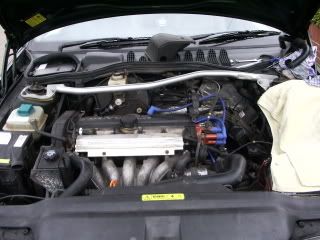 refit the air inlet hose to the turbo and fit the ventilation pipe and blow off to the pcv, the latter will require a jubilee clip  Stage 14 Replace the airbox, air inlet to airbox and intercooler pipe work....not forgetting the dipstick to inlet manifold bolt 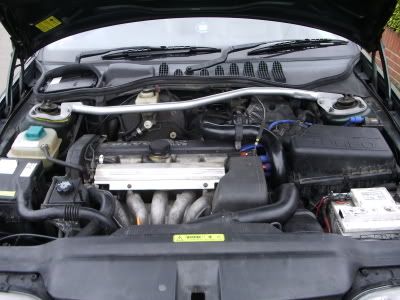 i have omitted serveral small bits and bobs regarding disconnecting this and connecting that which will be all apparent to anyone undertaking this operation... This job is only imo a 2/5 and is easy provided you are methodical and keep your bolts etc in order... Do not forget your 12mm ratchet spanner.... Good luck cheers jod
__________________
Dum Spiro Spero VOC 20419 Last edited by Jod T5; Sep 24th, 2007 at 10:24. |

|

|
| The Following 8 Users Say Thank You to Jod T5 For This Useful Post: |
|
Sep 2nd, 2006, 18:49
|
#2 |
|
diy bhp

Last Online: Apr 7th, 2011 19:38
Join Date: Jun 2006
Location: great yarmouth
|
good work jodders, ill be printing it off and looking forward to my hols :-)
wayne.
__________________
 auto 96 T5 tweaked n ratted |
|
|
|
|
Sep 2nd, 2006, 20:34
|
#3 | |
|
Phoenix from the ashes
Last Online: Apr 3rd, 2024 01:16
Join Date: Jan 2006
Location: Finchingfield
|
Quote:
__________________
Dum Spiro Spero VOC 20419 |
|
|
|
|
|
Sep 3rd, 2006, 10:34
|
#4 |
|
Senior Member
Last Online: Apr 14th, 2024 20:50
Join Date: Dec 2004
Location: Wrexham
|
Nice guide there. One thing I will say about it is that you don't actually have to remove the fuel rail from the manifold. I disconnected the fuel feeds and left it on the manifold because I didn't want to disturb the injector seals.
I found that all of my hoses were basically shot, so had to replace all of them. |
|
|
|
|
Sep 4th, 2006, 06:32
|
#5 | ||
|
Phoenix from the ashes
Last Online: Apr 3rd, 2024 01:16
Join Date: Jan 2006
Location: Finchingfield
|
Quote:
Quote:
cheers jod
__________________
Dum Spiro Spero VOC 20419 |
||
|
|
|
|
Sep 6th, 2006, 11:21
|
#6 |
|
Forum Support Team
|
Hi Jod,
thanks for posting the guide. Just got back from the parts department so all bits are on order. Now I just have to pluck up some courage for when they come in! Cheers, Pete
__________________
'97MY black 855R M56H + Quaife Porsche/S60R BBK + XP8s, TD04HL-19T, 17"x8J Pegasus, THS intercooler, custom intake & RIP, Samco coolant, Koni/Nivo H&R, S60R manifold, TT-USB, Simota, IPD turbo back, IPD anti-roll bars & droplinks, IPD HT, MSD coil, Innovate LC-1, dimming mirror, Goodridge hoses, DOT5.1, V70 rear lights & handles, poly top bush & A arms & tie bar, strut brace, clear repeaters, 6k HID, catch tank, 2x rear brace 
|
|
|
|
|
Sep 6th, 2006, 19:24
|
#7 | |
|
Phoenix from the ashes
Last Online: Apr 3rd, 2024 01:16
Join Date: Jan 2006
Location: Finchingfield
|
Quote:
cheers jod
__________________
Dum Spiro Spero VOC 20419 |
|
|
|
|
|
Sep 6th, 2006, 19:49
|
#8 |
|
Former Support Team

Last Online: Jan 26th, 2024 11:26
Join Date: Jan 2006
Location: Nr Norwich
|
Don't have an 850, but must say that your detailed explanation is excellent, as are the photos. Would be happy to have a go myself on the basis of your post.
Have you ever thought of trying to put Haynes out of business! The 'old' UK produced ones were good, but the US clone ones are awful, in my humble opinion, and your explanation and pics knock theirs into a cocked hat
__________________
Alec. (My other car is a WD 2-10-0) |
|
|
|
|
Sep 6th, 2006, 20:01
|
#9 | |
|
Phoenix from the ashes
Last Online: Apr 3rd, 2024 01:16
Join Date: Jan 2006
Location: Finchingfield
|
Quote:
i agree with your opinion on the haynes manual, they are imo priceless...a must for every diy'er.. cheers jod
__________________
Dum Spiro Spero VOC 20419 |
|
|
|
|
|
Sep 7th, 2006, 12:30
|
#10 |
|
Forum Support Team
|
Hi Jod,
all the parts arrived today - for what it's worth there's a small typo in your parts list, apparently the inlet manifold gasket is 9146266. Got envious of your Samco 4mm hoses too, so got some of that coming since I'll be in that area anyway. Did you re-use the clips when you did yours? Thanks for the offer of a hand by the way - I'm should have a mate over to give some moral support so hopefully won't need it ;-) Cheers, Pete
__________________
'97MY black 855R M56H + Quaife Porsche/S60R BBK + XP8s, TD04HL-19T, 17"x8J Pegasus, THS intercooler, custom intake & RIP, Samco coolant, Koni/Nivo H&R, S60R manifold, TT-USB, Simota, IPD turbo back, IPD anti-roll bars & droplinks, IPD HT, MSD coil, Innovate LC-1, dimming mirror, Goodridge hoses, DOT5.1, V70 rear lights & handles, poly top bush & A arms & tie bar, strut brace, clear repeaters, 6k HID, catch tank, 2x rear brace
|
|
|
|
|
| Currently Active Users Viewing This Thread: 1 (0 members and 1 guests) | |
|
|


 Linear Mode

