
|
|||||||
| 700/900 Series General Forum for the Volvo 740, 760, 780, 940, 960 & S/V90 cars |
 Information
|
|
760 GLE Rear Axle Oil Check/Replace.Views : 1433 Replies : 26Users Viewing This Thread : |
 |
|
|
Thread Tools | Display Modes |
 Aug 5th, 2020, 21:57
|
#1 |
|
VOC Member

Last Online: Apr 11th, 2024 11:41
Join Date: Nov 2004
Location: London
|
Hello all,
I want to check/replace/top up the rear axle oil on my 1990 760 GLE estate (AW71 transmission), a task I have never undertaken and so I am unsure how best to tackle it. I have I believe identified the drain plug, just right of centre in the attached photo. I plan to clean the area around the drain plug to avoid any surface dirt from entering the chamber. I have a syringe to extract/replace the oil. The Haynes suggests a 'dipstick' made from bent wire (do not drop it in) to measure the level. Should I be looking to replace all of the oil or just topping up? I'd like to think that "Comma EP80W-90 GL5 Gear Oil" is the correct oil for the job but I do know that getting the oil right is very important so if this is the wrong choice please do say so. And guidance would be very welcome. Thanks Steve |

|

|
| The Following User Says Thank You to diccapilly For This Useful Post: |
|
Aug 5th, 2020, 22:45
|
#2 |
|
Premier Member

Last Online: Today 14:28
Join Date: Sep 2014
Location: Bristol
|
The drain is the bottom most bolt holding the diff cover on. It's just to the right of centre of the bottom edge of your picture.
I would drain all the oil and replace. The fill plug is just to the left of the centre (vertical and horizontal) of the picture. Remove this before draining, just in case you can't get it undone! Regards oil, use whatever your manual recommends - I can't remember the correct oil off the top of my head. I filled mine to the fill plug height with the car level - this tends to be how they are designed so I just assumed the Volvo was the same, but I'm happy to be corrected! |
|
|
|
| The Following 2 Users Say Thank You to tofufi For This Useful Post: |
|
Aug 5th, 2020, 22:51
|
#3 |
|
Go redblock or go home

Last Online: Today 17:10
Join Date: Feb 2012
Location: UK
|
I've always just filled axles on a flat surface until the oil stops running from the filler plug.
As above remove the filler plug before you remove the drain plug in case you can't get the filler plug out. |

|
|
| The Following 2 Users Say Thank You to 360beast For This Useful Post: |
|
Aug 6th, 2020, 00:20
|
#4 |
|
Premier Member
Last Online: Yesterday 23:44
Join Date: May 2012
Location: Lakenheath
|
A few pics of when i did mine - 1988 760GLE :
 Drain and filler plugs removed ^^^^^  Swarf on magnetic drain plug!   ^^^^^ ^^^^^ How it should look! Drain (left) and filler plugs cleaned ready for refitting ^^^^^ 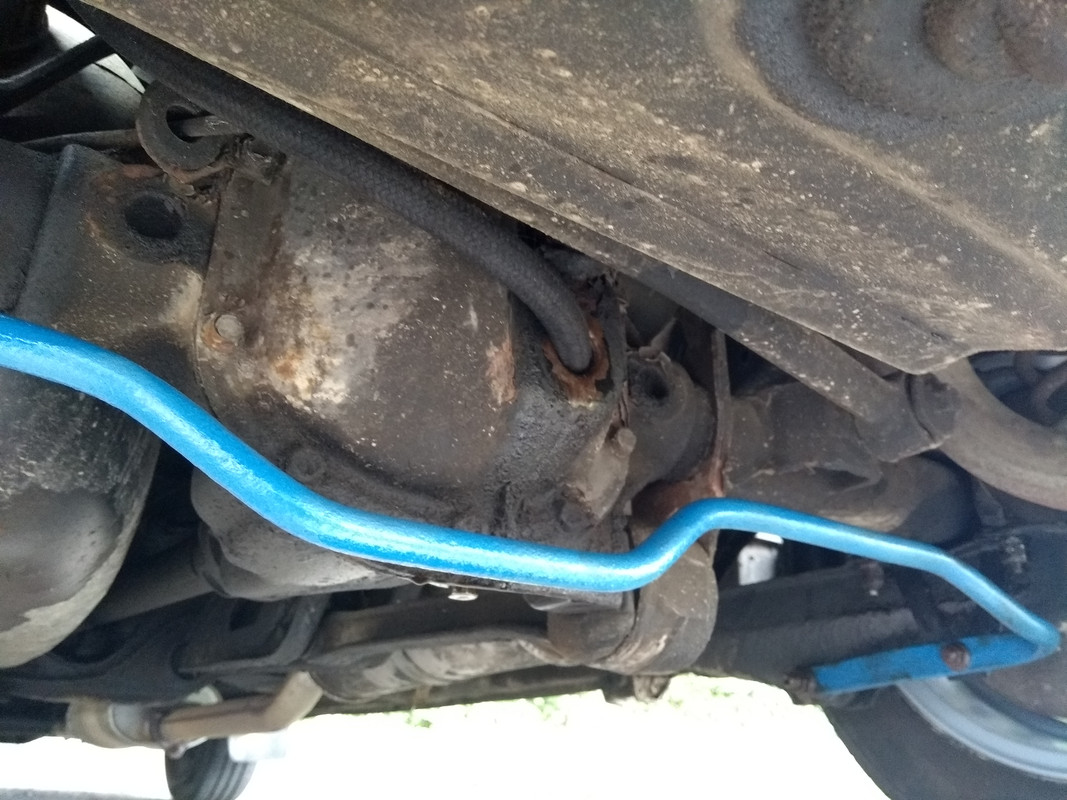 Filling cheat ^^^^^ A short (~2') length of 10mm bore rubber hose on the end of a ...... :  .......... funnel positioned in the fuel pump access hole. From memory it holds 1.3L so the first litre of 80W90 went straight in, the second after some treatment (STP for axles/gearboxes as i recall) was added slowly until it started to flow out of the fill hole. It was just possible to see the fill hole while filling via the funnel but can't remember the angle of dangle to see it. Underneth, refit and tighten the drain plug then inside, remove the funnel and hose, refit the access panel followed by the floor panel, job done! There is an altertive axle design where the drain plug is the bottom centra diff flange bolt as others have pointed out - your pic doesn't show enough of the area to confirm which you have but from the position of the speedo sensor, it think yours is the later one. HOwever, Volvo have a penchant for "mix'n'match" so expect anything and just be glad you can confirm it when you next crawl under! As for getting it level, that's the ideal. Where i park has a slight slope so i parked facing uphill then reversed onto a normal pair of ramps and the car was more or less level. The same applies to oil/filter changes at the front end and i park facing downhill for ATF changes and pump it out using a 12V oil transfer pump into a clear, empty 5L tub (ex screenwash or similar) while i have a coffee. Then estimate the contents pumped out, refill via the dipstick tube with that amount - 0.5L of Carlube ATF-U and then get it level, start the engine, cycle through all shift positions (returning to N between each position) from P to 1 and back again (P-R-N-D-N-2-N-1-N-2-N-D-N-R-P) and then check the level against the cold marks, topping up to the cold mark minimum if needed. Then a 5-6 mile drive to get the ATF hot, re-check using the Hot side of the dipstick markings. If you've never done it and/or don't know when the ATF was last changed, repeat at monthly intervals for 2-3 more of the same then at yearly intervals to keep it clean. Usually the third time is the charm but on a transmission that hasn't had a fluid change in a long time, it often takes the 4th part-change to get it right.
__________________
Cheers Dave Next Door to Top-Gun with a Honda CR-V & S Type Jag  Volvo gone but not forgotten........ Volvo gone but not forgotten........
|
|
|
|
| The Following 2 Users Say Thank You to Laird Scooby For This Useful Post: |
|
Aug 6th, 2020, 09:22
|
#5 |
|
VOC Member
Last Online: Apr 12th, 2024 13:08
Join Date: Aug 2006
Location: Hounslow West London
|
All the above is good advise. However, you can make access for refilling much easier if you place a plank of wood across the underside of the boot floor, and put a jack under it and you can the lift the car body about 6" up, leaving the axel where it is. You can then refill easily with the plastic bottles and extended nozzle attached. Whilst it is in the raised position with easy access, clean and lubricate the hand brake wires etc.
|
|
|
|
| The Following User Says Thank You to mjk164 For This Useful Post: |
|
Aug 6th, 2020, 14:53
|
#6 |
|
Premier Member
Last Online: Feb 11th, 2023 20:32
Join Date: May 2010
Location: Blyth, Northumberland
|
My diff. looks the same as yours diccapilly.
Good advice to check that you are able to remove the level plug before proceeding any further. The copper washer is part no. VO 11998. Its the same as the washers for my gearbox drain and level plugs. Drain by removing the lowest flange screw as the hole for it goes all the way through. 12mm. head. A previous owner had rounded some of my screws so I obtained some replacements prior to starting the job. Part no. VO 0985187. I had expected to find the hole blocked with debris which needed poking out but that was not the case and the oil flowed out quite freely. I refilled with Volvos Rear Axel Oil ( 1 litre bottle, part no. VO 1161620.) The label on the bottle indicated that it is API GL 5, SAE 80W. Additional information states quote Low friction type oil intended for passenger cars without differential brakes or with differential lock (Eaton). Recommended as year round oil and for the AWD rear axle for all XC90s and also for other cars up to and including model year 2012. unquote. Im not an oil spec. expert so I just took their word for it. My refill was 1650 mls. until it overflowed from the level plug hole. I used a flexi spout oil can reserved for the diff. oil. ( l have another for the gearbox oil ). Took a while but did the job. Haynes only suggests the bent wire for checking the level if you are only intending to top up. I wouldnt bother as if the oil doesnt overflow then its too low, so top up until it overflows. As it happens I have a piece of bent coat hanger with a couple of markings at 1 cm intervals which I think I fashioned when my daughter had her Ford Orion, but not sure about that. I definitely needed it for something.
__________________
Ian. Since 2005: 1992 Volvo 940 estate 2.0L. Manual. Daily driver and workhorse. |
|
|
|
| The Following 2 Users Say Thank You to Ian21401 For This Useful Post: |
|
Aug 7th, 2020, 09:27
|
#7 |
|
VOC Member
Last Online: Apr 11th, 2024 11:41
Join Date: Nov 2004
Location: London
|
Hello all,
I feel a lot more confident in achieving this task now. Didnt realise there was a gasket/washer needed, thanks and more thanks for the part number. (I'll need another one for the gearbox drain plug, as that needs doing too). Getting the right oil was something I was concerned about but I'm reassured that it needs API GL5, SAE 80W90. So thanks, that is weight off my mind. Using the access panel, did not know there was one, I will certainly 'look into it', thanks. Remove the fill plug before draining, it all makes sense, thanks. I really appreciate the time taken to create a clear image of the task. I think, I am looking forward to it. The picture of the swarf on the magnetic nut is a real eye opener. Many many thanks. Steve |
|
|
|
|
Aug 7th, 2020, 10:33
|
#8 | ||
|
Premier Member
Last Online: Yesterday 23:44
Join Date: May 2012
Location: Lakenheath
|
Quote:
Quote:
Getting the back end of the car higher than the front and pumping out using an oil transfer pump means the dirt is pumped out as well.
__________________
Cheers Dave Next Door to Top-Gun with a Honda CR-V & S Type Jag Volvo gone but not forgotten........
|
||
|
|
|
| The Following User Says Thank You to Laird Scooby For This Useful Post: |
|
Aug 7th, 2020, 19:43
|
#9 | |
|
Premier Member
Last Online: Today 14:28
Join Date: Sep 2014
Location: Bristol
|
Quote:
 In theory shouldn't leave and dirty fluid in the box when drained 
|
|
|
|
|
|
Aug 7th, 2020, 21:25
|
#10 | |
|
Premier Member
Last Online: Yesterday 23:44
Join Date: May 2012
Location: Lakenheath
|
Quote:

__________________
Cheers Dave Next Door to Top-Gun with a Honda CR-V & S Type Jag Volvo gone but not forgotten........
|
|
|
|
|
| The Following 2 Users Say Thank You to Laird Scooby For This Useful Post: |
|
| Currently Active Users Viewing This Thread: 1 (0 members and 1 guests) | |
|
|


 Linear Mode

