
|
|||||||
| XC90 '02'15 General Forum for the P2-platform XC90 model |
 Information
|
|
Thermostat replacement - GuideViews : 33309 Replies : 35Users Viewing This Thread : |
 |
|
|
Thread Tools | Display Modes |
 Mar 5th, 2011, 20:41
|
#1 |
|
Master Member

Last Online: Feb 3rd, 2024 18:39
Join Date: Sep 2009
Location: Sunny Scotland
|
Guys
I am attempt to get the heater working better, I wanted to change the thermostat. A good way to check it is to watch the temperature gauge when starting from cold, and when the gauge starts to rise, check the temperature on the top radiator hose. If the hose is warm, the thermostat is probably passing water before opening at the right temperature. The thermostat swap is complicated by the fact that the power steering pump needs to be removed - adding 15mins to the job. Anyway - had a searching around and no guides seem to be around for changing it... so here it is... First, inside the cabin, set the heater to max - with iginition on II, give it 10seconds, switch off, and under the hood, remove the acoustic engine cover - this simply lifts off. The thermostat housing can be seen lurking in the centre of the picture. 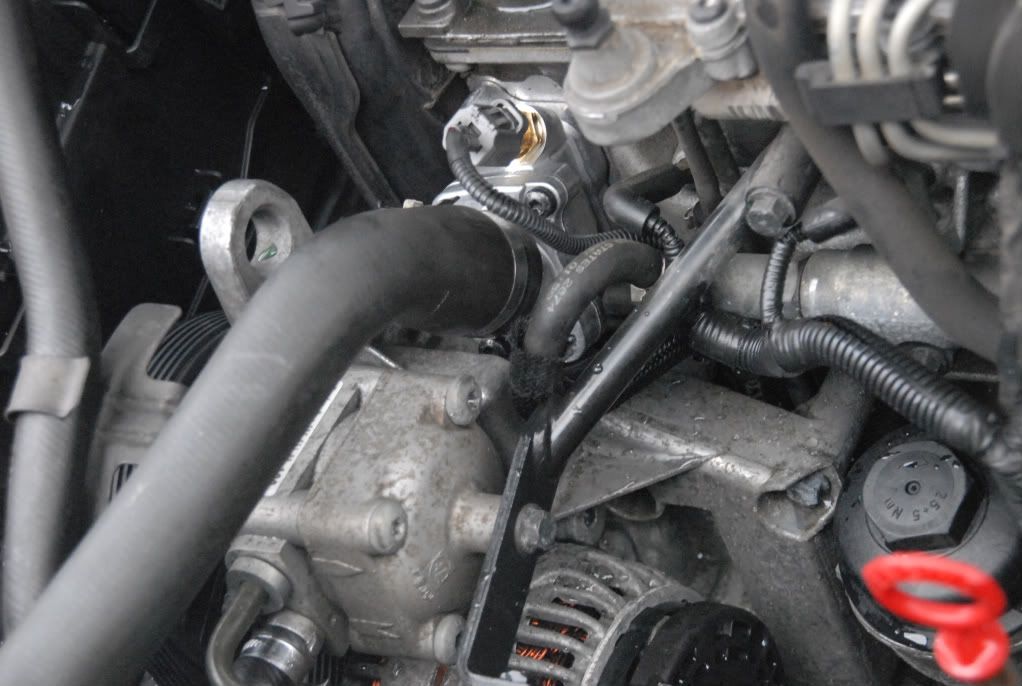 You will most likley want to change the coolant as part of this job. To drain the system, I removed the radiator bottom hose - and collected the old coolant for disposal. I also removed the thermostat hose too. The thermostat swap is not just the usual element - it comes as a complete assembly - in a cast housing - and includes a new temperature sender unit too - and dont forget to buy the gasket!. You will fall off your chair at the price - genuine part lists at circa £110! 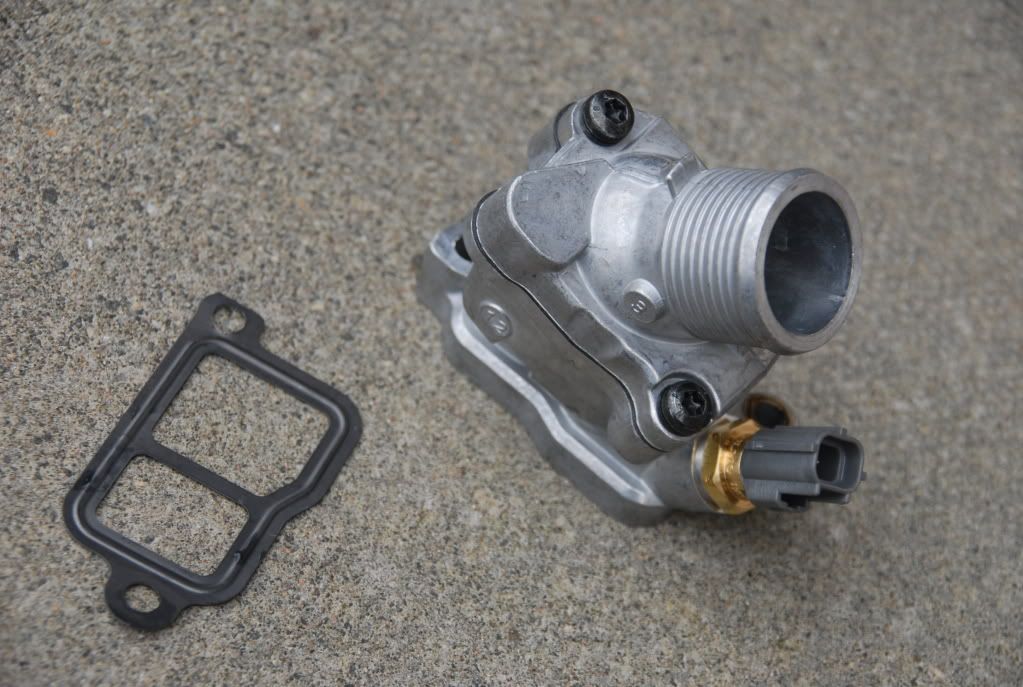 You can see here that its a 90 degree opening stat. 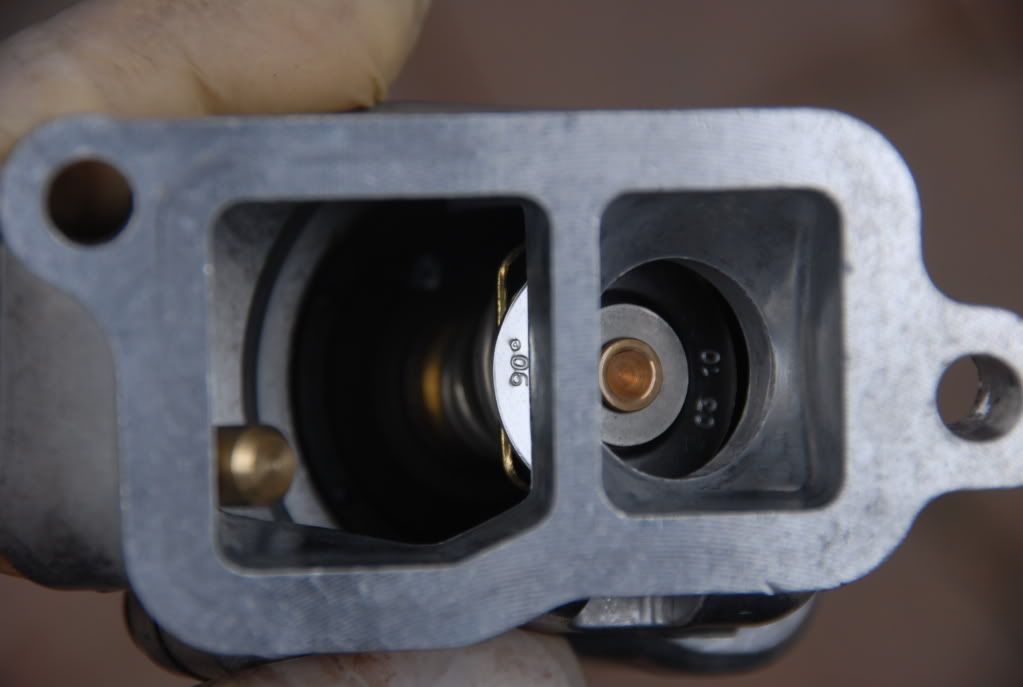 Next, I would remove the auxilliary belt - the tensioner has a T55 hole (from memory), and I used a long 1/2 drive bar as there is limited room between engine and inner wing. 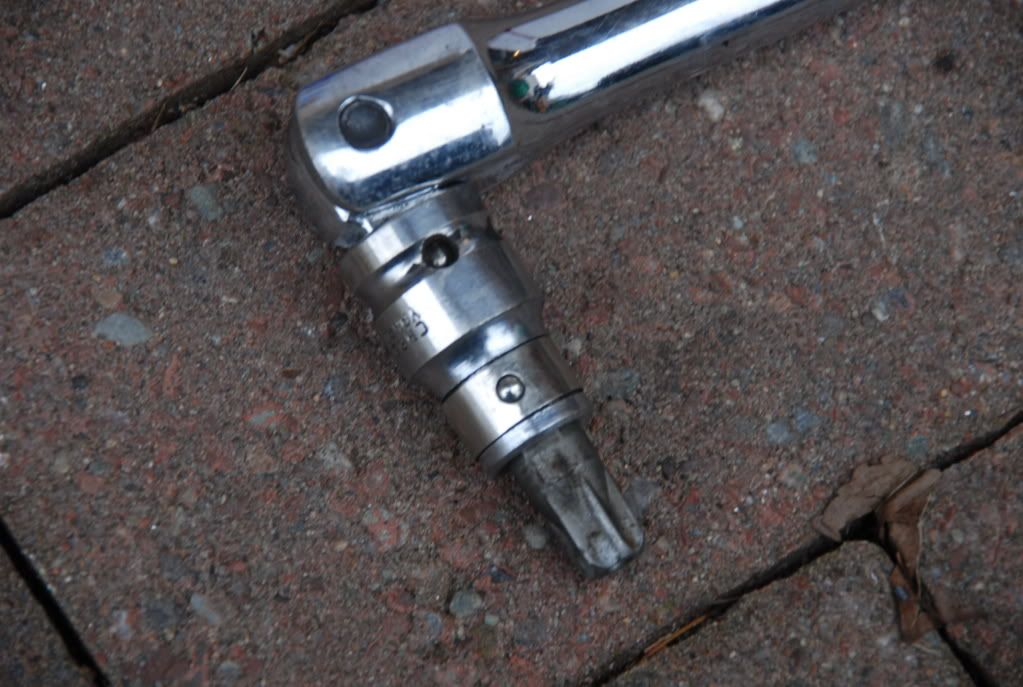 Please take a note of how the belt runs - the tensioner is the top pulley - and you pull the bar from rear to front of car to loosen the tension for removal. 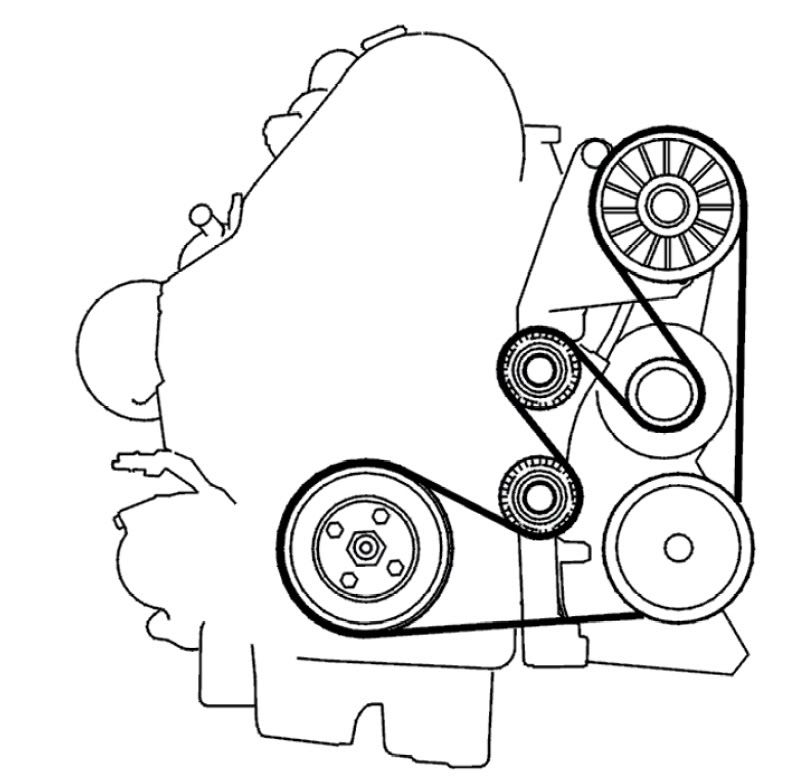 Ok - with the belt off, you can now remove the power steering pump. This is attached by three bolts and also has one for a hose carrier bracket. You will need to rotate the pulley to align the holes that give you access to the bolt heads. I used a 1/4" drive socket set here as there is little room - once cracked off with the ratchet, I unscrewed the bolts by hand - the ratchet was too clumsy in the space available. 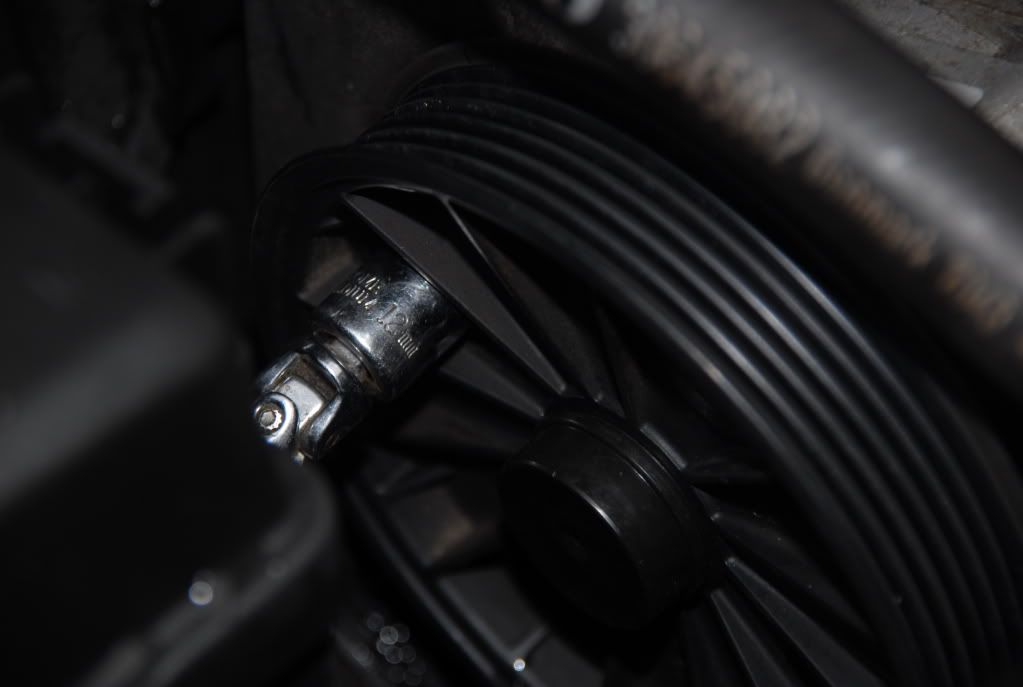  There is also a bolt at the rear and a pipe retainer bolt too - seen here. 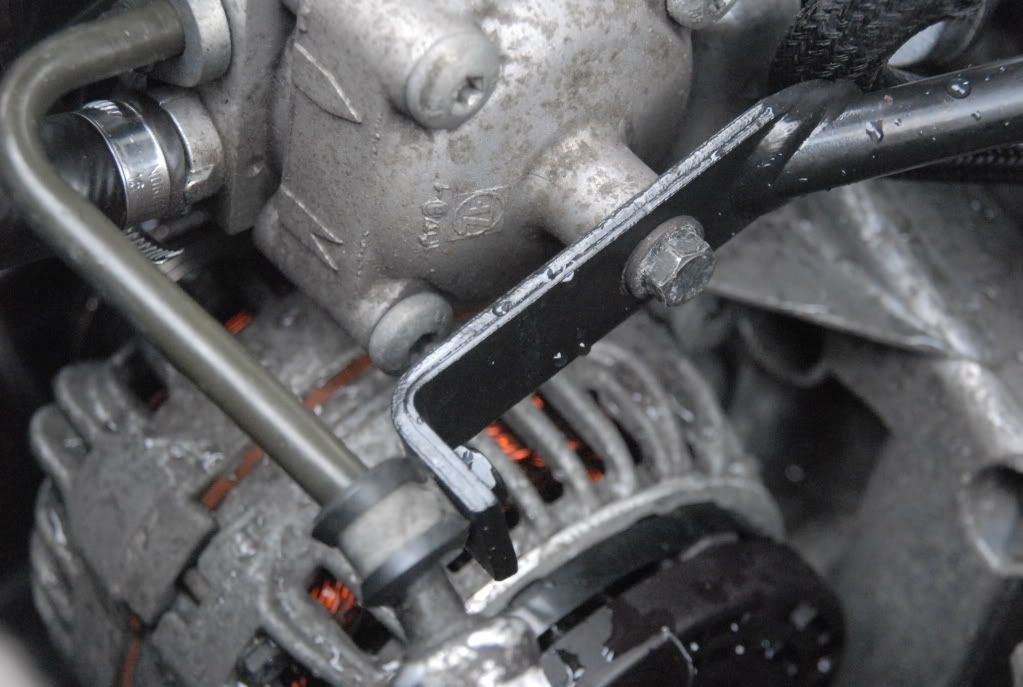 Ok - you can now move the pump away from the thermostat. 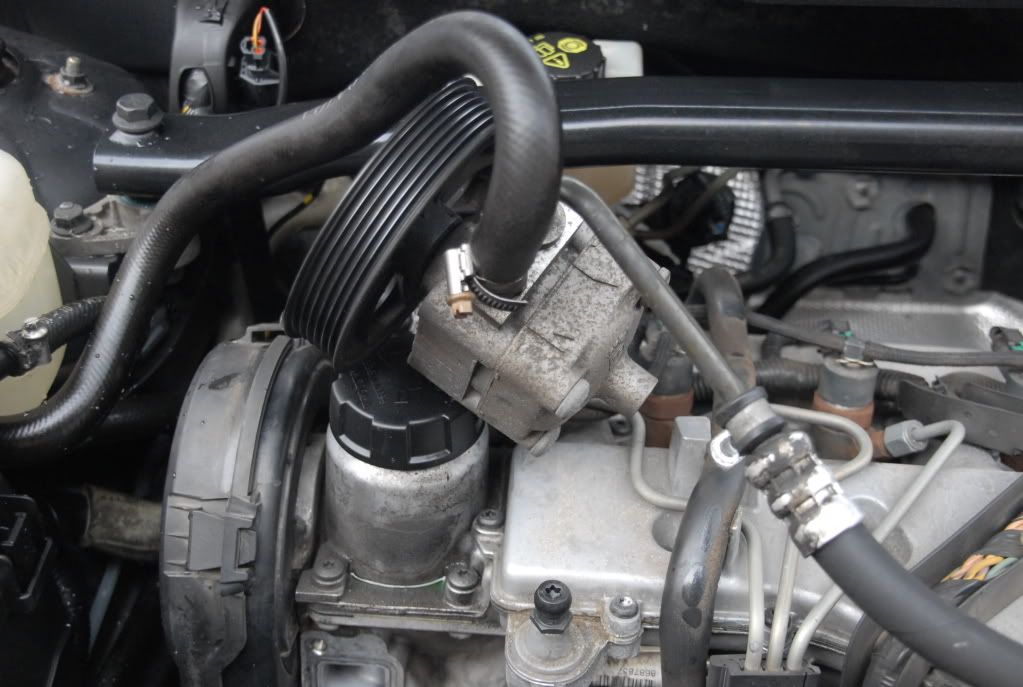 Next - off with the thermostat! Luckily, there are two access holes through the ancilliary bracket - shown here. This gives you access to the lower thermostat screw.  The lower screw was tight to undo with a driver.. but I did not have anything better! Also, remove the temperature sender wire. 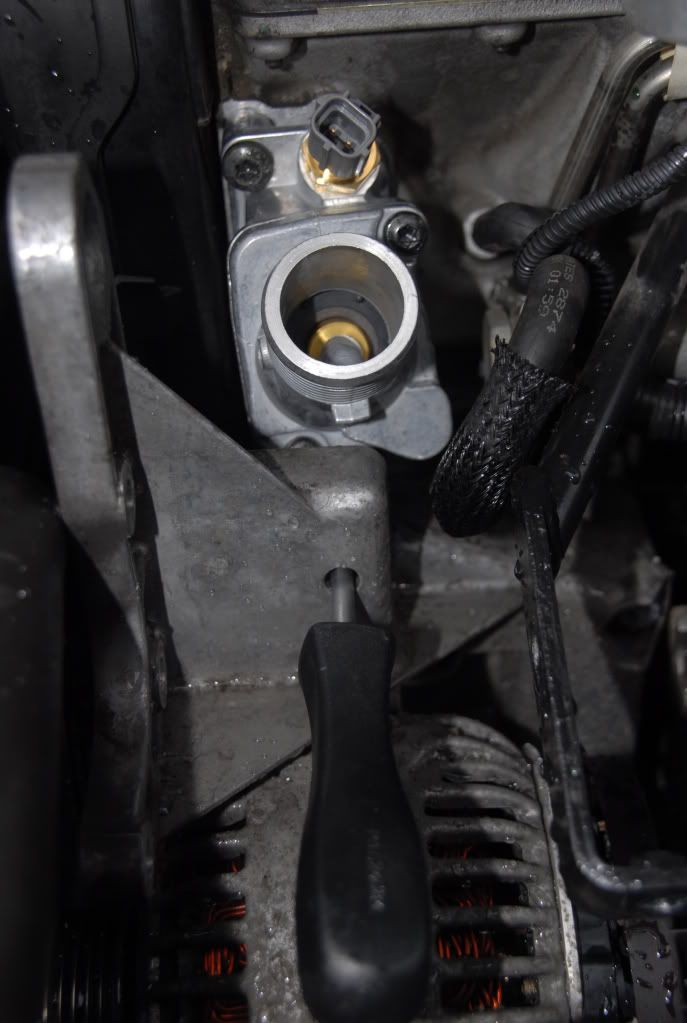 So - both screws out, lift the thermostat and gasket off, and you are half way there! 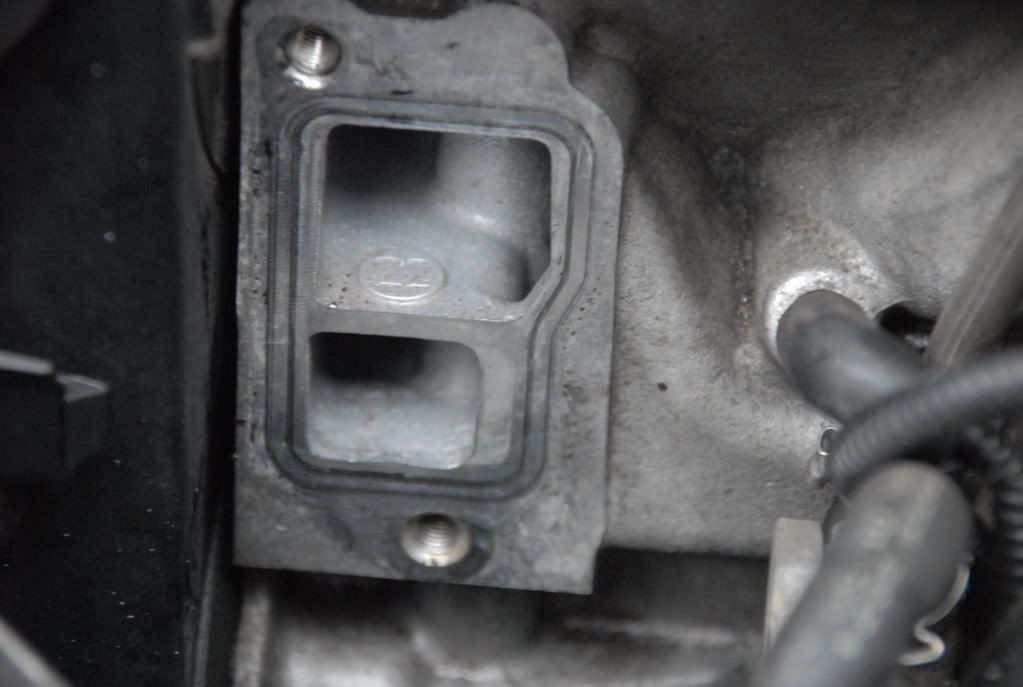 I suggest that before you reassemble everything, you may want to flush the system with running water - to clean the radiator and block/heater matrix. This can be done with a hose, inserted into the block at the thermostat opening and also the radiator lower hose. Don't forget to flush the header tank too. You should also clean up the gasket face on the block to ensure that there is not old gasket or sealant left on the mating face. Reassembly is reversal of removal (you just love that, don't you!). When back together you need to refill the coolant and bleed the system. I could not see any obvious coolant bleed screws, so suspect (and read elsewhere) that its a simple process of refilling, ensure heater is full on hot, and run engine until air escapes. You may need to put the expansion bottle cap back on if you have an airlock and squeeze some hoses, but all being well, it will sort itself out. The system needs approx 7 litres of coolant mix to refill from empty. I cheated when refilling, and used a nice vaccum tool I have for the job - this is its second outing having done a BMW 530D last weekend. This is obviously optional and a chance to show off the gadget! The tool sits on the expansion tank, and uses an airline to create a vaccum within the cooling system. This can be left to test the system, as any reduction in vaccum shows you have a leak. 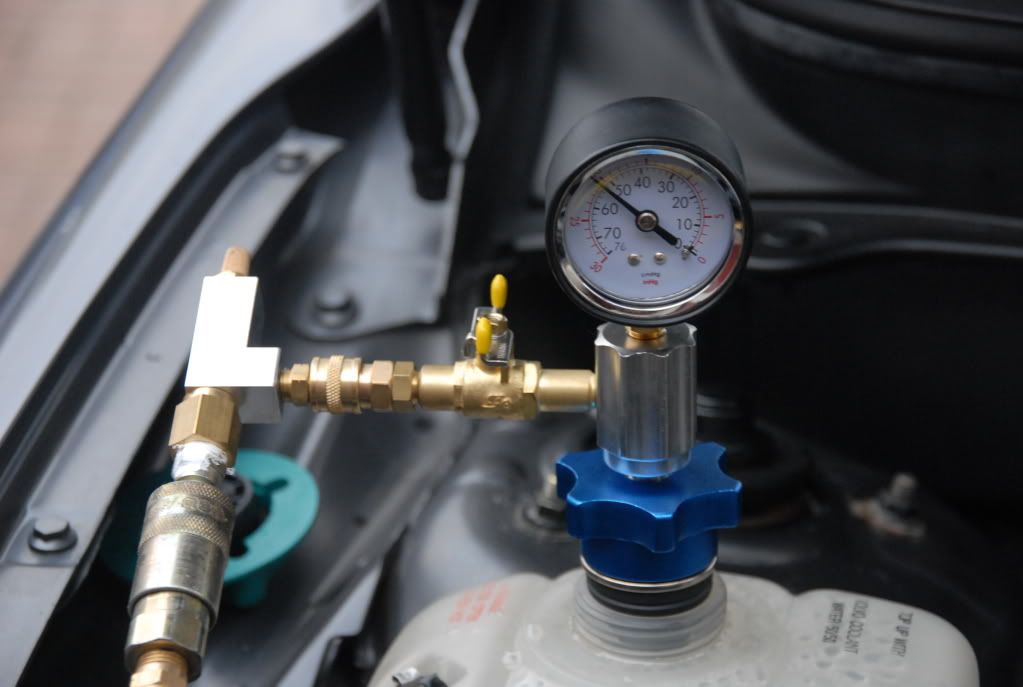 You can see under vaccum, the hoses collapse!  Once the vaccum is up there, you remove the airline and attach the hose to the fresh coolant, diluted to the correct 50% water /50% coolant. When you open the valve on the tool, the fresh collant rushes in. 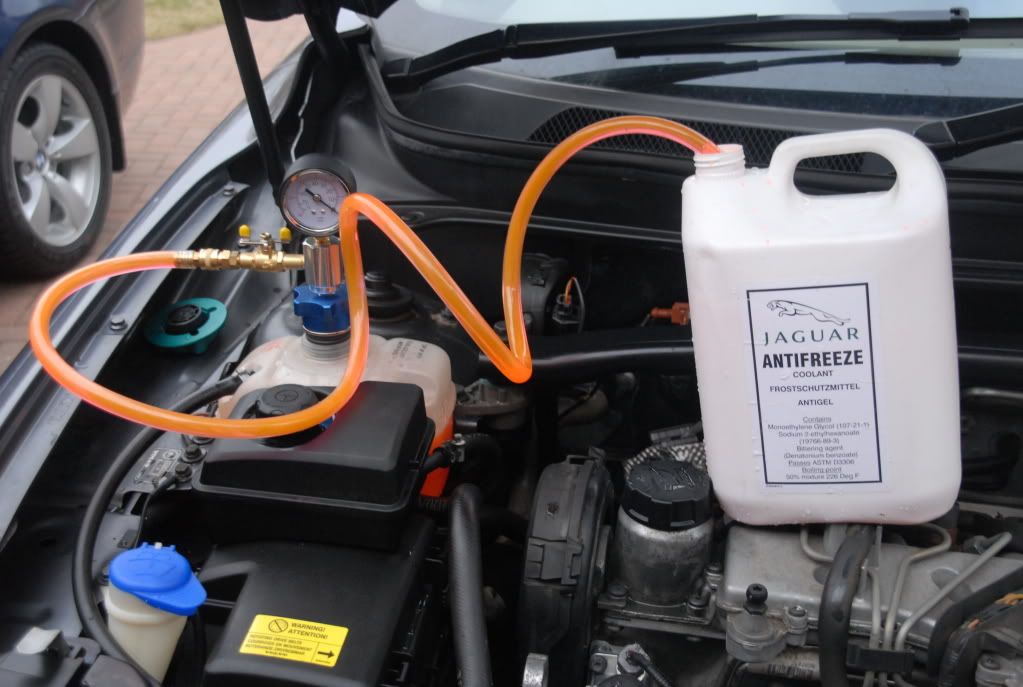 Job done! So - easy job... shame the pump has to come off, but at least Volvo had the insight to leave these access holes in the bracket. Hope that helps someone. David PS - no points for spotting the continuity error in the pictures... 
__________________
My Weather Station |

|

|
| The Following 13 Users Say Thank You to BestGear For This Useful Post: |
|
Mar 6th, 2011, 11:51
|
#2 |
|
xc90, volvo number five

Last Online: Today 17:28
Join Date: Dec 2005
Location: Grappenhall
|
dave
yet another suberb write up, thanks, is it possible to strip the old housing to see if it contains a " standard" thermostat, I was going to try that before I proved my own didnt need replacing dave |

|
|
| The Following User Says Thank You to galloot633 For This Useful Post: |
|
Mar 6th, 2011, 14:13
|
#3 |
|
Premier Member
Last Online: Today 10:05
Join Date: Mar 2008
Location: Derby
|
Great job as usual David.
Your vacuum fill system, it it the Draper or Machine Mart one? I have been thinking of getting one for doing the MG. I have just started to strip it to swap the thermostat housing before I sell it (its a V6 and the inlet manifolds have to be removed!). What are the vacuum kits like to use? Is the quality any good? Rob.
__________________
1997 V70R AWD, Saffron, Manual; Lotus Carlton; Ascona 400; Mini Cooper S Works; 4.2 Supercharged Range Rover; Land Rover Discovery 4; Suzuki GSF1200N; BMW R80/7; Velocette Venom; Daimler V8 250. |
|
|
|
|
Mar 6th, 2011, 16:03
|
#4 | |
|
Anycolouraslongasitsblack

Last Online: Mar 19th, 2012 23:38
Join Date: Mar 2010
Location: swadlincote
|
Quote:
Bri
__________________
 2008my xc90 sport,Polestar 205bhp, Flip down DVD, Full intergrated phone volvo on call, RTI Satnav full post code, privacy glass, Winter pack, Family pack, calcite soft leather, .Bi-xenon active headlights, Brembo discs Redstuff Pads. 2008my xc90 sport,Polestar 205bhp, Flip down DVD, Full intergrated phone volvo on call, RTI Satnav full post code, privacy glass, Winter pack, Family pack, calcite soft leather, .Bi-xenon active headlights, Brembo discs Redstuff Pads.
|
|
|
|
|
|
Mar 6th, 2011, 19:00
|
#5 | |
|
Master Member
Last Online: Feb 3rd, 2024 18:39
Join Date: Sep 2009
Location: Sunny Scotland
|
Quote:
It certainly does look like a standard element - but the rear of the element beside the spring does mate with the case enclosure, so it may be a special... not to say that a standard element would not fit however. If you wanted to check this, I think you could do it without removing the PS pump and just separate the housing. I am sure the old one went to the skip today so may not have it to disect! I will have a look and report back. Thinking about this more, it would be quite easy to check without removing the thermostat if its passing water. If you were to remove the host from the thermostat housing and push water in the hose end you just removed, then if it emerges from the thermostat opening, (when its stone cold obviously!) then you know its not sealing.... worth a try? All you have to loose is the replacement coolant. David
__________________
My Weather Station Last edited by BestGear; Mar 6th, 2011 at 20:07. |
|
|
|
|
|
Mar 6th, 2011, 19:59
|
#6 | |
|
Master Member
Last Online: Feb 3rd, 2024 18:39
Join Date: Sep 2009
Location: Sunny Scotland
|
Quote:
The vaccum kit is the Laser one, which I am sure you have spotted is the same as Sealey, Franklin, Draper and a few others... I ended up going to Halfords to buy it, as with their Trade Card discount, it was cheaper than Ebay or the local motor factors! I dont know if you saw the review of these tools in Car Mechanics mag a year or so ago - they compaired about 6 tools, and this one came up best for value and the only negative that the kit got was that you need to remove the airline from the unit to attach the pickup hose to the fresh coolant. In reality, this is irrelevant, as when you turn the value, you can leave the gauge fitted and check to see if you have any leaks - obviously you would spot the drop in vaccum. The kit that I think got the huighest ward was one that you bought custom expansion bottle caps - but that was £££ as it was not one size fits all, and at £15-£30 a cap, would get expensive. It also had two valves on it so that you could switch the airline off then open the coolant feed with no disconnecting. The kit comes with four rubber sleves so that pretty much any header tank will be manageable. I used one extra ring for the XC90, and the Beemer I did fitted straight away without any extra ring. 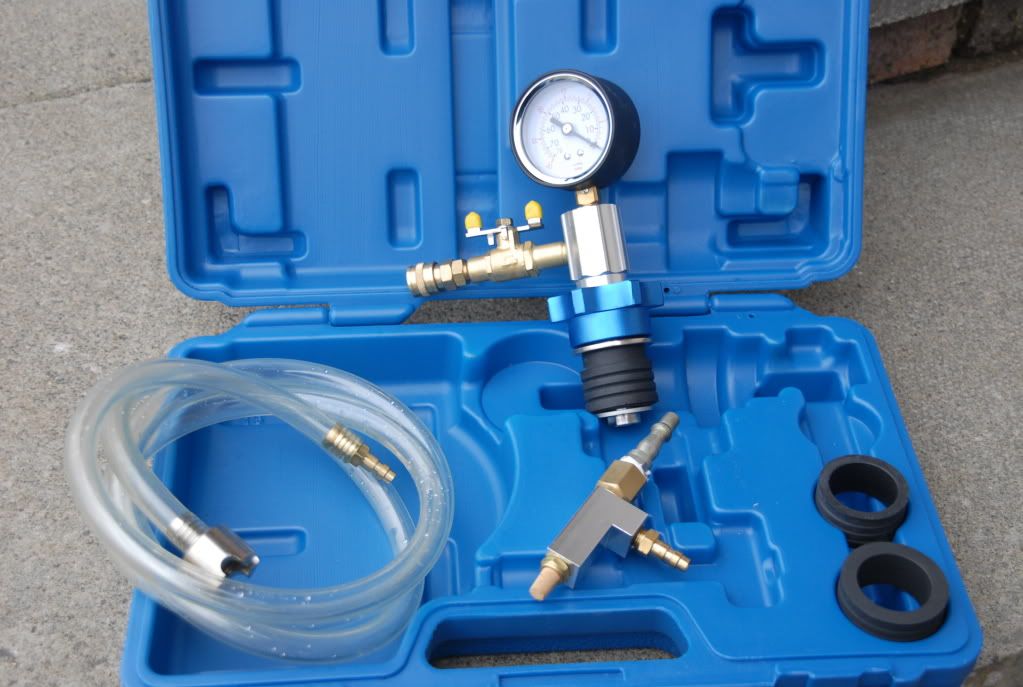 For me, with two cars done now, it saved heaps of time as it was really as simple as it looks. ... and we all know how much a pain some cars are for airlocks. David
__________________
My Weather Station Last edited by BestGear; Mar 6th, 2011 at 20:01. |
|
|
|
|
|
Mar 6th, 2011, 20:05
|
#7 | |
|
Master Member
Last Online: Feb 3rd, 2024 18:39
Join Date: Sep 2009
Location: Sunny Scotland
|
Quote:
My feeling was that if this caused a hose to fail, I was happy to swap it out anyway, as its better done in the drive than at the side of a road! David
__________________
My Weather Station |
|
|
|
|
|
Mar 6th, 2011, 20:07
|
#8 |
|
Premier Member
Last Online: Today 10:05
Join Date: Mar 2008
Location: Derby
|
Thanks David. What do Halfrauds charge trade (I know someone with a card)?
Rob.
__________________
1997 V70R AWD, Saffron, Manual; Lotus Carlton; Ascona 400; Mini Cooper S Works; 4.2 Supercharged Range Rover; Land Rover Discovery 4; Suzuki GSF1200N; BMW R80/7; Velocette Venom; Daimler V8 250. |
|
|
|
|
Mar 6th, 2011, 20:26
|
#9 | |
|
Master Member
Last Online: Feb 3rd, 2024 18:39
Join Date: Sep 2009
Location: Sunny Scotland
|
Quote:
David
__________________
My Weather Station |
|
|
|
|
| The Following User Says Thank You to BestGear For This Useful Post: |
|
Mar 6th, 2011, 20:33
|
#10 | |
|
xc90, volvo number five
Last Online: Today 17:28
Join Date: Dec 2005
Location: Grappenhall
|
Quote:
thanks, when I thought my thermostat was faulty , I was going to swap it anyway , well theyre only a few quid arent they ? that was a shock when I found out what they really cost, I shopped around and the cheapest was my local dealer , £ 95, but my local car spare shop had a schematic of the housing and to him it looked run of the mill , if i could bring him my old unit he'd match it up, as it turned out there was nothing wrong with the car, just me new to diesels and their warm up time dave |
|
|
|
|
|
| Tags |
| diy, heater, replacement, thermostat, xc90 |
| Currently Active Users Viewing This Thread: 1 (0 members and 1 guests) | |
|
|


 Linear Mode

