
|
|||||||
| 700/900 Series General Forum for the Volvo 740, 760, 780, 940, 960 & S/V90 cars |
 Information
|
|
Oil Breathers / flame trap...Views : 12511 Replies : 53Users Viewing This Thread : |
 |
|
|
Thread Tools | Display Modes |
 May 23rd, 2018, 12:18
|
#31 |
|
Premier Member
Last Online: Apr 9th, 2024 21:44
Join Date: Jul 2009
Location: Holywood
|
Another point worth mentioning is any imperfect seals will we exacerbated by spirited driving and using of the turbo.
The B230 Turbo breather design is missing a check valve, and I've noticed on my boosted and tuned 360 B230FT that oil literally spurts out of the seals (cap, valve cover, rear disti hole plug (it pushes out), breather pipes everything.. splashing small spots of oil everywhere. I'm pretty sure this was happening on the dump when the throttle is closed and the crank case is briefly pressurized as the pressure is dumped out the air filter. Adding a 16mm check valve (£25 from ebay) in the big breather tube from the inlet to the oil sep solved my issue and I think will also make my daily standard B230FT 940 alot cleaner. |

|

|
| The Following User Says Thank You to TonyS9 For This Useful Post: |
|
May 23rd, 2018, 16:09
|
#32 |
|
🤍💙💗

Last Online: Today 03:38
Join Date: Mar 2006
Location: Lichfield
|
So you've added a check valve on the big breather hose like this?
__________________
MY97 940 CD LPT Super Sports Edition 2 Turbo, Midnight Purple, 175,000 miles. 
|
|
|
|
| The Following User Says Thank You to baggy798 For This Useful Post: |
|
May 24th, 2018, 14:13
|
#33 |
|
Premier Member
Last Online: Apr 9th, 2024 21:44
Join Date: Jul 2009
Location: Holywood
|
Yes, but the arrow direction for normal air flow is the other way around. The inlet normally sucks at it, but pressurises on dump.
The semi-rigid pipe inside is smaller than the insulation, I actually replaced mine with normal rubber pipe as it was damaged so it fitted easier. You need jubillee clips on the inlet side of the valve and the T point into the big pipe (which is also a heater). On the 360 I did also put one in the small pipe too, but I think that maybe overkill, as its manifold side of the throttle and small bore. Last edited by TonyS9; May 24th, 2018 at 14:19. |
|
|
|
| The Following User Says Thank You to TonyS9 For This Useful Post: |
|
Jun 20th, 2018, 10:11
|
#34 |
|
Senior Member
Last Online: Mar 25th, 2022 06:54
Join Date: May 2018
Location: Southampton
|
I recently completed this task on my B230FK but plan to have a re-run at it for a couple reasons...
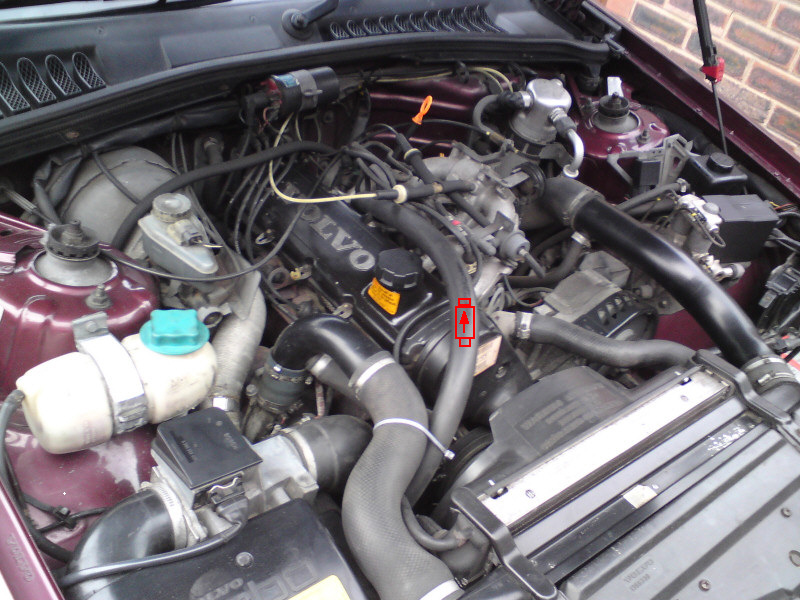
1. I'd like to take some more large hi-res pictures for the purposes of creating a 'How to' so others can follow a guide to help them. 2. Whilst I did blast the pipework/Y-piece and box through with carb cleaner, I cleaned the breather system as an impromptu afterthought whilst removing the throttle body and as such didn't have a replacement 0-ring to fit at the time (I now do) Also I didn't get much of a chance to clean the mini oil slick around the base of the breather box... 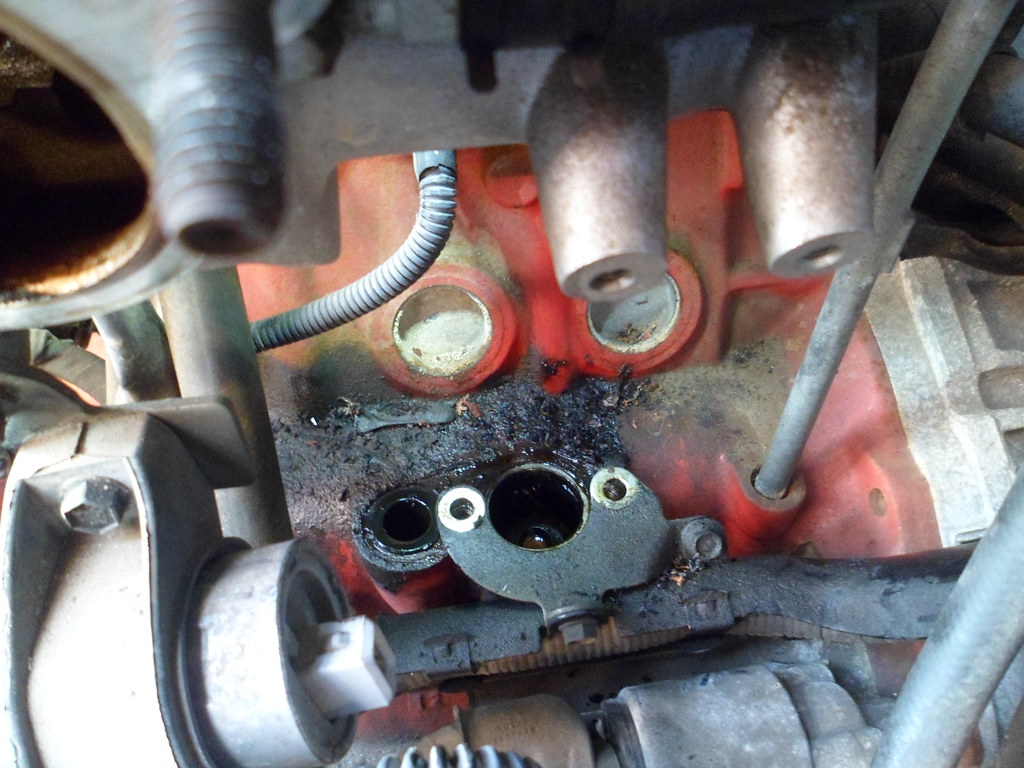 SAM_6807 by [url=https://www.flickr.com/photos/152293344@N05/] SAM_6807 by [url=https://www.flickr.com/photos/152293344@N05/]Presumably this has occurred on the basis of an improper seal to the block at the base of the separator/breather box itself as the box showed no signs of leaks further up or on any of the pipework and had no cracks etc. My plan is to remove the lot again, clean everything for a second time taking pics as I go. RE the oil slick at the base of the box on the block, it's baked on good and hard... Best course of action seems to me to be to block the two holes for the pump gear and rubber drain ports carefully with small rags/blue roll to avoid anything dropping down there and then clean /scrape the oily area round them with rags soaked in white spirits? Any thoights on this approach chaps? |
|
|
|
|
Jun 20th, 2018, 12:57
|
#35 |
|
🤍💙💗
Last Online: Today 03:38
Join Date: Mar 2006
Location: Lichfield
|
Yep, I used turps and carb cleaner to tidy up the block.
New breather box was less than £40 in 2012. New bolts because I'm kinky like that.  
__________________
MY97 940 CD LPT Super Sports Edition 2 Turbo, Midnight Purple, 175,000 miles.
|
|
|
|
|
Jun 20th, 2018, 13:18
|
#36 |
|
Senior Member
Last Online: Mar 25th, 2022 06:54
Join Date: May 2018
Location: Southampton
|
I used a breather box salvaged from a sub 80k 2.3 NA breaker car that I cleaned out thoroughly before fitting to mine as the part no was the same (I'm a bit of a pikey like that)
I shall re-use the existing bolts as they're not stretch bolts and should be fine to use more than once. |
|
|
|
|
Jun 20th, 2018, 17:45
|
#37 | |
|
Premier Member
|
Quote:
__________________
1989 740 GL 2.0 estate 2000 V40 2.0 (gone) 2005 Toyota Avensis 2.0 estate (gone) 2012 Ford Mondeo 2.2 TDCi estate 1999 Land Rover Discovery 2 TD5 |
|
|
|
|
|
Jun 21st, 2018, 17:15
|
#38 |
|
Senior Member
Last Online: Mar 25th, 2022 06:54
Join Date: May 2018
Location: Southampton
|
Second question...
RE the nipple on the inlet manifold that the thinner crankcase hose leads to, I know mine is clear to a fashion as I can blow through it... Either way I'd like to make sure it's 100% clean/as clear as it can be. Clearly poking down through it would lead to any gunk dislodged falling into the inlet- clearly that's not cool.... For cleaning the nipple itself are you lot un-bolting it from the inlet altogether and cleaning it once detached or...? Again, TIA 
|
|
|
|
|
Jun 21st, 2018, 19:58
|
#39 |
|
Premier Member
|
In my case, I had the whole inlet manifold off, because I was renewing the head gasket. I gave everything a thorough clean while I had the opportunity, including the air metering flap in the K-Jet unit.
But yes, if it's a nipple that you can unscrew and clean, that sounds like the best way.
__________________
1989 740 GL 2.0 estate 2000 V40 2.0 (gone) 2005 Toyota Avensis 2.0 estate (gone) 2012 Ford Mondeo 2.2 TDCi estate 1999 Land Rover Discovery 2 TD5 |
|
|
|
|
Jun 22nd, 2018, 14:28
|
#40 |
|
Premier Member
Last Online: Apr 9th, 2024 21:44
Join Date: Jul 2009
Location: Holywood
|
I consider crud like that fairly soft kinda dirt, engines are often full of it. If its loose it should just blow out the exhaust and/or get burnt.
Mainly you just need to worry about volume of soft dirt perhaps blocking the oil pump. If you have a crudy engine and try to clean it you might well end up with a blocked oil pump. I just cleaned the breather nipple with the intake cleaner squirting in from the outside. Push some tissue/cloth in their to capture the dirt as much as possible but don't worry about stray bits too much. |
|
|
|
|
| Currently Active Users Viewing This Thread: 1 (0 members and 1 guests) | |
|
|


 Linear Mode

