
|
|||||||
| PV, 120 (Amazon), 1800 General Forum for the Volvo PV, 120 and 1800 cars |
 Information
|
|
Amazon Estate Rolling ProjectViews : 70158 Replies : 599Users Viewing This Thread : |
 |
|
|
Thread Tools | Display Modes |
 Jun 29th, 2011, 20:48
|
#61 |
|
VOC Member

Last Online: Jan 16th, 2023 22:07
Join Date: May 2009
Location: teesside
|
looking forward to the pics mitch,i should have mine back from the bodyshop early august,having a lot of panel work done before paint.
|

|

|
|
Jun 29th, 2011, 22:01
|
#62 |
|
Chief Bodger

Last Online: Yesterday 21:01
Join Date: Oct 2009
Location: Aberdeen
|
Thanks Pez,
Just back in, the cars looking good and we like the colour. I'll give a run down on progress later but here and the pics I took today. |
|
|
|
|
Jun 29th, 2011, 22:09
|
#63 |
|
VOC Member

|
Thanks for showing pics they bring back memories of just over a year ago for us . The end result well worth it .
From this , 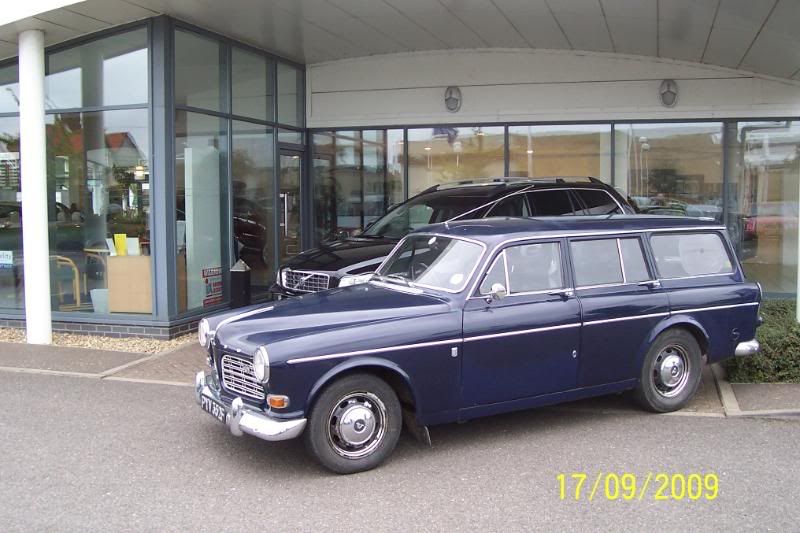 to this , 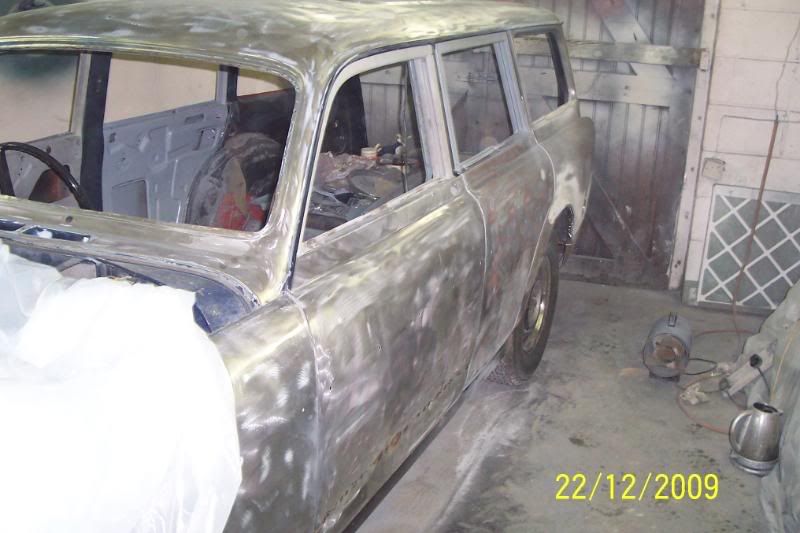 ending with this a photoshoot for practical classics  Well worth the wait and she is now giving us endless pleasure and after all the work we know she will for many years to come . Yours will be a joy , please keep the progress pics coming .
__________________
 1968 Amazon estate (Gracie). 2003 Vauxhall astra estate (her car) 2009 XC90 (Jo) . Not forgetting 1967 Cheltenham Nyala (caravan) |
|
|
|
| The Following 3 Users Say Thank You to gillberry For This Useful Post: |
|
Jun 30th, 2011, 07:48
|
#64 |
|
Chief Bodger
Last Online: Yesterday 21:01
Join Date: Oct 2009
Location: Aberdeen
|
I went to have a look at the car last night and am very please how things are going. Graeme the resto guy has pretty much finished the bodywork and priming the outside with only a bit more left to do. He said it's had a lot of paint over the years and was glad when he finished removing it. He's going to crack on with the inside now.
The engine build is all but completed and am just waiting on the new push rods so I can finish it off. I'll then give the engine a coat of paint. Hopefully the pushrods will turn up today or tomorrow so I can finish the engine on the weekend and will post some pics. I'd also like to give Graeme the resto guy a plug. Anyone up my way looking for a good quality restoration guy and he's a really nice straight up guy as well then please get in contact with Graeme: Retro Restorations Fraserburgh 07785543283 Last edited by Burdekin; Jun 30th, 2011 at 07:54. |
|
|
|
|
Jun 30th, 2011, 20:12
|
#65 |
|
VOC Member
Last Online: Jan 16th, 2023 22:07
Join Date: May 2009
Location: teesside
|
looking good mitch! this reminds me i,ll have to update my own thread! and the progress so far,keep those pics coming mate.
|
|
|
|
| The Following User Says Thank You to pez For This Useful Post: |
|
Jun 30th, 2011, 21:52
|
#66 |
|
VOC Member
|
I've been slow to spot this. But, it's a nice car and a nice plan!
John
__________________
XX 
|
|
|
|
| The Following User Says Thank You to john h For This Useful Post: |
|
Jul 3rd, 2011, 18:05
|
#67 |
|
Chief Bodger
Last Online: Yesterday 21:01
Join Date: Oct 2009
Location: Aberdeen
|
I closed the engine off on the weekend and have given it one coat of paint, will do one or two more during the week. The new 4mm longer push rods are spot on so I put them in, torqued down the head, put on the rocker assembly and set the valve clearances. I set them at .5mm but will need to check with KG if this is okay for the KG10 cam. I need to crack on with getting the engine accessories sorted so it is all ready to go when the car is done.
The engine specs and new parts: Lightened flywheel Clutch assembly Polished crank and new bearings Balanced clutch/flywheel/crank and con rods assembly Bored 30thou over cylinders Pistons and rings Skimmed and worked E head with hardened exhaust seats - CR 10:1 Inlet & exhaust valves and valve springs KG10 cam, followers & push rods Oil, fuel and water pumps Front and rear crank covers with modern seals Rocker assembly Gasket, seals and bolts etc. I've attached some pics showing the push rods being too short, before the engine was painted (I would have left it like this if not painting the car), longer and thicker than standard push rod, rocker assembly and showing how we sealed off the injector ports with £1 coins which were given a whack with the hammer to flare out then some metal putty to help hold them in place and then filed flat, and the engine with one coat of paint. |
|
|
|
| The Following User Says Thank You to Burdekin For This Useful Post: |
|
Jul 3rd, 2011, 18:44
|
#68 |
|
VOC Member
Last Online: Jan 16th, 2023 22:07
Join Date: May 2009
Location: teesside
|
should be a good strong engine that mitch,good work,like what uve done to block off the injector holes! only cost yer four quid,and their readily avaliable!!
|
|
|
|
| The Following User Says Thank You to pez For This Useful Post: |
|
Jul 10th, 2011, 19:59
|
#69 |
|
Chief Bodger
Last Online: Yesterday 21:01
Join Date: Oct 2009
Location: Aberdeen
|
Just a wee update. Finished painting the engine this week, 4 coats and a wee rub down between each coat. I'm not the best painter but it looks okay. I'll dress the engine to make sure everything fits okay before I take it up to the resto guy.
Yesterday I stripped back and primed the petrol cap I got from Paul (222s), came up nice and it will looked good when painted and on the car. In the afternoon I drove up to see the resto guy to go through the bright work and interior to see what should be kept and what should be replaced. I'm still undecided on the interior with regard to what I should replace and what I should keep. The brightwork that I thought looks good enough to keep I brought home with me and today I've been hitting out all the dents with my lead chaser and hammer and polishing out the scratches. It won't be perfect but am happy and surprised so far how well things are coming up. I spent a bit of time on straightening the grills, one in particular was quite knocked about but it goes back into shape really easily and with some elbow grease I hope it will look great when finished. The resto guy reckons he might be finished the car this week so I need to get the new rubbers and everything else back up to him as soon as I can. Attached some pics from the weekend of the car in the final colour and some of the bits. I really like it. One last thing, have been using aluminium foil in soapy water to polish the side mouldings and is working a treat and polishes out the small scratches... Last edited by Burdekin; Jul 10th, 2011 at 20:03. |
|
|
|
| The Following 3 Users Say Thank You to Burdekin For This Useful Post: |
|
Jul 14th, 2011, 20:32
|
#70 |
|
Chief Bodger
Last Online: Yesterday 21:01
Join Date: Oct 2009
Location: Aberdeen
|
This week has been spent knocking out the dents, straightening the best I could and polishing the exterior brightwork. It's far from perfect but considerably better than what it was. I've been wrestling in my mind with regard to how many new parts to put on the car, as I want to keep the character which the original parts and their wear and tear bring but I don't want them to stand out like you know what against the new paint. I think I have a better idea what I want to achieve now and I want to ensure I don't over restore the car. The interior I'm going to restore as much as I can but will need a new headliner, the interior trimming around the doors and carpet. I'll get the two rips in the front seats repaired and new cushions if required and then just a thorough spit and polish and I think that will be cool, just like an old favourite leather couch. ;-) How does that sound?
I also ordered new stainless bumpers (the old ones were well past their best and had done their job), all new rubbers, and a few exterior bright work bits that couldn't be reused as hopefully the car will start being put back together next week. Brookhouse did me a good deal on the parts (except the bumpers which I got elsewhere for as much as I could haggle them down). Will give the resto guy a call tomorrow to see how he's getting on. I won't be able to spend much time this weekend on the car but the next thing on the to do list is make sure the engine is dressed and I have everything required. I hope to be putting the engine back in the following weekend all going well... |
|
|
|
| The Following 4 Users Say Thank You to Burdekin For This Useful Post: |
|
| Currently Active Users Viewing This Thread: 1 (0 members and 1 guests) | |
|
|


 Linear Mode

