
|
|||||||
| 700/900 Series General Forum for the Volvo 740, 760, 780, 940, 960 & S/V90 cars |
 Information
|
|
B230FK Crank Position Sensor Replacement: A 'How To' Guide.Views : 2915 Replies : 19Users Viewing This Thread : |
 |
|
|
Thread Tools | Display Modes |
|
|
 Aug 9th, 2018, 09:50
|
#1 |
|
Senior Member
Last Online: Mar 25th, 2022 06:54
Join Date: May 2018
Location: Southampton
|
As per the title, I tackled this job this morning so thought why not take some pictures and create a DIY guide as it seems a common issue.
N.B: I tried posting this in the '700/900 articles' section but unfortunately was met with a message stating that I don't have permission? If a mod could possibly move this there if possible that would be great.... Step 1. Decide you'd like to replace your crankshaft (Pulse) sensor. This could be for simple preventative maintenance, because of a no start condition or because you've found the wiring to be damaged like mine...  SAM_7029 by [url=https://www.flickr.com/photos/152293344@N05/] SAM_7029 by [url=https://www.flickr.com/photos/152293344@N05/]Step 2 Gather the bits you need... 1. New sensor (Mine was just under £40 trade price from Volvo) 2. 10mm ratchet spanner 3. Assortment of ratchet/10mm socket/extensions/uj's 4. Copper grease 5. Electric contact cleaner spray 6. Snips 7. Cable ties. 8. Torch 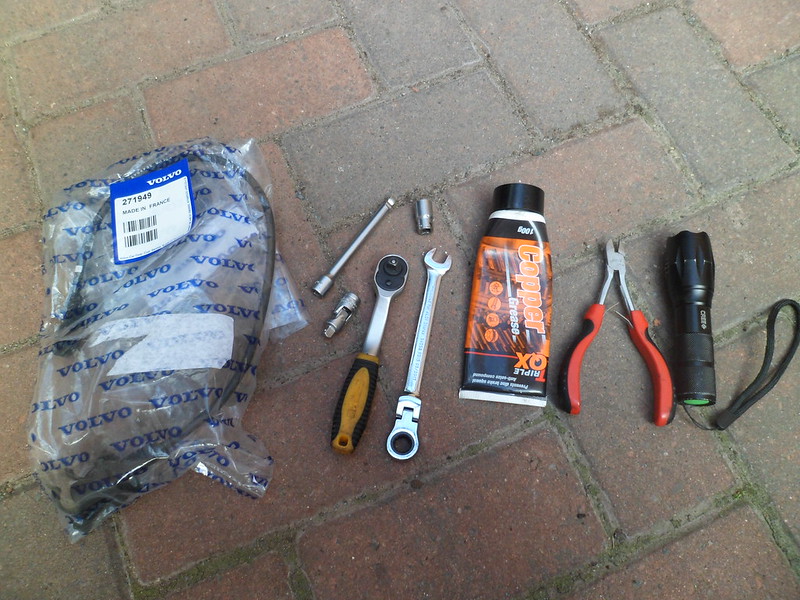 SAM_7034 by [url=https://www.flickr.com/photos/152293344@N05/] SAM_7034 by [url=https://www.flickr.com/photos/152293344@N05/] SAM_7046 by [url=https://www.flickr.com/photos/152293344@N05/] SAM_7046 by [url=https://www.flickr.com/photos/152293344@N05/]Step 3 Disconnect the cable tie harness fitting from the firewall by simply lifting it free of the tab it sits on at the back and then look at it, there's a little lever that when pushed allows you to open the cable tie section to make it loose and withdraw the wiring/loom. This allowed me so remove the old CPS without destroying it's wiring completely so as I can keep it as a spare just in case. Once you've done this you simply need to follow the wire from the plug down to the bellhousing, there you will find the sensor (Arrowed in green) It's a bit fiddly but is only held on by one 10mm bolt.  cps by [url=https://www.flickr.com/photos/152293344@N05/] cps by [url=https://www.flickr.com/photos/152293344@N05/]Step 4 Undo the 10mm bolt, remove the clips holding the wiring to other stuff along it's course and unclip and remove the plug. Remove the sensor and wiring from the car and compare it with your new part to ensure they match... 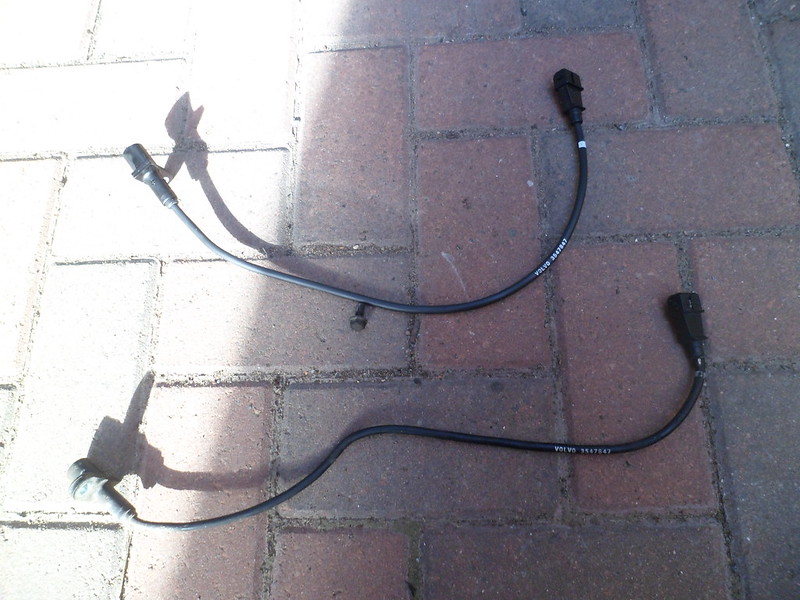 SAM_7045 by [url=https://www.flickr.com/photos/152293344@N05/] SAM_7045 by [url=https://www.flickr.com/photos/152293344@N05/]Step 5 Spray inside the plug fitting from the loom with contact cleaner to ensure a good connection, lightly cover the end of the bolt with copper grease and re install everything in the reverse order of removal. The bolt does not need to be too tight, DON'T STRIP IT!!!! Re-seat the loom support/cable tie to the firewall with loom in place and perhaps tidy up the extra wiring from the newly installed sensor with a couple of extra cable ties.  SAM_7050 by [url=https://www.flickr.com/photos/152293344@N05/] SAM_7050 by [url=https://www.flickr.com/photos/152293344@N05/]Step 6 Stand back and feel satisfied that the job is complete. it took me 20mins at a very relaxed pace and that included time to take pictures. In the end I didn't use the socket set and TBH could have done without lots of the gear pictured. At a push all that's needed is some snips and a 10mm spanner. HTH. Last edited by LPTJoe; Aug 9th, 2018 at 10:56. |

|

|
| The Following 5 Users Say Thank You to LPTJoe For This Useful Post: |
|
Aug 9th, 2018, 11:56
|
#2 |
|
Premier Member
Last Online: Oct 26th, 2023 20:42
Join Date: Jun 2010
Location: Thurrock
|
I have posted a thread upstairs, to ask if this is applicable to the 240. I guess the CPS must be in "the same" position. The connector is definitely similarly placed.
By the way the outer black support covering of my CPS connector is also split but all seems to be working. I suspect any CPS that has not been replaced recently will have a split outer support covering to the connector? Did you lie on top of the engine? What was your modus of approach to the task? FRF have quoted me £40.39 including VAT. Discount code C3. Where did you get your genuine Volvo part and does that price of just under £40 include VAT? I can't remember, sorry, did you consider a third party part? I still always aim for Volvo parts, I do keep an open mind on the point. |
|
|
|
|
Aug 9th, 2018, 12:25
|
#3 |
|
SilverBrick Lives!

Last Online: Apr 5th, 2024 19:06
Join Date: Apr 2015
Location: Poynton, Cheshire
|
I did mine from below, cuddling the gearbox.
__________________
Jeep ZJ, 960, Past:- Mazda2, Jumbuck, V70 (2002), 945 (1995), Hyundai Coupe, Golf Mk4, Previa, Carina, 2 x Corsa, 4 x Astra, 944 16v (1991), Espace, Escort, Audi 80, Renault 21 Savanna, Polo, Mini Clubman/Pickup, Standard 8, Capri, Maxi. |
|
|
|
|
Aug 9th, 2018, 13:55
|
#4 | |
|
Premier Member
Last Online: Apr 9th, 2024 21:44
Join Date: Jul 2009
Location: Holywood
|
Quote:
|
|
|
|
|
| The Following User Says Thank You to TonyS9 For This Useful Post: |
|
Aug 9th, 2018, 14:51
|
#5 |
|
Senior Member
Last Online: Mar 25th, 2022 06:54
Join Date: May 2018
Location: Southampton
|
240's are exactly the same but the gap between the firewall and the block is smaller.
The price was trade rate from my local Volvo dealer and included VAT. RE approach, stories of people lying on top of their engine bays (And more recently lying underneath and hugging gearboxes?) confuse me.... I think people may be winding you up?  It really isn't that hard to get to, the sensor is just there looking right at you. I simply leaned over and undid it, I can 100% assure you both feet remained on the floor at all times. I probably could have done it less that 10 mins if I hadn't been taking pictures. Last edited by LPTJoe; Aug 9th, 2018 at 15:04. |
|
|
|
| The Following User Says Thank You to LPTJoe For This Useful Post: |
|
Aug 9th, 2018, 17:16
|
#6 |
|
Premier Member
Last Online: Oct 26th, 2023 20:42
Join Date: Jun 2010
Location: Thurrock
|
240s are doubtless exactly the same, except one cannot see the CPS from any angle, not on my car anyway. Standing on the surface of the planet and reaching in behind the engine oil level dipstick tube, I have found the CPS now by the location detectors that are integral to my right hand.
 Apologies if I am wrong. I suspect the gearbox hug was winding up the lie on top of engine and use left hand (What?) post which was perhaps winding up....who knows who? Thanks for the how to do it thread Joe. |
|
|
|
| The Following User Says Thank You to Stephen Edwin For This Useful Post: |
|
Aug 27th, 2018, 00:09
|
#7 | |
|
Premier Member

Last Online: Today 01:27
Join Date: May 2012
Location: Lakenheath
|
Quote:
  Then stand on the wheel to thread some string onto the plug from above, disconnect the plug and lower it gently to the floor. Tie the new one onto the same piece of string after removing the old one from it, climb on the wheel again and pull it up, roughly into position, tie the string so it can't drop then go underneath, cuddle the gearbox (for your stability) and fit the new one. Back on the wheel, plug the new in and remove the string. By comparison, the Volvo is a lot easier!  Great write up as well Joe!
__________________
Cheers Dave Next Door to Top-Gun with a Honda CR-V & S Type Jag Volvo gone but not forgotten........
|
|
|
|
|
|
Aug 26th, 2018, 21:47
|
#8 | |
|
SilverBrick Lives!
Last Online: Apr 5th, 2024 19:06
Join Date: Apr 2015
Location: Poynton, Cheshire
|
Quote:
__________________
Jeep ZJ, 960, Past:- Mazda2, Jumbuck, V70 (2002), 945 (1995), Hyundai Coupe, Golf Mk4, Previa, Carina, 2 x Corsa, 4 x Astra, 944 16v (1991), Espace, Escort, Audi 80, Renault 21 Savanna, Polo, Mini Clubman/Pickup, Standard 8, Capri, Maxi. |
|
|
|
|
|
| Currently Active Users Viewing This Thread: 1 (0 members and 1 guests) | |
|
|


 Hybrid Mode
