
|
|||||||
| PV, 120 (Amazon), 1800 General Forum for the Volvo PV, 120 and 1800 cars |
 Information
|
|
Reviving a barn find P1800ESViews : 7290 Replies : 66Users Viewing This Thread : |
 |
|
|
Thread Tools | Display Modes |
 Sep 23rd, 2020, 17:26
|
#11 |
|
Master Member

Last Online: Apr 27th, 2024 15:46
Join Date: Jul 2020
Location: Saskatchewan, Canada
|
In North America, both the group 24 and 34 list as fitting the 1800. The 34 being a bit shorter than the 24. The group 24 has a bunch of sub codes (F, H, R, T and no sub code). All the 24 batteries are the same width and length; but the heights vary because the sub codes designate the battery post arrangement. The application guides list 24 (no sub code) for the 1800. I believe the equivalent UK code is 069. Top mount posts with the positive post on the left side when facing the post side of the battery.
I have been through the process of resurrecting a B20E (B20F in your case??) that sat for 20 years prior to restoration. Unless the engine was put into storage condition when parked (fuel system drained, coolant drained, cylinders oiled, oil drained or drained and replaced with new, all opening to the engine and fuel system sealed to prevent air entry) I would not be attempting an engine start. I will hazard a guess that the car was stored in an unheated garage? You do not experience the severe temperature swings that I experience being in the middle of a continent where the closest ocean is 1700 km. However, you have high humidity and the temperature does change. The temperature changes will cause the engine to breath atmospheric air if the engine was not sealed up and over 20 years of breathing moisture will accumulate in the combustion chambers and fuel system to bad effect. If the car was parked with coolant in the block the corrosion inhibitors will almost certainly be rendered ineffective. Your gummed fuel system suggests that the car was not put into long term storage mode. My B20E 'ran when parked' and was not put into storage mode when parked. At some point the head gaskets failed allowing coolant leakage into two of the cylinders. Most of the valves were OK and were rehabilitated with some light machining. A couple were corroded beyond use. The piston rings were corroded in place requiring a rebore and over size pistons. The good news was the crankshaft and con rods were just fine; but, I did replace the bearings with new standard bearings. My advice is, rather than jump in and try to crank the engine as is, remove the head and inspect parts. Even if you try rotating the engine by hand, you risk damaging the main and con rod bearings because they will assuredly have absolutely no lubrication at this point. Removing the head will allow you to have the exhaust valve seats upgraded with hardened inserts to deal with unleaded fuel and you can inspect the valves for corrosion. The other consideration is that if the engine has the original camshaft and lifters and has more than 100,000 miles on it the camshaft and lifters will be in the failure mode. Volvo had metallurgy issues with the B18 and B20 lifters which resulted in spalling of the lifter contact surface which resulted in accelerated wear on the cam and lifter. At some point Volvo changed the design of the lifters (the later lifters are visually very different) to address the problem. My 1971 still had the original style lifters and the higher lift D and later K cam probably exacerbated the wear issue. With the head off you can extract the lifters to examine the contact face for spalling (if it is occurring you won't need a magnifying glass to see it). Extraction will also clarify whether you still have the original style lifters or whether the engine received the later improved lifters. Short version, first step for the engine would be to purchase a top end gasket kit and plan for the removal of the head to allow for a detailed inspection. If things look wonderful then you can button it back up and proceed to the next items on the list. Based upon my experience, things will not look wonderful. Rejoice in the fact that you found a complete 1800ES that appears to require minimal body work. Even the paint looks like it might come back with some cleaning and DA work with paint restoration compound. Having to do some engine repair work is a minor cost and inconvenience compared to any body work - trust me on that one! Go here and download the .pdf copy of the D jet trouble shooting manual. It will be your best friend when it comes time to get it running well. http://volvo1800pictures.com/sweden/...in_page_en.php Nice find and the timing is perfect as we potentially enter another round of COVID 19 restrictions. Much better to be squirreled away working on a P1800E than binge watching on NetFlix. Last edited by 142 Guy; Sep 23rd, 2020 at 17:28. |

|

|
| The Following User Says Thank You to 142 Guy For This Useful Post: |
|
Sep 23rd, 2020, 18:28
|
#12 | |
|
Junior Member
Last Online: Mar 17th, 2023 06:04
Join Date: Sep 2020
Location: St Albans
|
Quote:
Your assumptions are largely correct and no preparations were made before the car was parked up, other than the parking brake being left off and clean oil putting in, but that was coincidental. Oil and coolant are still full to the max marks and oil is clear. Although the garage isn't heated, it's dry and the body and underside seem to have fared very well indeed. After looking over the car I'm confident this is just going to need a lot of mechanical attention and the body and interior can be revived. Once I've cleaned the car up I'll post more detailed pics. It'll be some time until I get round to looking into the engine and first I want to install a new fuel system. Taking the head off is not something I envisaged doing before attempting a start, but I was considering this down the line to have it rebuilt with hardened valve seats. I may just get this done sooner than anticipated now! I did get a borescope into the cylinders and I'm not quite sure what to make of the pics I got, but I'll share these soon once I have got them off my device. |
|
|
|
|
|
Sep 23rd, 2020, 20:31
|
#13 | |
|
Member since 1988
Last Online: Apr 23rd, 2024 19:28
Join Date: Dec 2003
Location: Middlewich
|
Quote:
The front seat squab cushions are held in place by four press studs and therefore easy to remove, you could therefore simply put some old furniture cushions in their place while you are clambering in and out of the car during your restoration and re-commissioning. I agree that after so long in storage they will benefit from a really good clean and feed! |
|
|
|
|
|
Sep 28th, 2020, 16:54
|
#14 |
|
Junior Member
Last Online: Mar 17th, 2023 06:04
Join Date: Sep 2020
Location: St Albans
|
Not much to add to this as we've been too busy to get back to the car.
We are planning to give it a full clean up very soon so I'll post an update on that with plenty of detailed pics when that's done. In the meantime I managed to get some pics off of the borescope. I'm not quite sure what to make of these, but I think that considering this engine is approaching 50 years old, done 100k miles and hasn't been fired for 25 years; they don't look too bad. The camera amplifies the detail so it looks worse than it is. A sensible restorer with unlimited time and funds would do a full engine rebuild first, but I think we're just going to send it and go for a start up once we've renewed the fuel and ignition systems! I'm keen to know what any experts think of these. 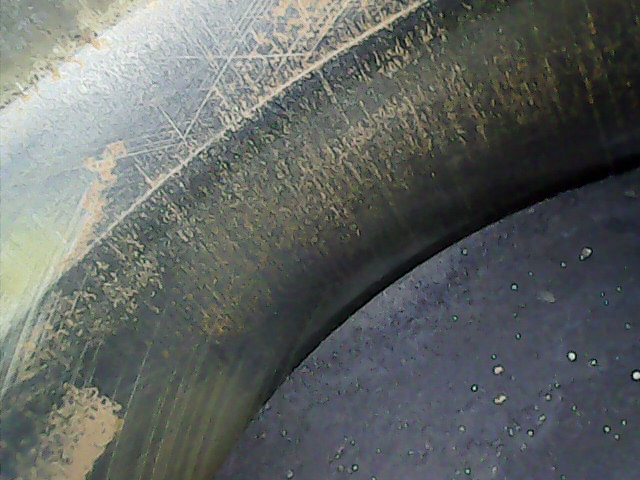 |https://thumbsnap.com/STKRsVxF[/img] |https://thumbsnap.com/STKRsVxF[/img]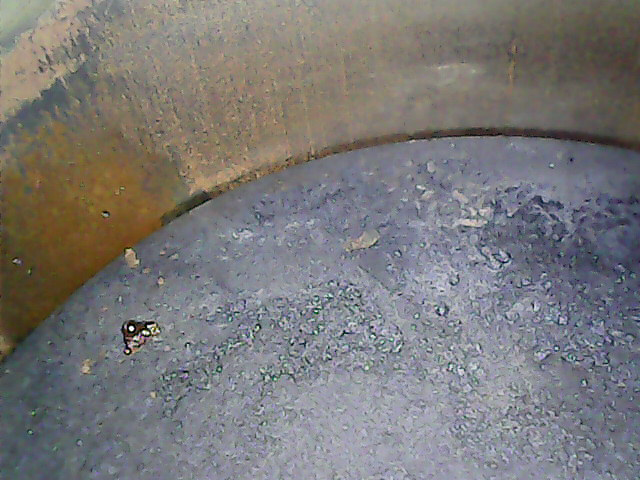 |https://thumbsnap.com/pvZUmdKr[/img] |https://thumbsnap.com/pvZUmdKr[/img]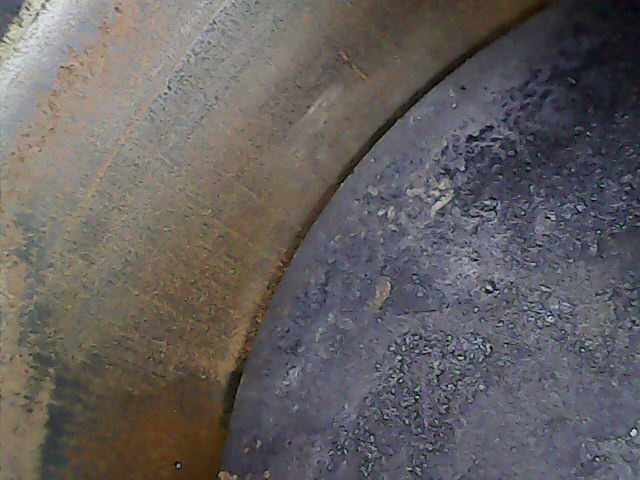 |https://thumbsnap.com/EBEwwyKi[/img] |https://thumbsnap.com/EBEwwyKi[/img]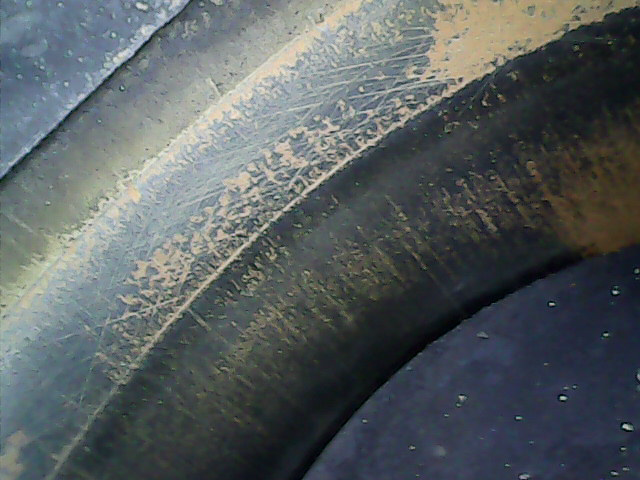 |https://thumbsnap.com/7BTv7dz7[/img |https://thumbsnap.com/7BTv7dz7[/img
Last edited by P1800 ES; Sep 28th, 2020 at 18:35. |
|
|
|
| The Following User Says Thank You to P1800 ES For This Useful Post: |
|
Sep 28th, 2020, 17:33
|
#15 |
|
Master Member
Last Online: Apr 27th, 2024 05:36
Join Date: Oct 2013
Location: Alberta
|
Pictures won't open for me.
|
|
|
|
|
Sep 28th, 2020, 17:36
|
#16 |
|
Senior Member
Last Online: Oct 5th, 2021 19:46
Join Date: Oct 2013
Location: Huddersfield
|
Nor me either
|
|
|
|
|
Sep 28th, 2020, 18:12
|
#17 |
|
Master Member
Last Online: Apr 27th, 2024 15:46
Join Date: Jul 2020
Location: Saskatchewan, Canada
|
I thought it was just me and some odd parental authority application blocking the view.
In the absence of seeing anything, its your prerogative to try a restart without a tear down. Recognizing that, some comments: - before rotating the crankshaft there is a procedure for pre lubricating the bearings which involves removing the distributor and its drive gear and using an adapter (which you need to fabricate) and a drill to spin the oil pump which forces oil into the important areas prior to start up. I didn't do this because I did a rebuild and used assembly lube for the start up. Search the web and you can probably find details on the adapter and the procedure. - once the bearings are lubed you can do a crank turn over by had and listen for bad noises - before start up consider removing the injectors (including cold start injector) and having them sent to a specialist for cleaning and flow testing. A non functioning injector(s) will greatly complicate start up. If you elect not to send the injectors out prior to start up, after you get your fuel system rehabilitated do a test with the injectors attached to the rail; but, removed from the holders. Pressurize the system and look for drooling injectors. Open and close the throttle switch which will cause the injectors to pulse - check for flow from all injectors. Make provision to catch the fuel from the injectors during these test and 'no open lights'. Removal of the injectors on a vehicle of your age will require that at a minimum you replace the rubber seals on the injector pintels. - check valve clearances prior to start up. With over 100,000 miles the rockers will have grooves worn in them at the valve tips. The rockers can be reprofiled at the point you decide to do major engine work. Being aware of the rocker grooves is important because you cannot use a conventional wide flat feeler gauge to adjust the valves. You need a feeler gauge with a thin Vee tip and you need to feed the feeler gauge in from the side of the rocker along the groove in order to do the measurement. No trying to slide the feeler gauge from back to front. Last edited by 142 Guy; Sep 28th, 2020 at 18:20. |
|
|
|
|
Sep 28th, 2020, 18:45
|
#18 | |
|
Junior Member
Last Online: Mar 17th, 2023 06:04
Join Date: Sep 2020
Location: St Albans
|
Quote:
... and thank you for the super helpful advice. I was sure that I had read something about spinning the oil pump from under the distributor, but this confirms that. I want to take as many precautions as I can prior to firing it up. I will probably test the injectors first as you described and if there's anything untoward I'll send them off for cleaning and testing. I could also do a compression test at some stage once everything is lubed up and if it's wildly out of spec I'll be doing a rebuild sooner rather than later. Another reason I'm hesitant to do a rebuild so soon is because I've never rebuilt an engine. I have done all sorts of mechanic work, restored and sprayed cars, swapped gearboxes, upgraded turbos etc... but an engine rebuild is not on my resume YET!! And apologies in advance for the slow progress on this. It's not been easy to get to the car with a full time job, an 18 month old in the house and the weather taking a turn. |
|
|
|
|
|
Sep 28th, 2020, 19:46
|
#19 |
|
Master Member
Last Online: Apr 27th, 2024 15:46
Join Date: Jul 2020
Location: Saskatchewan, Canada
|
On the up-side your cylinders are not full of engine coolant which was a big deciding factor for me. You clearly have some surface rust on the cylinder walls. Flushing some light machine oil down the spark plug holes and allowing it to eventually drain past the rings and out the the oil pan drain may remove some surface rust and accumulated debris and get it clean enough to allow start up and running around to detect and fix other problems; but, the writing is probably on the (cylinder) wall.
Last edited by 142 Guy; Sep 28th, 2020 at 19:53. |
|
|
|
|
Sep 28th, 2020, 22:22
|
#20 |
|
Premier Member

Last Online: Today 06:45
Join Date: Jul 2007
Location: Connecticut, USA
|
P;
Good info from 142G, but if you are not yet familiar or comfortable enough with the powerplant to remove (and more importantly, correctly replace and retime) the Distributor...I would just note, that Dist does not need to be removed for pre-oiling...simply disable FI (no fuel!), disable Ignition (no sparks!), pull Spark Plugs (no compression for Starter to turn against), pour an ounce of engine oil down each pushrod hole (to get oil in Lifter/Cam area, I guess you've already poured some into the Cylinders), then crank away for 15 Sec or until Oil Pressure comes up on gauge. Viola! |

|
|
| The Following User Says Thank You to Ron Kwas For This Useful Post: |
|
| Currently Active Users Viewing This Thread: 1 (0 members and 1 guests) | |
|
|


 Linear Mode

