
|
|||||||
| S80 '98-'06 / S60 '00-'09 / V70 & XC70 '00-'07 General Forum for the P2-platform S60 / V70 / XC70 / S80 models |
 Information
|
|
Bulb Failure MessageViews : 25525 Replies : 41Users Viewing This Thread : |
 |
|
|
Thread Tools | Display Modes |
 Feb 5th, 2009, 09:39
|
#11 | |
|
Experienced Member

Last Online: Today 16:01
Join Date: Jun 2007
Location: L/H side
|
Quote:
__________________
|
|

|

|
| The Following User Says Thank You to Clan For This Useful Post: |
|
Feb 5th, 2009, 18:07
|
#12 |
|
Master Member

Last Online: Feb 23rd, 2021 00:40
Join Date: Jan 2009
Location: rotherham
|
dont think it's relevant but i had a bulb go and it doesnt look like the bulb (when it took it out) had actually gone, anyway got another for 3 quid from halfords (only on trade card)
|
|
|
|
|
Feb 5th, 2009, 18:29
|
#13 | |
|
New Member
Last Online: Feb 8th, 2009 23:26
Join Date: Jan 2009
Location: Bracknell
|
Quote:
AS I understand this diagram, the CEM (Central Electronic Module) has 1 single relay (CMI6 @ 2/152), then it splits to 2 separate fuses 11C/30 and 11C/31. Then through connectors 54/3RB (port 9 & 10) If the CEM is able to turn on the left dip/daylight running light, but not the right one, through 1 single relay, I deduct that it's not the relay's fault, and something further down the line. Any idea ? |
|
|
|
|
|
Feb 5th, 2009, 18:34
|
#14 |
|
Experienced Member
Last Online: Today 16:01
Join Date: Jun 2007
Location: L/H side
|
yes indeed from your diagram it must be a connector or fuseholder, i was looking at a 2005 diagram where the CEM uses transistors to switch the lights rather than a relay .
some circuit tracing with a test light is called for when the fault is apparant ...
__________________
|
|
|
|
|
Feb 5th, 2009, 20:00
|
#15 |
|
XC70 2008 D5 SE
Last Online: Mar 10th, 2024 17:38
Join Date: Jul 2007
Location: Kent
|
It seems that this bulb failure is a feature across the range and not so isolated as the thread maker thought!
I have had this problem ever since we bought the car. I have been told that it is the bulb that blows and then welds itself back again! The last time this happened was during the MOT test just before Christmas... bloody typical as all the lights were working on the way there! Anyway the tester failed the car... and yet saw for himself when I picked the car up the problem had resolved itself... the bulb had not been changed and yet was working perfectly well! Still didn't get a pass though until a partial retest! Daft but true! |
|
|
|
|
Feb 5th, 2009, 20:31
|
#16 | |
|
Master Member
Last Online: Feb 23rd, 2021 00:40
Join Date: Jan 2009
Location: rotherham
|
Quote:
i cant believe he still failed it even though he'd seen it come on when you picked it up lol! |
|
|
|
|
|
Feb 6th, 2009, 21:22
|
#17 | |
|
Member
Last Online: Dec 16th, 2022 22:06
Join Date: Sep 2008
Location: Wellingborough
|
Quote:
|
|
|
|
|
|
Feb 7th, 2009, 18:30
|
#18 |
|
Member
Last Online: Jan 17th, 2020 18:42
Join Date: Nov 2004
Location: Glasgow
|
I've had the same problem on my S60 a couple of times. First time seemed to be connection problems which was remedied by removing all the bulbs and giving the connectors a rub with wet & dry then spraying with WD40.
The second time was a blown bulb, which wasn't apparent because there are 2 in the same cluster, when I replaced this it resulted in one ore two of the others going over the next week. I don't know if there was moisture in the system or not but it's been fin for a whie now. |
|
|
|
|
Feb 7th, 2009, 19:20
|
#19 | |
|
Master Member

|
Quote:
ok so bulb had failed this time, but before it failed (About a month) it would seemingly come on sometimes and othertimes not, assumed was some dogdgy connection, popped into volvo yesterday after work, and they just swapped out the bulb wth a new one for free. i was wondering if bulbs nearing the end of their life cause the system to react, i found before it died completly a gentle knock on the lamp caused it to come back on! |
|
|
|
|
|
Feb 18th, 2009, 09:11
|
#20 |
|
Volvic Driver

Last Online: Jan 8th, 2014 14:56
Join Date: Jun 2006
Location: colombo
|
I got this info from another site. All credit to original poster
http://www.matthewsvolvosite.com/for...?p=51613#51613 P2 V70 & S60 headlight fix Symptoms: Headlights not on, system display reads "BULB FAILURE DIPPED BEAM" Problem: Shunt is overheating, carbon has deposited on shunt connection. Need to replace shunt, clean carbon off CEM connector. You will need: patience, no-residue electrical connection cleaner, T25 torx bit, flashlight, 400 grit sandpaper, volvo part# 9442190 costs $9 (same part# for S60) Entire procedure is same as S60. First, disconnect the negative lead from the battery. Then use the t25 torx to remove 2 screws that lie near the footwell/pedal light. You'll need to pull this panel down(with strong force) on the left side, then the right. Then, to disconnect it from the center consol, this "sound barrier" must be pushed up and toward the front of the car. You'll get it, just be careful. Now with the plastic out of the way, you'll need to locate the CEM. Its directly in front of the obd port. To remove the CEM from it's clips, you'll need a screwdriver(I pried the clips with my bare hands). You will be upside-down and backwards, so you are looking towards the sky in the footwell. The clip that holds the CEM in place is behind it on the port side, the side closest to the door. It must be pulled directly away from the CEM. At the same time, pull the cem not down but back towards the obd port. It will take a few tries, as it will try to clip back into place. You can now maneuver the CEM down into a more workable location.  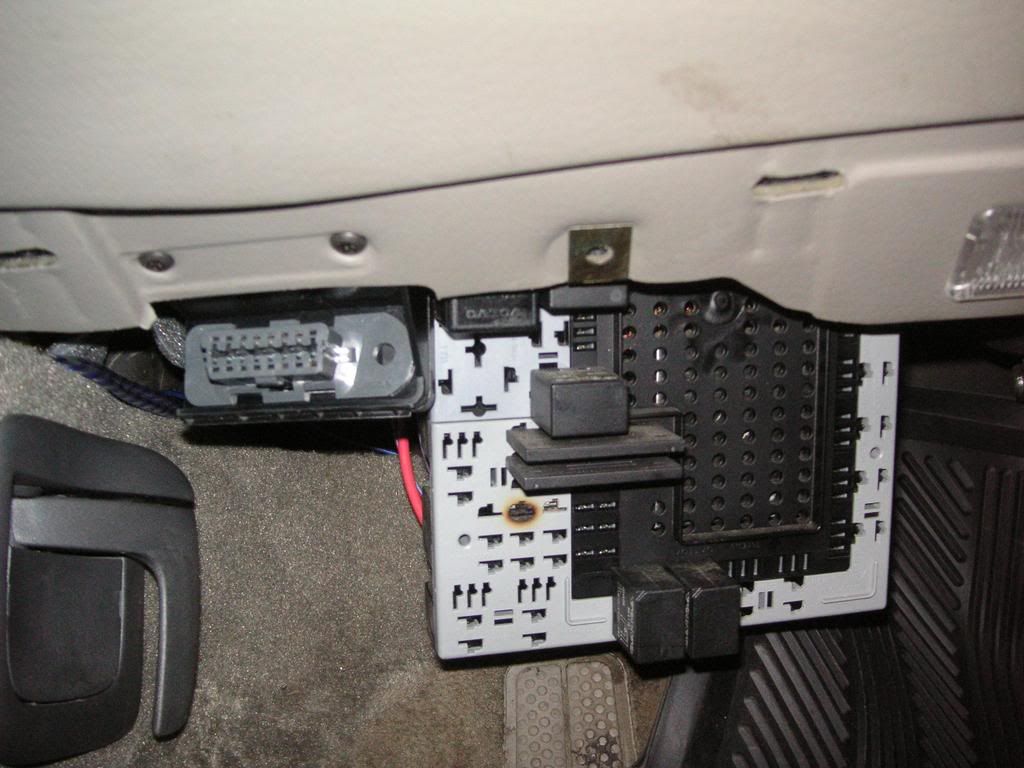 You will see the burnt part of the cem even with the shunt still in. It is obvious, yellowy/black burned plastic. Pull the shunt out like you would a fuse. Take a break... Before going back to work on the car, take 400 grit(or something close to 400) and cut about a 8cm by 1cm rectangle. You need it to slip into the connector(just the burned one where the old shunt sat. Sand the inside of that connection real good. Your sandpaper will become dicolored, proving that you are cleaning. Sand it until you feel it's clean enough. I gave it a good 20-30 strokes. Clean with electrical cleaner. Let cleaner dry(30min to be sure). You are ready to replace the shunt(with the new one), replace the CEM, and put everything back together. 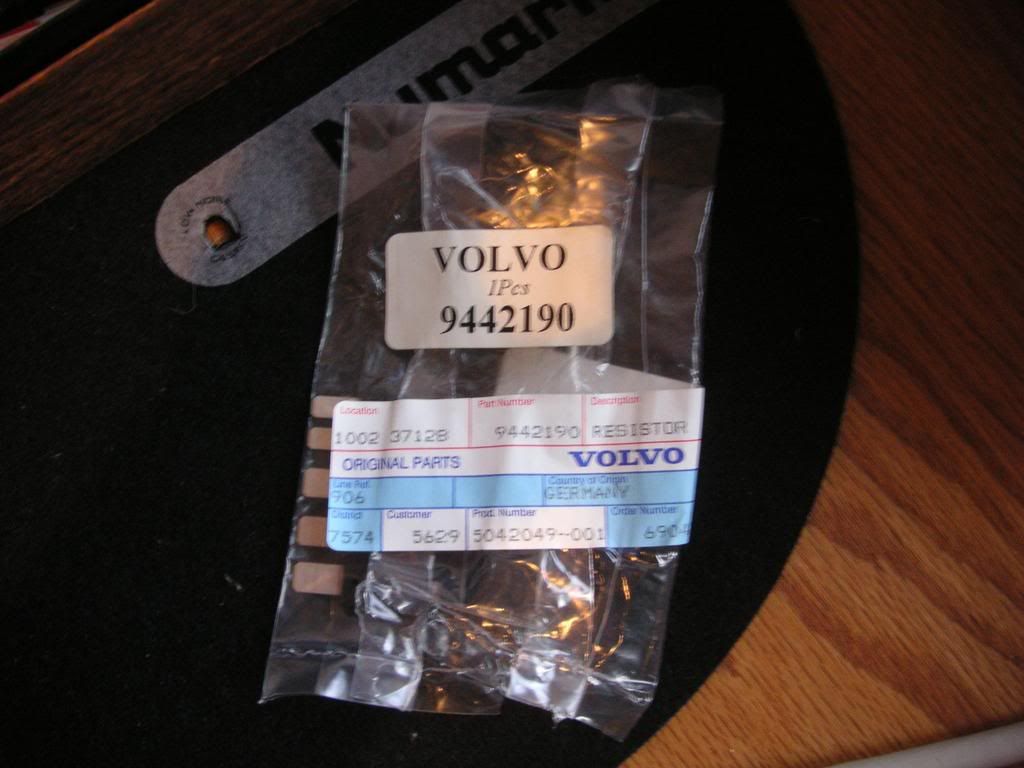 
|
|
|
|
| The Following User Says Thank You to Talon For This Useful Post: |
|
| Currently Active Users Viewing This Thread: 1 (0 members and 1 guests) | |
|
|


 Linear Mode

