
|
|||||||
| S60 & V60 '11-'18 / XC60 '09-'17 General Forum for the P3-platform 60-series models |
 Information
|
|
D4 VEA - cleaning boost pressure sensorViews : 9000 Replies : 3Users Viewing This Thread : |
 |
|
|
Thread Tools | Display Modes |
 Sep 23rd, 2015, 11:32
|
#1 |
|
I've Been Banned
Last Online: Jun 17th, 2016 10:39
Join Date: Feb 2015
Location: Stirling
|
Yesterday I decided to have a look at the boost pressure sensor from my S60 D4 manual, which I've owned from new. I've done 14,000 miles in just over 14 months. About 70% of my driving is urban, and typically involves journeys of less than 10 miles. However, the car does get long open-road trips every couple of weeks.
Also, I had the EGR valve and cooler replaced 6 months ago. I had noticed other D4 owners had reported that their dealers had 'cleaned sensors' at the same time as replacing EGR components. I guessed this was the boost pressure sensor, as it's the only one that is upstream of the EGR valve on the inlet side. I wasn't having any noticeable performance / economy issues, and I have not seen the emissions warning light since the EGR work, but I wondered why the dealers felt it was necessary to clean the sensor Well, now I know. The sensor was FILTHY. It was covered in oily, goopy muck. Unfortunately, I didn't take a photo of it, but it was similar to this, if not quite as bad: 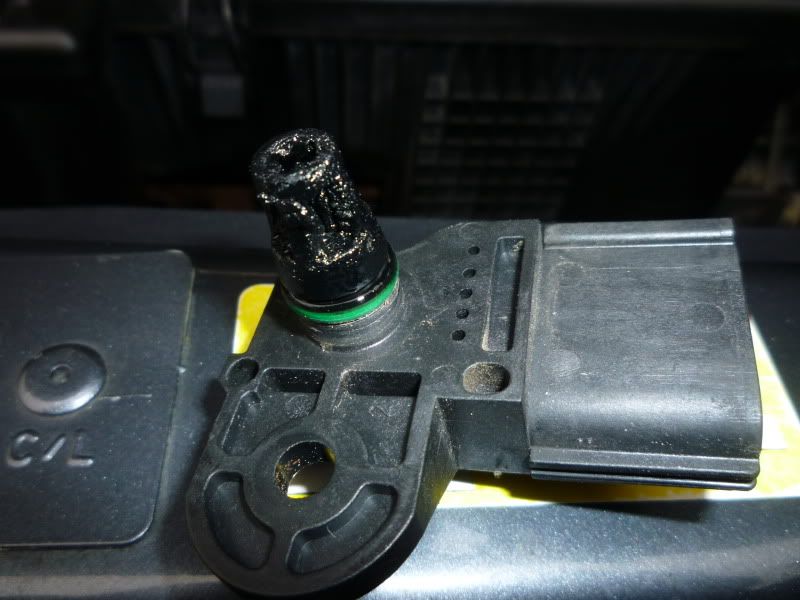 Obviously, the sensor is not going to be able to work as effectively as it should when caked in crud. So here's where you can find it on the D4 VEA motor, and how I cleaned it. Please note - if you decide to do this, you do so at your own risk. I like tinkering with my cars, but I cannot be held responsible for what you do to your car  You will need: a Torx bit; can of residue-free electrical contact cleaner (NOT WD40 or similar); paper towels; a small interdental brush 1. Remove the engine cover. At the front right-hand side of the engine as you look at it, you'll see the sensor:  2. Unclip the connector. 3. Using a Torx-head screwdriver bit, loosen the single bolt that holds the sensor in place. Take care not to drop the bolt. 4. Gently but firmly, lift the sensor while waggling it a little. The sensor has a green rubber o-ring gasket which seals it to the manifold: keep pulling and waggling and it will come out. 5. Marvel at the amount of crud on the sensor. Hold sensor so spray / residue doesn't get into the connector, and hose the muck off with your contact cleaner. Wipe GENTLY with paper towel. If there are carbon deposits sticking to the sensor, spray again and gently remove these with the interdental brush. 6. Once the sensor is clean, give it a final wipe with a paper towel. Refit it by pushing gently back into the manifold to seat the o-ring. Retighten bolt and GENTLY nip it up, DON'T overtighten it. 7. Enjoy better driveability and throttle response. Happy to answer questions about this if anyone's interested. |

|

|
|
Dec 24th, 2017, 13:26
|
#3 |
|
New Member
Last Online: Jun 5th, 2021 10:43
Join Date: Dec 2017
Location: Tallinn
|
Last edited by fizzz; Dec 24th, 2017 at 13:28. |
|
|
|
|
Dec 24th, 2017, 13:59
|
#4 |
|
Premier Member
Last Online: Feb 4th, 2023 15:10
Join Date: Apr 2015
Location: uk
|
manifold intake tempreture sensor is what youve cleaned i cant remeber but there another sensor they should both mirror image read approx same in degrees celcius ive seen them be 10 degrees or 15 degrees out ..
what do you think you manifold looks like if your sensors was chocked manifold runner fitte to side of manifold and comes with manifold will be chocked too .. you tend to find approx 6 weeks ago when temp dropped thast when youll see egr coolers ecm faults you should also remove exhaust sensor back of engine and clean that out too Last edited by volvo for ever; Dec 24th, 2017 at 14:20. |
|
|
|
|
| Currently Active Users Viewing This Thread: 1 (0 members and 1 guests) | |
|
|


 Linear Mode

