
|
|||||||
| 850 / S70 & V70 '96-'99 / C70 '97-'05 General Forum for the 850 and P80-platform 70-series models |
 Information
|
|
How to - SC901 replacement with aftermarket unit & extrasViews : 13062 Replies : 10Users Viewing This Thread : |
 |
|
|
Thread Tools | Display Modes |
 Feb 11th, 2011, 10:31
|
#1 |
|
Member
Last Online: Apr 7th, 2013 08:20
Join Date: Oct 2010
Location: Notts
|
I have recently replaced my SC901 (Amp, subs and Dolby) with an aftermarket Pioneer single din unit. I found a lot of useful information on the forums here, but nothing specifically detailed, so I did a bit of a how to - here goes...
At the same time as fitting the new unit, I fitted a Parrot bluetooth kit, and an aerial down switch, but more on that later First of all, I used JimmyC's thread from a couple of years back found HERE . This told me what I needed to get to be able to fit the new unit without butchering the original wiring loom. So, on the shopping list was a pc2-37-4 . This was about the cheapest I could find. As mentioned in JimmyC's thread, this wouldn't feed the speakers, but would give power to the new unit. Hold on to that thought for now  . . Next on the list was a pc9-414 . I can't remember where I ordered mine from, but a google search found one which was delivered for about £15 The last thing I needed was something to fill the blank left from the double din unit when fitting a single din. I had heard some varying reports about the Autoleads universal pocket, so decided genuine Volvo was the way to go. I contacted Rufe at FRF in Swansea and decided on the genuine single din pocket. Simon was extremely helpful, and suggested an alternative which was an 8cd holder which also fits perfectly. Part no's are:- 8 Disk DIN CD holder: [9192749, 9192751] or DIN Storage Tray: [9150773]. I won't quote prices on these as the VAT has changed since I got mine, but anyone thinking of doing this should really contact Simon for the best price The pocket in question 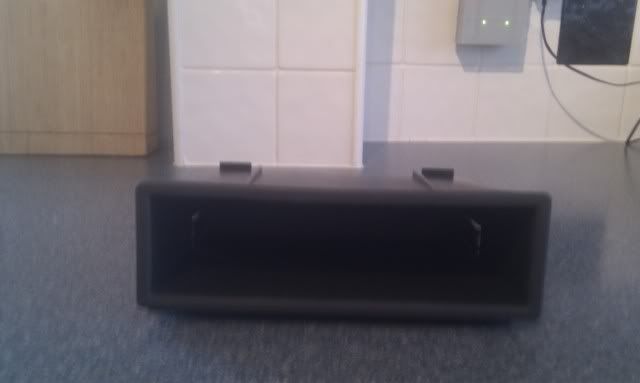 I already had a head unit from a previous car, so this was all I needed to get to complete the install. The head unit in question is a Pioneer DEH-P77MP . I've had this for about 6 years, and I don't think the quality has been surpassed as yet. All in all I spent around £30 getting to this stage 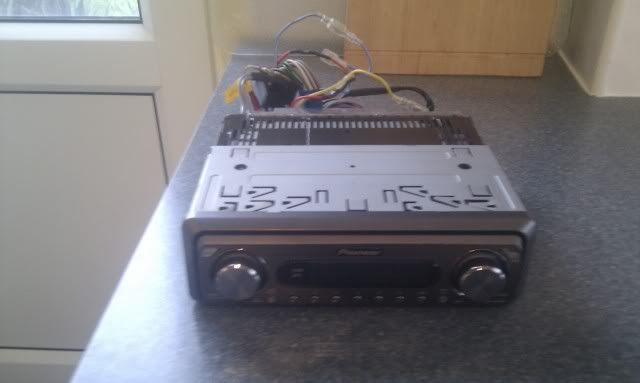 All the parts arrived, so it was down to work. As previously mentioned, the PC2-37-4 wouldn't feed the speakers, so I 'amended' it slightly to have just the power part in use. Speaker pins were removed from the power block by pulling with needle nose pliers. Then the ISO connector was chopped in half. We now have just the necessary bit to power the Pioneer Before 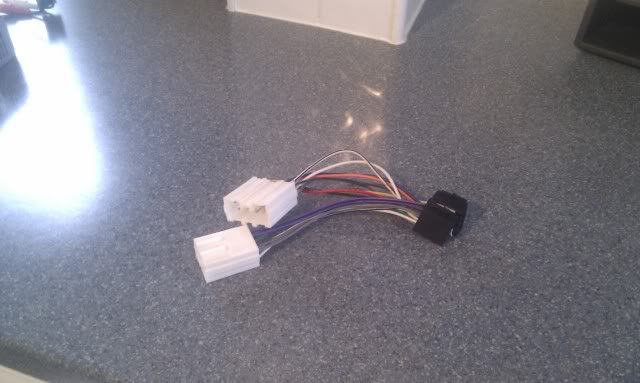 After 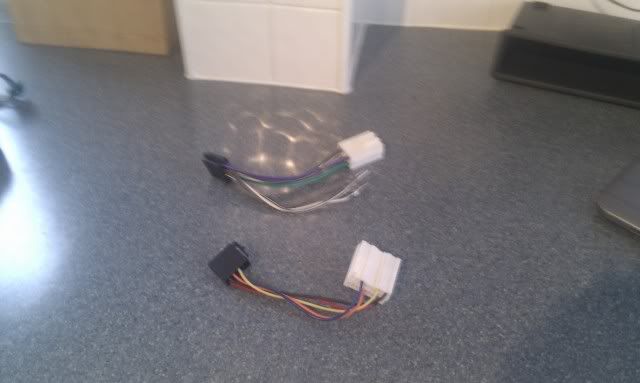 Looking at the pc9-414, this had a blue cable labelled telemute. This isn't actually a telemute lead, but what this does is switches the Amp on when the Pioneer is powered on. This needed to be connected to the remote switching lead on the Pioneer. Problem no.1 has happened. I need this lead to feed the electric antenna. On closer inspection, the Pioneer loom has 2 terminals on the remote switching lead, but one was the wrong connector type. Female spade, where I needed a female bullet. I'll deal with this one later  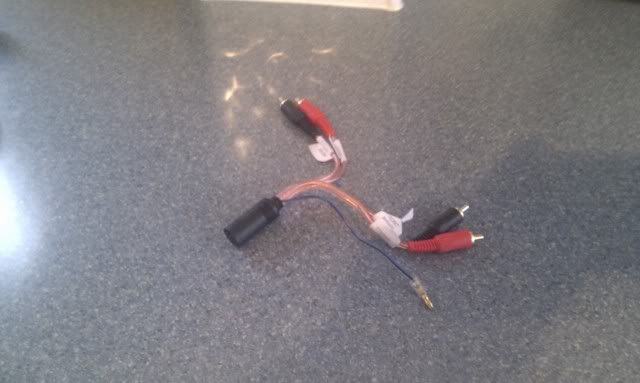 Next up was to remove the SC901 and see exactly what we're dealing with. Easy job, just utilise the release catches and pull. I popped the car into 4th so I had more space to work with. Ensure engine is not running at this point 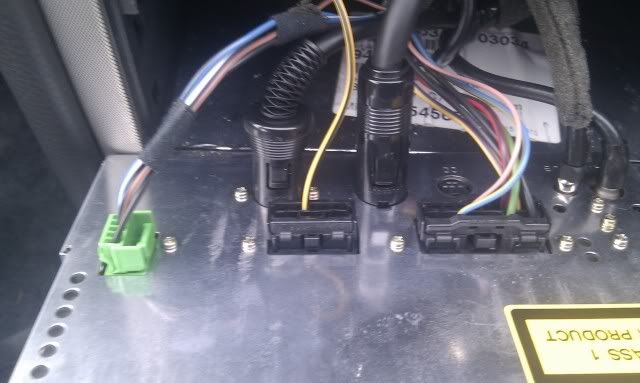 Behind the SC901 we have a LOT of cables and connectors. No problem. I looked at them one at a time. 2 antenna co-axials (Conventional, and Diversity). I only need one, so the other was tucked away out of sight (This got me thinking about something else though, which I'll mention later). One CD changer cable. I don't have the CD changer so this was also tucked away. One large cable going to the Dolby processor. The Pioneer isn't Dolby so I could tuck this one away aswell One DIN cable going to the Amp - Here we use the pc9-414 I was left with 3 cable blocks. One was for the Dolby centre speaker. I'm not using this speaker with the Pioneer so this was also tucked away (for now...) One had a single speed pulse wire - again, not used so tucked away And finally the power block - Using the aforementioned butchered pc2-37-4 we can convert this to standard ISO 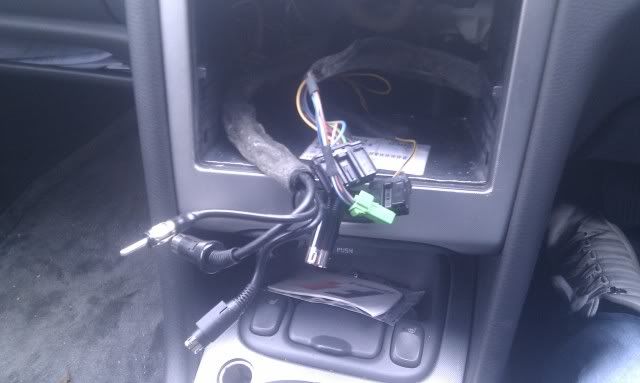 The car is now offering everything needed to test the Pioneer and see if I got this right. Well, almost everything - I still don't have power for the electric antenna but we can test power to the unit and a CD for the speakers. The pc9-414 was connected to the front and rear RCA's on the Pioneer, the blue telemute lead (which isn't telemute) connected to the switched power, and the pc2-37-4 connected to the ISO block. Rest everything in place, knock the car back into neutral, turn the key and fingers crossed. The Pioneer powered up, so I popped a CD in and all I can say is WOW!!! The sound quality is much better than the SC901 and this is before I had changed any EQ settings 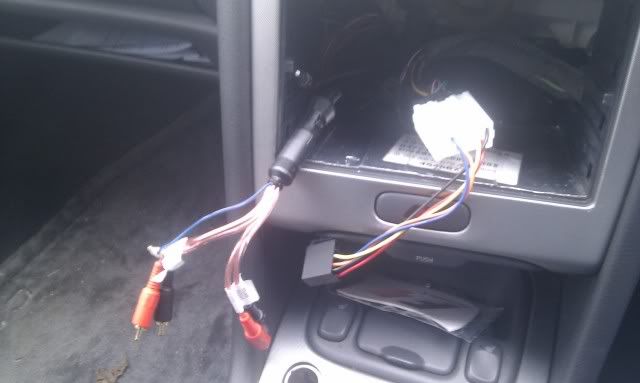 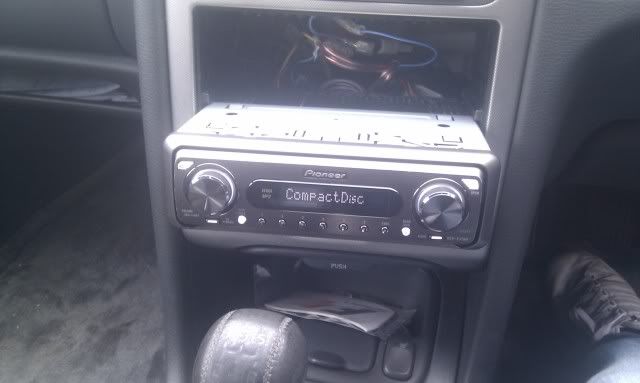 With everything working, it's time to see what I need to get power to the electric antenna. On inspection, I need a short cable with a female bullet and a male spade (This may not be the same for all installs, but it's what I needed for mine). I knocked one of these up with various bits I had lying around, plugged it and the aerial co-axial cable in, and tried the radio. We're on to a winner now. Everything working as expected. Remember this lead as we'll be coming back to it later  Time for an experiment. I removed the rear RCA's and plugged them into the Subwoofer output on the Pioneer, chose a track which would give a good soundstage (Gorillaz - Feel Good Inc) and almost soiled myself when the bass kicked in. This has got me thinking about future enhancements, but as yet not complete. I moved the RCA's back to the Rear output ready for the final installation. I chose to mount the Pioneer in the lower section on the aperture with the pocket above - this was a personal thing, but could be mounted either way. My reasons for this are that I tend to rest my hand on the gear lever when changing volume, stations, tracks etc 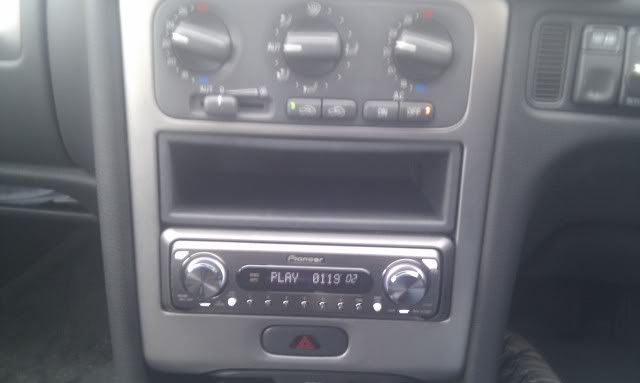 The cage doesn't have locating lugs in the right place for the volvo aperture so I left this unsecured. It wasn't a problem as the pocket has a lip on the front that holds the cage in place. The pocket was pushed into place and job done. The pocket is a perfect fit and match for the Volvo interior, and a top quality piece of kit too. I would recommend this over the universal ones anyday, and really not expensive either The last thing for me to do is to change the EQ settings, and store my radio presets. I won't go into details here as it's a very personal thing, and different for everyone. However, the sound quality is better than any other system I have ever had. The SC901 really doesn't do the standard speakers any justice at all Originally I had planned to get a new head unit which was IPOD control only, and no CD mechanism, but as this Pioneer unit seems to match the Volvo interior far better than expected I'll stick with this one. I have a connector which allows a Line in, so the IPOD will just have to be manually controlled. I normally just use the random shuffle so it won't be an issue anyway Thanks to JimmyC and all other contributors to the original thread where I got my inspiration from. I hope this helps anyone else who is wanting to upgrade their units. I'm happy to help where I can if anyone does follow this guide Disclaimer - The above is a guide only and may not work for your individual situations. I will not be held responsible for any injuries or damages resulting from this guide |

|

|
| The Following User Says Thank You to jjd101 For This Useful Post: |
|
Feb 11th, 2011, 10:31
|
#2 |
|
Member
Last Online: Apr 7th, 2013 08:20
Join Date: Oct 2010
Location: Notts
|
OK, so on to the Aerial Down Switch then. Remember the little cable I made up earlier? The one with the female bullet and the male spade? Well, this is what I tapped in to for the aerial down switch
The only additional part I needed was the switch. Genuine Volvo ones are available, but expensive and rare. I'm still on the look out for one but in the meantime I settled for a simple 'push on, push off' switch from Maplins at a cost of £2.39. I went for the plain black, and not coloured or illuminated. There are only 2 terminals on this switch so it's going to be an easy job. I simply soldered 2 lengths of wire to the terminals, crimped a male spade to one end, and a female bullet to the other, making sure I had enough length to reach the back of the Pioneer from my chosen mounting point. I chose the blank to the right of the steering wheel to mount the switch (Ignore the Parrot for now - more on this below) 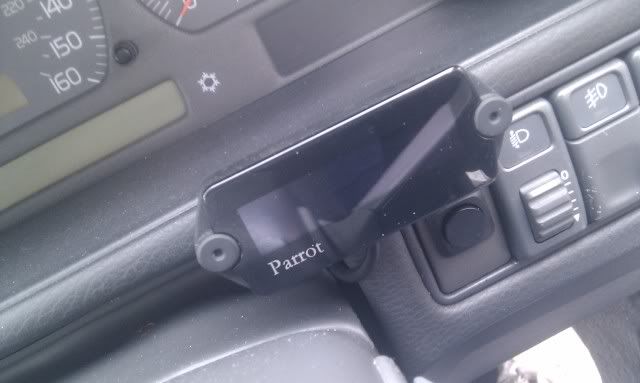 Connected it up at the back of the stereo (replacing the little cable I made up earlier), mounted the switch, powered on and tested. WINNER!!! I can now have the aerial down when listening to anything apart from the radio. Also very useful in multi-storey car parks as it's a long aerial The only real important thing to remember here is to make sure it's connected correctly at the back of the stereo. It would be easy (on my install) to get the wires wrong, and power off the amp instead. Not a good idea Disclaimer - The above is a guide only and may not work for your individual situations. I will not be held responsible for any injuries or damages resulting from this guide |
|
|
|
| The Following User Says Thank You to jjd101 For This Useful Post: |
|
Feb 11th, 2011, 10:32
|
#3 |
|
Member
Last Online: Apr 7th, 2013 08:20
Join Date: Oct 2010
Location: Notts
|
Fitting the Parrot Bluetooth was a little more tricky. I have had the MK6100 for a few years now, and have fitted it in and out of a few cars. Hopefully this will be the last one for a while
The parrot wiring is standard ISO, which in most cars is a simple 'plug and play' install. Thinking back to when we fitted the Pioneer above, the ISO is only used for power. That's fine for now, we can get power to the Parrot by simply using these ISO connectors, and think about sound after I removed the Pioneer again so I could get to the wiring, unplugged it and connected it back up with the Parrot wiring in between. Plugged everything in to the Parrot, switched on the ignition to test it was all working as expected. Phew, it all works even though there is no sound from the parrot Don't worry - I know what all these are for 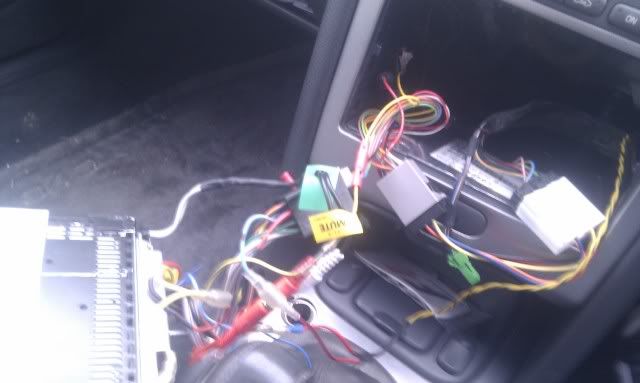 Referring back to a comment in JimmyC's thread got me thinking. Can I get the Parrot sound to the Dolby centre speaker which at this time is redundant? Only one way to find out - lets see if we can get to the speaker terminals. The easier way would have been to splice into the Volvo wiring, but I've never been happy chopping anything that is standard to the car. I managed to prise off the cover on top of the dash to reveal the speaker. No pics of this I'm afraid as I can't really remember how I did it. I unscrewed the speaker and removed it from the car. Looking at the connector, there was no way I had one I could use, so I made up a little block thingy with the correct size pins to fit the speaker terminal. I fed the other end of this wiring block through the dash under the speaker, down to the back of the stereo I had an old ISO connector that I could use to connect to the Parrot wiring, so next was to attach the wires from the centre speaker to this, and plug it in to the parrot wiring. The Parrot only sends phone calls through the front speakers in normal set ups, so I was careful to only use the front speaker part of the ISO block to connect to the centre speaker. Powered everything on again, and test for sound. YYYEEEAAAHHHHH!!!!!! Finally, it was time to mount all the parrot parts, and refit everything. I chose not to jam everything behind the stereo, even though there is enough space. The parrot blue box was to go behind the glovebox. 6xT25 torx screws and the glovebox was out. I found a nice and handy metal support bar under the glovebox, and made a little cradle from cable ties to hold the bluebox secure. The microphone was routed to just above the rear view mirror (But I may change this as I have a convertible), parrot screen was fixed just above the aerial down switch, below the dash binnacle. I can see this clearly through the steering wheel, and all cables are hidden. Plugged it all back in, refitted the Pioneer and glovebox, mounted the Parrot remote next to the handbrake (Easy to find and reach while using the armrest) and that was that - complete 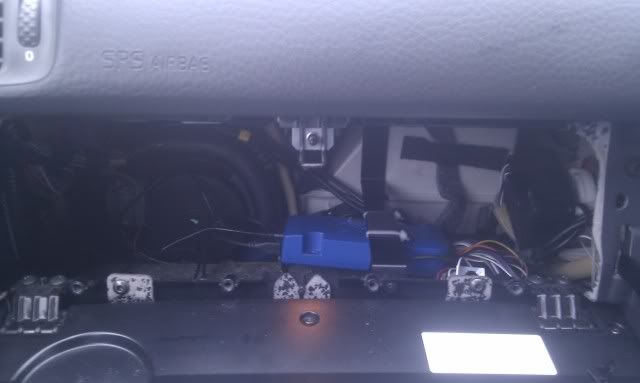 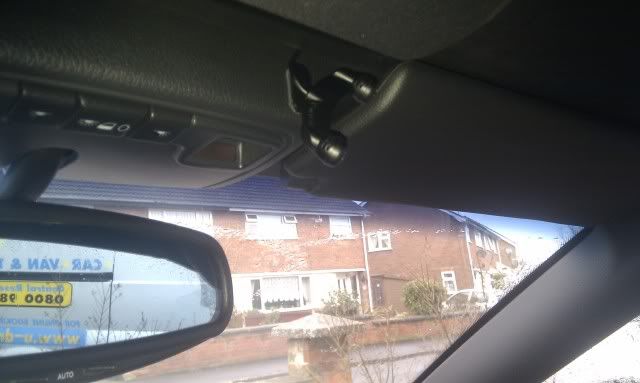 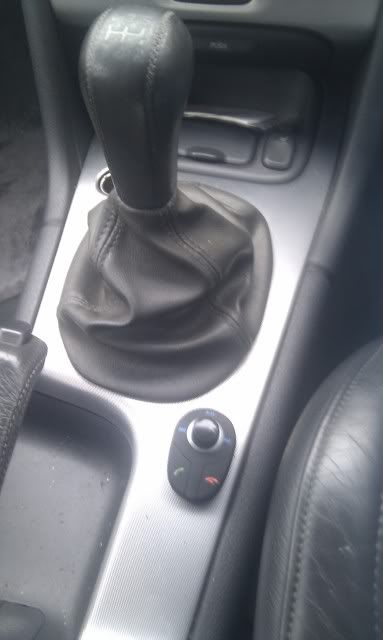 In normal circumstances, this would be everything done, but my parrot kit has packed up due to being fitted and removed quite a few times in the past. Somehow I have managed to split the PCB rendering it U/S. New parrot kit on order but the same process as above will be used Disclaimer - The above is a guide only and may not work for your individual situations. I will not be held responsible for any injuries or damages resulting from this guide |
|
|
|
|
Feb 11th, 2011, 11:56
|
#4 |
|
Premier Member
Last Online: Jul 4th, 2022 16:48
Join Date: Feb 2007
Location: belfast
|
intresting read as i have an aftermarket head unit,was one in the car when i bought it a cheap sony now changed to an alpine cde unit tho i was kinda dissapointed with the bass unless up loud i dont think the volvo woofer is being used ,and didnt think it was compatable,off to check this out also where did you get the areail down switch?
 just seen your switch there is actually a genuine volvo switch for this operation
__________________
1995 black 854 t5r man, Last edited by martybelfastt5; Feb 11th, 2011 at 12:04. Reason: add |
|
|
|
|
Feb 11th, 2011, 13:50
|
#5 |
|
ba baracus...

Last Online: May 30th, 2023 12:30
Join Date: Dec 2008
Location: chichester west sussex
|
just a quick one what ohm are your car speakers.....and what ohm are your head unit......i have updated my head unit but i have 8ohm speakers in the car......and most moden headunits are 4ohm,im going to be replacing all my speakers as it clips at high volume.and thay are 15 years old im on the understanding the head unit will have to work harder to get sound through the speakers.........
__________________
i aint getting on no plane.............
|
|
|
|
|
Feb 11th, 2011, 17:52
|
#6 | ||
|
Member
Last Online: Apr 7th, 2013 08:20
Join Date: Oct 2010
Location: Notts
|
Quote:
Quote:
|
||
|
|
|
|
Feb 11th, 2011, 22:18
|
#7 |
|
ba baracus...
Last Online: May 30th, 2023 12:30
Join Date: Dec 2008
Location: chichester west sussex
|
i will be running a non volvo amp tho.......have one just not sure how it will work with the new head unit.and will be running a sub at somepoint its more for the dvd sound than jungle bass.......its only when i took the speakers out i saw that it has 8ohm which i thought was house speakers......just need to make sure im not barking up the wrong tree......
__________________
i aint getting on no plane.............
|
|
|
|
|
Feb 12th, 2011, 17:38
|
#8 |
|
Premier Member

Last Online: Feb 15th, 2022 07:50
Join Date: Dec 2001
Location: Back home in 'Norn Iron'
|
The part number for the aerial down switch for the S/C70 is 9204656 but I don't think it is available any more.
__________________
Simon J |
|
|
|
|
Feb 12th, 2011, 18:21
|
#9 |
|
VOC Member

Last Online: Nov 22nd, 2018 18:25
Join Date: Nov 2004
Location: Over there.
|
Excellent guide, matches what I did when I fitted my, ironically enough, Pioneer head unit to my C70. I still need to get my aerial plugged in again as like you found the connection is wrong. I was planning on cutting of the end of the appropriate wires and soldering them together (on the adapter cables not the original loom!) Maybe I'll get around to it one day... Its very rare I listen to the radio, but its nice to have.
Also I'd advise not to wire up the amps to the permanent live as I did, thinking & hoping the car would turn it off when appropriate... Needless to say it didn't. Battery lasted 2/3 days after with my amps on 24/7, I've never seen a battery so flat!!!
__________________
Current: '96 850 2.5 20v GLT Estate & '17 Skoda Rapid 1.0 Sport Prev: '04 V40 1.9D Sport '98 C70 2.3 T5 GT Coupe '89 760 Turbo Intercooler Est. '95 850 2.5 20v GLT Saloon '96 460 1.6i GS |
|
|
|
|
Feb 1st, 2013, 19:37
|
#10 |
|
Member
Last Online: Jun 18th, 2021 09:48
Join Date: Aug 2009
Location: Chalton
|
Would this work for a C70 with an SC 805 ? Similar same adapters , I don't have Dolby surround.
|
|
|
|
|
| Currently Active Users Viewing This Thread: 1 (0 members and 1 guests) | |
|
|


 Linear Mode

