
|
|||||||
| 850 / S70 & V70 '96-'99 / C70 '97-'05 General Forum for the 850 and P80-platform 70-series models |
 Information
|
|
1998 V70 Electric Driver's Seat ControlsViews : 1393 Replies : 11Users Viewing This Thread : |
 |
|
|
Thread Tools | Display Modes |
 May 4th, 2023, 20:39
|
#1 |
|
bob12
Last Online: Apr 25th, 2024 11:19
Join Date: Aug 2006
Location: Woking
|
I am looking for any guidance or the wisdom of anyone who may have experienced 'problems' with the above.
A couple of days ago when I had just started to reverse out of a parking space at a local supermarket there was a short sharp what seemed to be an small electrical 'crack' coming from somewhere in the region of my right buttock (!) near the seatbelt as I sat in the drivers seat. It was sufficently alarming to make me think I had hit something and made me get out of the car to have a look .... but nothing. Consequently I suspected it may have been something to do with the electric seat rather than the SIPS on the seat and today I had time to have an initial look at what it might have been without stripping anything out. It transpires whilst the 3 memory buttons work faultlessly with the seat moving up/down, forward/backwards and the back going backwards and forwards that the two main large control buttons to adjust the 3 seat functions do not work. As the seat memory system is working I assume power is getting to the seat controls and the 3 drive motors are working OK. There are only two peices of electronic gagetry associated with the seat. 1) the control module underneath the front of the seat on the left inside of the seat in the region of the driver's left thigh (not where the 'bang' was heard) and, 2) the seat switch control panel where towards the back of near the seatbelt fixing the offending electrical noise seemed to have occurred. I will have a further look over the weekend and take out the switch control panel to see if there are any signs of electrical damage. I was wondering if anyone had experienced similar problems with an electric seat or could give me any clues as to what may have failed or is the cause of the problem. I have already looked at a couple of Robert's videos about removing the switch panel and the control module. Thanks, Bob. |

|

|
|
May 6th, 2023, 11:29
|
#2 |
|
bob12
Last Online: Apr 25th, 2024 11:19
Join Date: Aug 2006
Location: Woking
|
Excellent guide now found. Knew there had to be one .... somewhere very obvious!
Now to strip it out and hopefully fix but, not in this weather. Bob 
|
|
|
|
| The Following 2 Users Say Thank You to bob12 For This Useful Post: |
|
May 13th, 2023, 18:26
|
#3 |
|
bob12
Last Online: Apr 25th, 2024 11:19
Join Date: Aug 2006
Location: Woking
|
Following on from the above I removed the seat side trim and inbuilt electric memory control panel from the '98 V70 a couple of days ago using the previously mention thread as very useful aguide.
I found that over the years weather had sightly deteriorated the bottom section of the electronic pcb control board. However, I cleaned the whole board with Servisol Swich Cleaner and an old tooth brush as well as the spraying and working the switches every which way. I then tested all the various circuits and wiring for continuity. All seemed to be OK so everything was reassembled and I put the lot back on the side of the seat this morning and plugged the panel in to the control module under the seat. Repositioning the whole assembly to the side of the seat was fairly easy starting with the rear clip on to the seat back frame first and then pushing the front clip over the SIPS mechanical activator. That was a bit tricky as I hadn't looked at it before I took the whole trim off at the outset and now it didn't seem to want to fit finally all the way down to the the previous mark on the seat. Looking underneath then I realised how it fitted. Part of the SIPS mechanical actuator mechanism must fit into the groove on the seat trim as shown in the last pic. The metal 'tongue' was caught on the plastic preventing it slotting into the groove. Success everything worked perfectly without any bang noise! So what originally caused that who knows. Bob
Last edited by bob12; May 13th, 2023 at 18:56. |
|
|
|
| The Following 5 Users Say Thank You to bob12 For This Useful Post: |
|
May 17th, 2023, 12:33
|
#4 |
|
Grumpy Old Git

Last Online: Apr 19th, 2024 09:16
Join Date: Dec 2004
Location: South Yorkshire
|
I had to clean the seat switches on my old S70. As you say the hardest part is clipping that plastic trim back over the SRS actuator - I was terrified that I'd trigger it by accident when I replaced that side trim : D
One thing I would add, is that when you're taking the switch panel apart, beware that there are some TINY springs under the seat memory buttons which are very easy to lose...Yes, the voice of experience  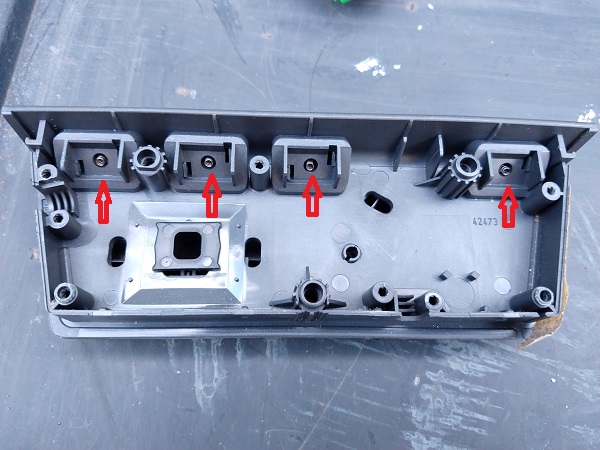
__________________
S40 2.4i '07 Japanese import '96 850R - https://www.volvoforums.org.uk/showthread.php?t=312484 Ex Danish Embassy '96 940 GLE LPT - https://www.volvoforums.org.uk/showthread.php?t=326071 Last edited by RollingThunder; May 17th, 2023 at 12:37. |
|
|
|
| The Following 4 Users Say Thank You to RollingThunder For This Useful Post: |
|
Jun 5th, 2023, 16:43
|
#5 |
|
Member
Last Online: Yesterday 23:36
Join Date: Aug 2020
Location: N/A
|
Hi bob12,
I too need to do this piece of work but for my passenger side. None of the buttons move the seat at all. I've so far managed to remove the electrical pack from the side of the seat (first photo), but I can't seem to disconnect/unplug the connectors underneath the seat to fully remove the module (as arrowed in the second photo). I can feel they are held into the metal frame by zip ties. I've tried squeezing them out by hand but they won't budge. Any idea how they disconnect so I can work on the seat module on a bench? What I attempted to do first was remove the spade connector to resplice this loose wire more easier (third photo). Do the spade connectors come out of the block connectors at all? I tried removing with a pair of thin pliers but it wouldn't come out. Passenger seat module.JPG Passenger seat electrical connections.JPG Loose wire.jpg Many thanks in advance if you have any ideas. |
|
|
|
|
Jun 5th, 2023, 18:35
|
#6 | |
|
bob12
Last Online: Apr 25th, 2024 11:19
Join Date: Aug 2006
Location: Woking
|
Quote:
Fortunately before I did the job I found a link warning me to ensure I kept the outer trim/buttons flat down when unscewing the pcb and don't tilt it for fear of loosing the springs. Bob
|
|
|
|
|
|
Jun 5th, 2023, 18:50
|
#7 | |
|
bob12
Last Online: Apr 25th, 2024 11:19
Join Date: Aug 2006
Location: Woking
|
Quote:
My experience is based on a 1998 V70. Detatching this plug/soucket is one of the wonders of Volvo car building science .... nothing is easy! From your pics I can't quite make out the plug for the seat switch module. The release tab on my driver's seat is green. There's another connector (white) for the heated seat/seat belt warning/seat drive motors. You don't need to touch this connector. At the underneath centre flat side of the green socket (nearest to the floor) of the the two halves there is a release tab. It's on the part that will separate with the wires to the switch module that you will be removing whilst the other half remains fixed to the seat. As long as your are a contortionist you can get a finger underneath the socket. There's a bit of free upwards movement at the connector. Push it rather heavily upwards (also to get your finget at it!) and pull on the wires at the same time and it separates. Bob
Last edited by bob12; Jun 5th, 2023 at 19:24. |
|
|
|
|
| The Following 2 Users Say Thank You to bob12 For This Useful Post: |
|
Jun 6th, 2023, 16:28
|
#8 |
|
Member
Last Online: Yesterday 23:36
Join Date: Aug 2020
Location: N/A
|
Hi bob12,
I forgot to say my car is also a 98 V70. The driver's seat memory module is easier to remove (following Robert DIY's video on it) but it's the connectors in my second photo on the passenger seat side I'm having difficulty with. I agree, not the easiest things to take apart and in the most awkward position at the best of times. I'll try disconnecting from different angles to see if it budges by squeezing up, down etc. |
|
|
|
| The Following User Says Thank You to El Padrino For This Useful Post: |
|
Jun 6th, 2023, 19:06
|
#9 | |
|
bob12
Last Online: Apr 25th, 2024 11:19
Join Date: Aug 2006
Location: Woking
|
Quote:
Maybe stupidly without looking I had assumed both sides were the same just reversed .... but maybe not!! When I use the car tomorrow I will have a look under the passenger seat. Bob
|
|
|
|
|
| The Following User Says Thank You to bob12 For This Useful Post: |
|
Jun 6th, 2023, 19:09
|
#10 |
|
Member
Last Online: Yesterday 23:36
Join Date: Aug 2020
Location: N/A
|
Is it possible to remove the spade connector from this block connector to make re-splicing the wire easier? Tried pulling them but they won't budge.
Loose wire.jpg |
|
|
|
|
| Currently Active Users Viewing This Thread: 1 (0 members and 1 guests) | |
|
|


 Linear Mode

